Previous
¶ Kick-off Overview
The kick-off workshop forms the foundation from which the team will work. Prepare it well to ensure complete transparency, clarity, and alignment so that the foundation is strong.
Start the project with a kick-off workshop. Some of the key objectives of the workshop are:
- Introduce the team members to each other (that’s very important, as the team is going to work daily for several months together), and introduce key stakeholders (who are not in the working team but might be very closely involved)
- Introduce the main collaboration tools the team will use during the project (e.g., Miro or Google Slides).
- Create alignment among the team on expectations towards the project and its outcome.
- Structure the problem at hand
- Structure the stakeholder map of the project organisation
In the following content, you will see examples of how to run the kick-off workshop best.
¶ Useful Tips
¶ Workshops
Workshops are a powerful way to engage a group in an intensive discussion, generate ideas, and align team members along the project journey. Therefore, you will likely conduct multiple workshops (physically or remotely).
Organising efficient and valuable workshops:
- Set up the necessary workspaces in advance and do a dry run to test all exercises and tools
- Prepare groupings for any group exercises in advance
- Take the time to speak with key stakeholders in advance, to understand their concerns and hopes
- Ensure everyone prepared the material expected of them in advance
- Plan enough breaks to keep up the energy levels of the participants
- Invite participants who bring value to the workshop
- Take time to break the ice, engage all participants in the session and call on people by name
Hosting:
Book a conference room or use online tools (e.g., Slack, Zoom, Hangouts, Webex, Teams)
Agenda:
- Goal - What do we need to achieve?
- Audience - Who needs to attend?
- Workshop Approach - What is the best way to reach your goal with the participants?
- Workshop Outline - How do we take attendees from start to finish to accomplish what needs to get done?
Tools:
Materials and tools to stimulate brainstorming and share ideas easily (e.g., whiteboard, pens, markers, post-its, papers, timer). The digital equivalents are tools such as Miro and Mural. In addition, templates can be prepared, and the team can create post-it notes synchronously.
File sharing:
There will often be the need to share larger documents (PDFs, PPTs…). For that purpose, it is ideal to have a cloud storage space ready for the team. Tools such as Dropbox and Google Drive are well-suited for the task. A clear folder structure also helps in keeping things orderly.
¶ Opening & Introductions
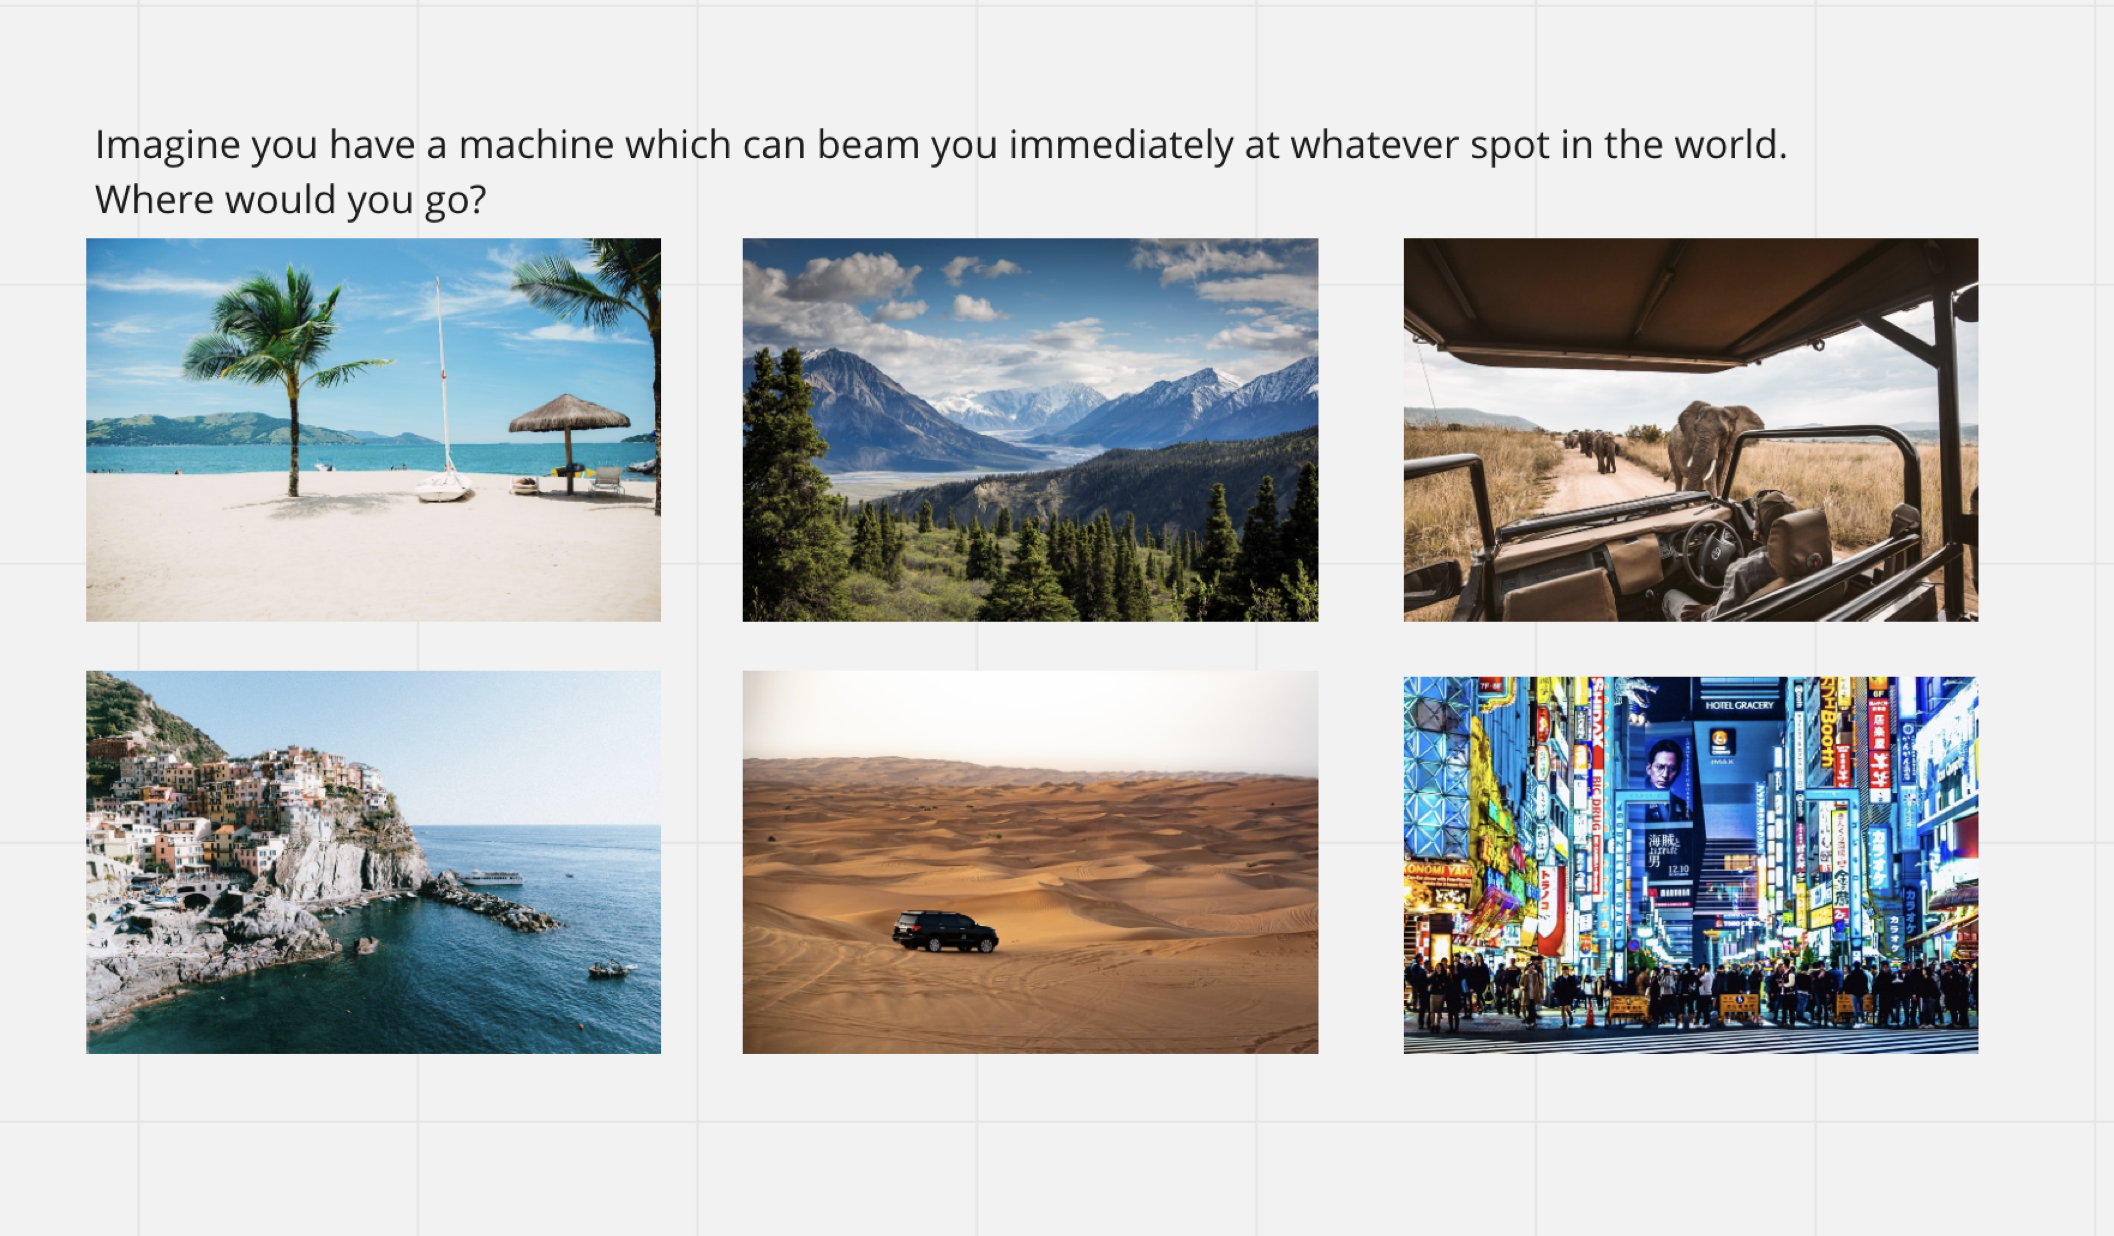
Ask everyone on the team to introduce themselves. Make sure to not only ask for name and role but also include an icebreaker question (e.g., share with us your favourite food; if you have a time machine, where would you go, etc.). Icebreaker questions make each workshop more fun and personal!
You can see such an icebreaker question in the example to your right. Give the team 2 minutes to think about their favourite spot on earth.
After 2 minutes, ask the project team to introduce themselves, share their background and role, and share their favourite spot on earth with the group.
¶ Collaboration Tools
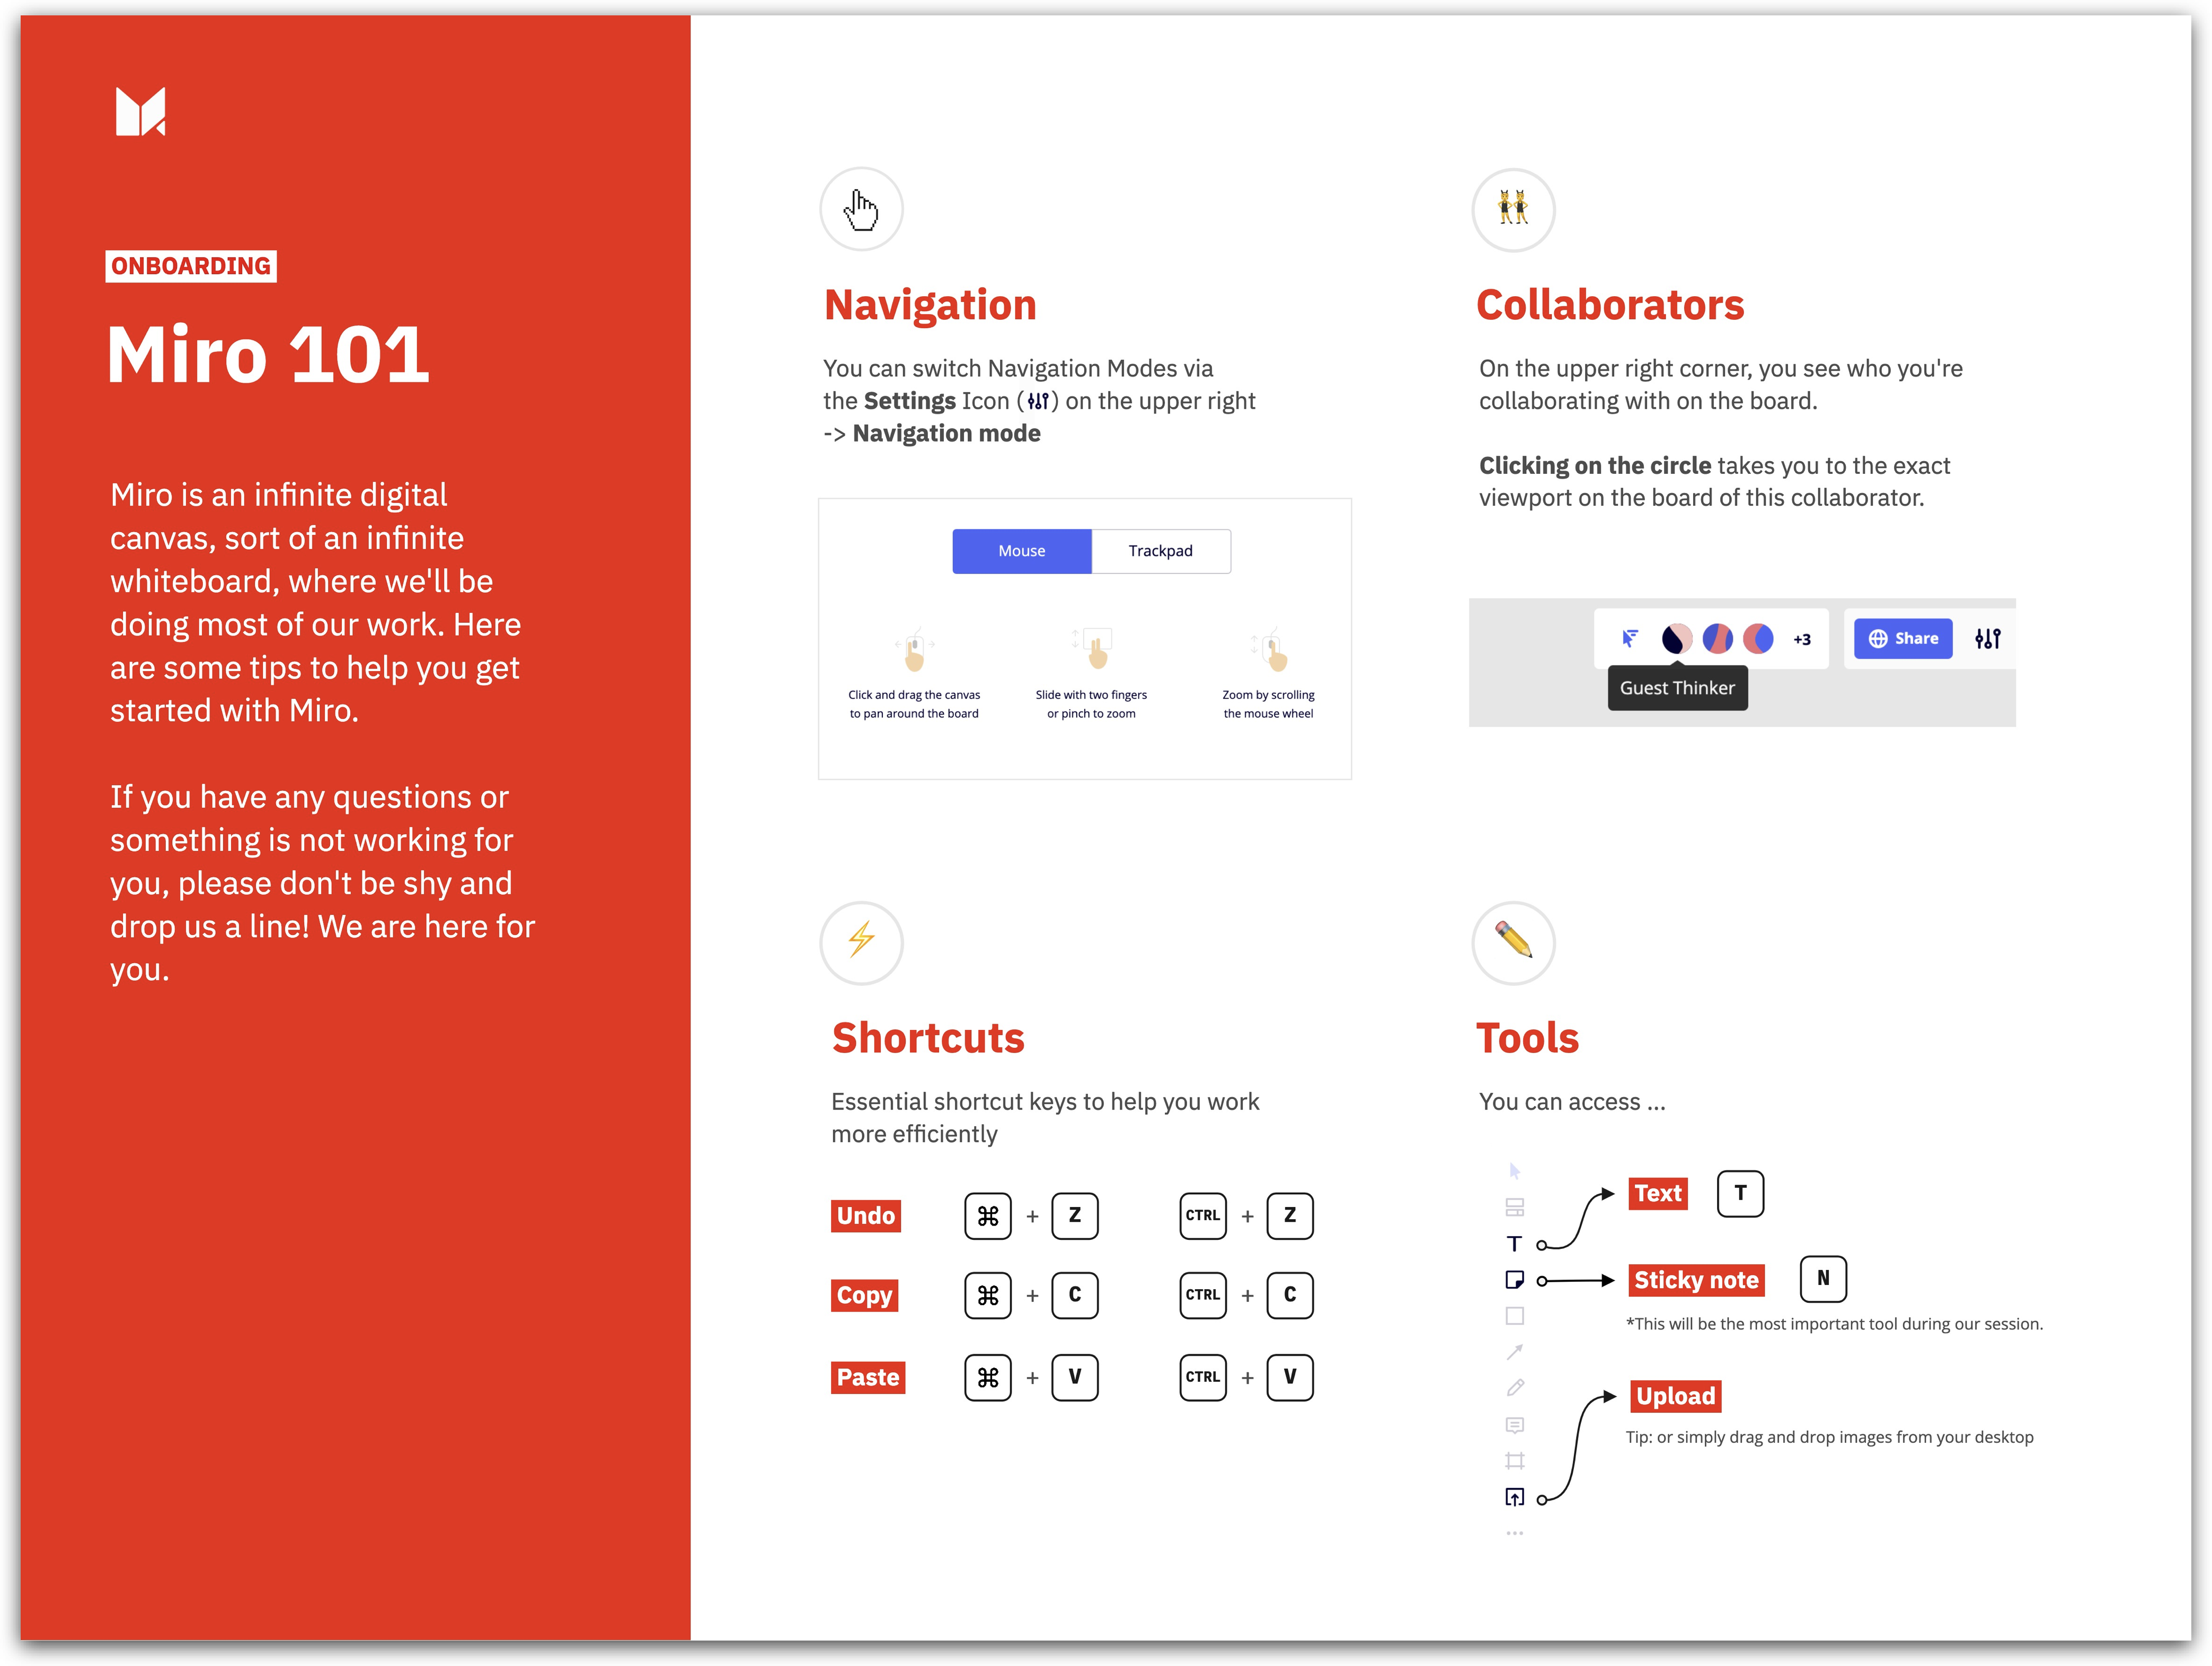
During your project, you will use collaboration tools, such as Microsoft Teams, Miro, or Google Slides. Ensure every team member has access to them and knows how to use the tools. Make sure first to explain the main functionalities of the tools and then reserve enough time to let the team do some easy exercises to get familiar with the tools if needed (e.g., create and move around post-its, draw connection lines, write in a text field).
To your right, you can find an example of a simple Miro introduction.
¶ GenAI Tool Use Case
¶ Enhancing Collaborative Workshops
FigJam AI spares users the time-consuming tasks of creating visuals, summaries, and organizing information, allowing for more efficient collaboration during workshops.
You can quickly make templates by clicking the "Star" icon and choosing a template or entering a topic. Sorting sticky notes is easy too - just select them, click the "Star" icon, and pick "Sort Stickies." You can also summarize notes using Jambot: select a few sticky notes, click the "Star" icon, and choose "Summarize" to get shorter versions. All these features make it easy to describe how to use FigJam AI in different situations during workshops.
Read More:
Generate boards and diagrams with FigJam AI
Sort and summarize stickies with FigJam AI
Sample Prompt:
- Let's make a... A team retrospective with sections for what went well, kudos, what could have gone better, what we should keep doing.
Other Inspirational Tool:
Miro Assist
Summarizing sticky notes, grouping sticky notes by sentiment or keywords, generating mind maps on click, and generating sequence diagrams from plain text.
ChatGPT
Providing knowledge, research, multifunctionality, objectivity, efficiency, customization, and feedback for workshop prep and agenda creation.
Mentimeter
Sorting a myriad of freeform text responses during a live presentation with the simple click of a button.
¶ Set Project Expectations
In the next part of the kick-off workshop, ask the participants to share their expectations towards the project. This is important so that all participants are aligned on what they are trying to achieve and what they are getting from this project. It also helps you, as the facilitator of this workshop, to manage expectations and highlight what you could realistically achieve.
Ask the team three questions:
- What are the bigger organisational goals behind the product/program/initiative? Again, this helps to understand the big picture and should refer back to the vision.
- What are the goals for our project? Aligns team members on the desired and shared project outcomes.
- Imagine one year has passed. How do we know we were successful? Sets some tangible project goals.
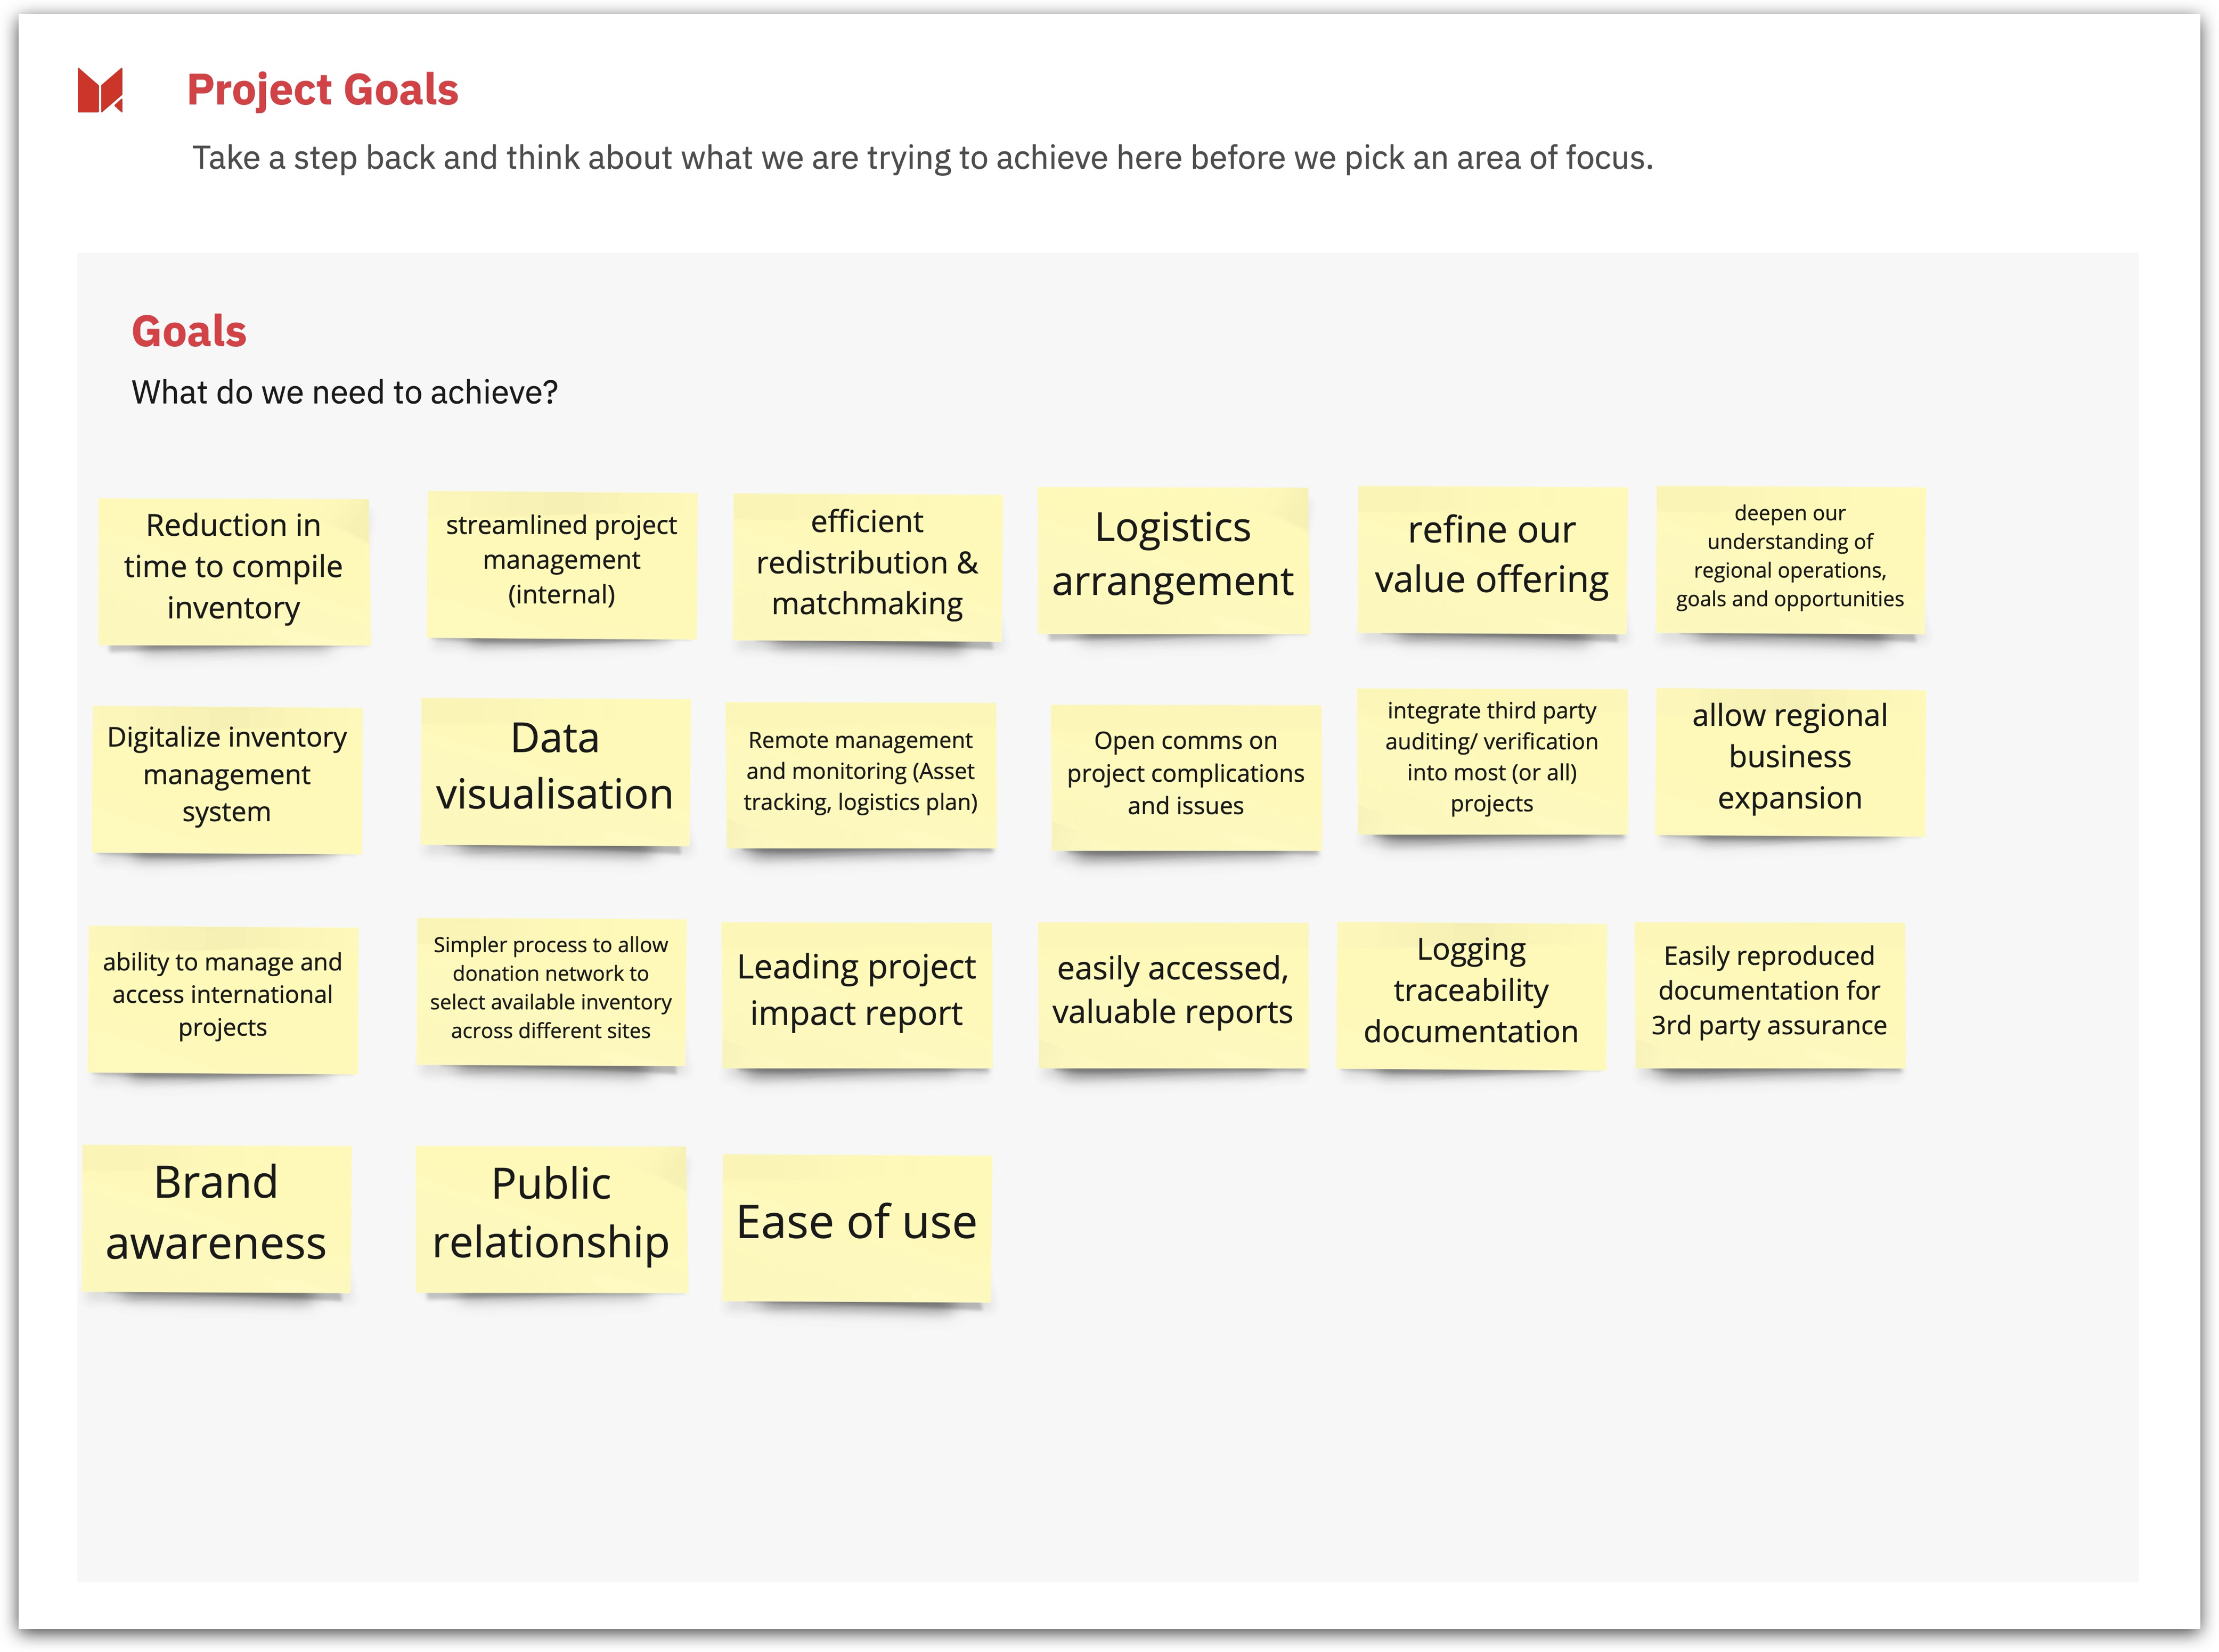
On the left, you see an example of a project goals discussion.
¶ Barriers & Enablers
After we have set goals, further clarity can be gained by addressing underlying barriers and enablers to achieving this goal. This exercise helps us identify future blockers we should be aware of and accelerants we can and should leverage for success.
Ask the team four questions:
- What might prevent us from achieving those stated goals? It helps to understand potential barriers and blockers.
- What could enable us to reach those stated goals? Looking for existing solutions and helpful resources.

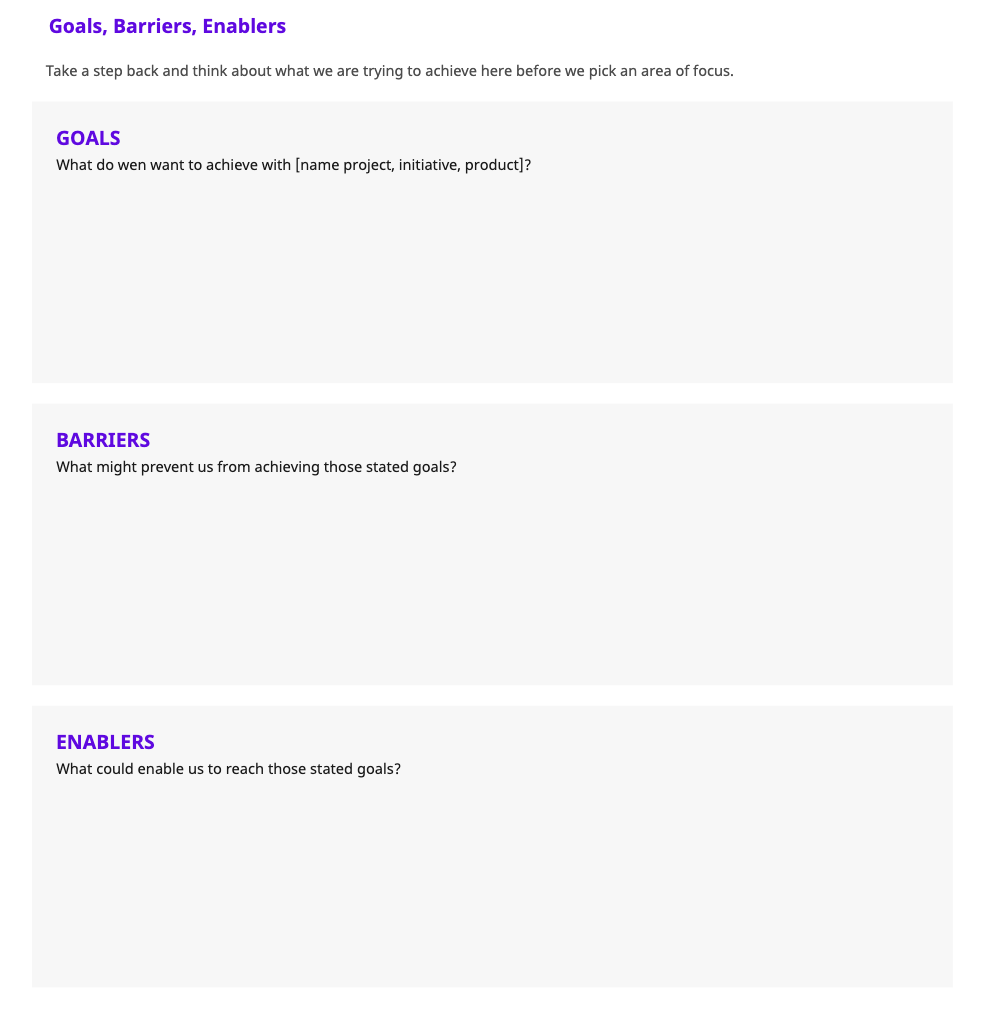
¶ Barriers & Enablers Resources
¶ Pre-Mortem
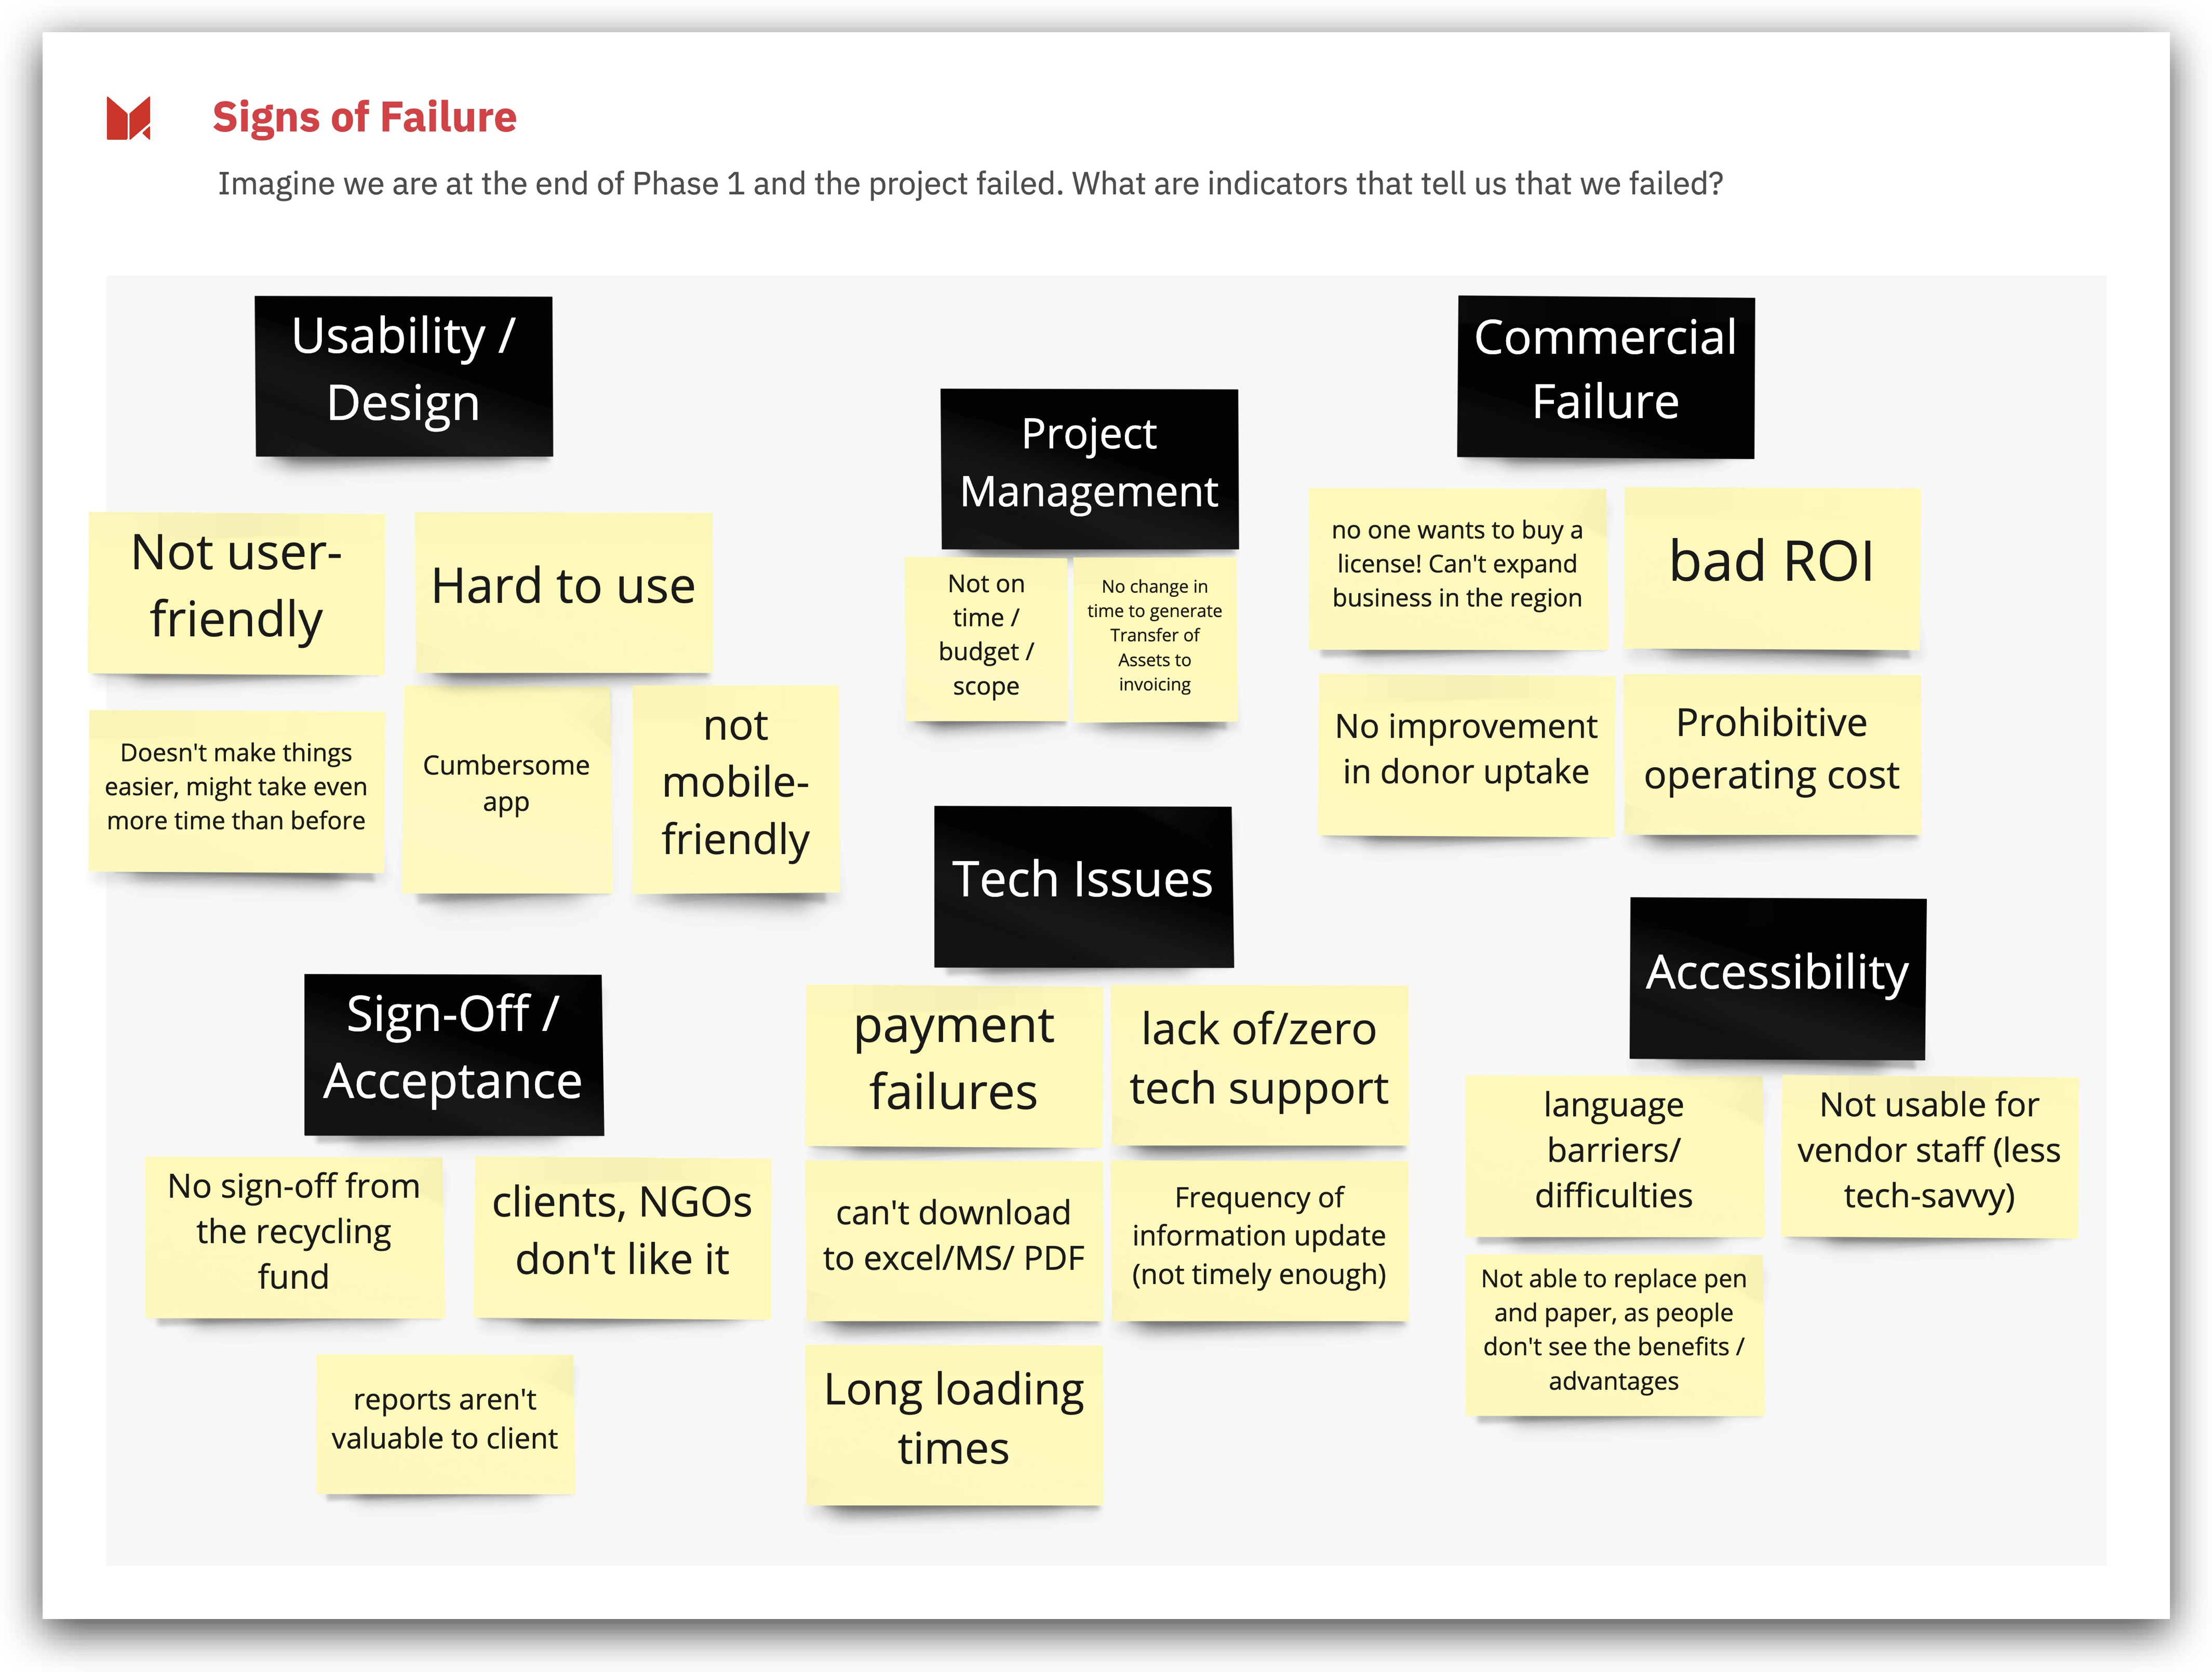
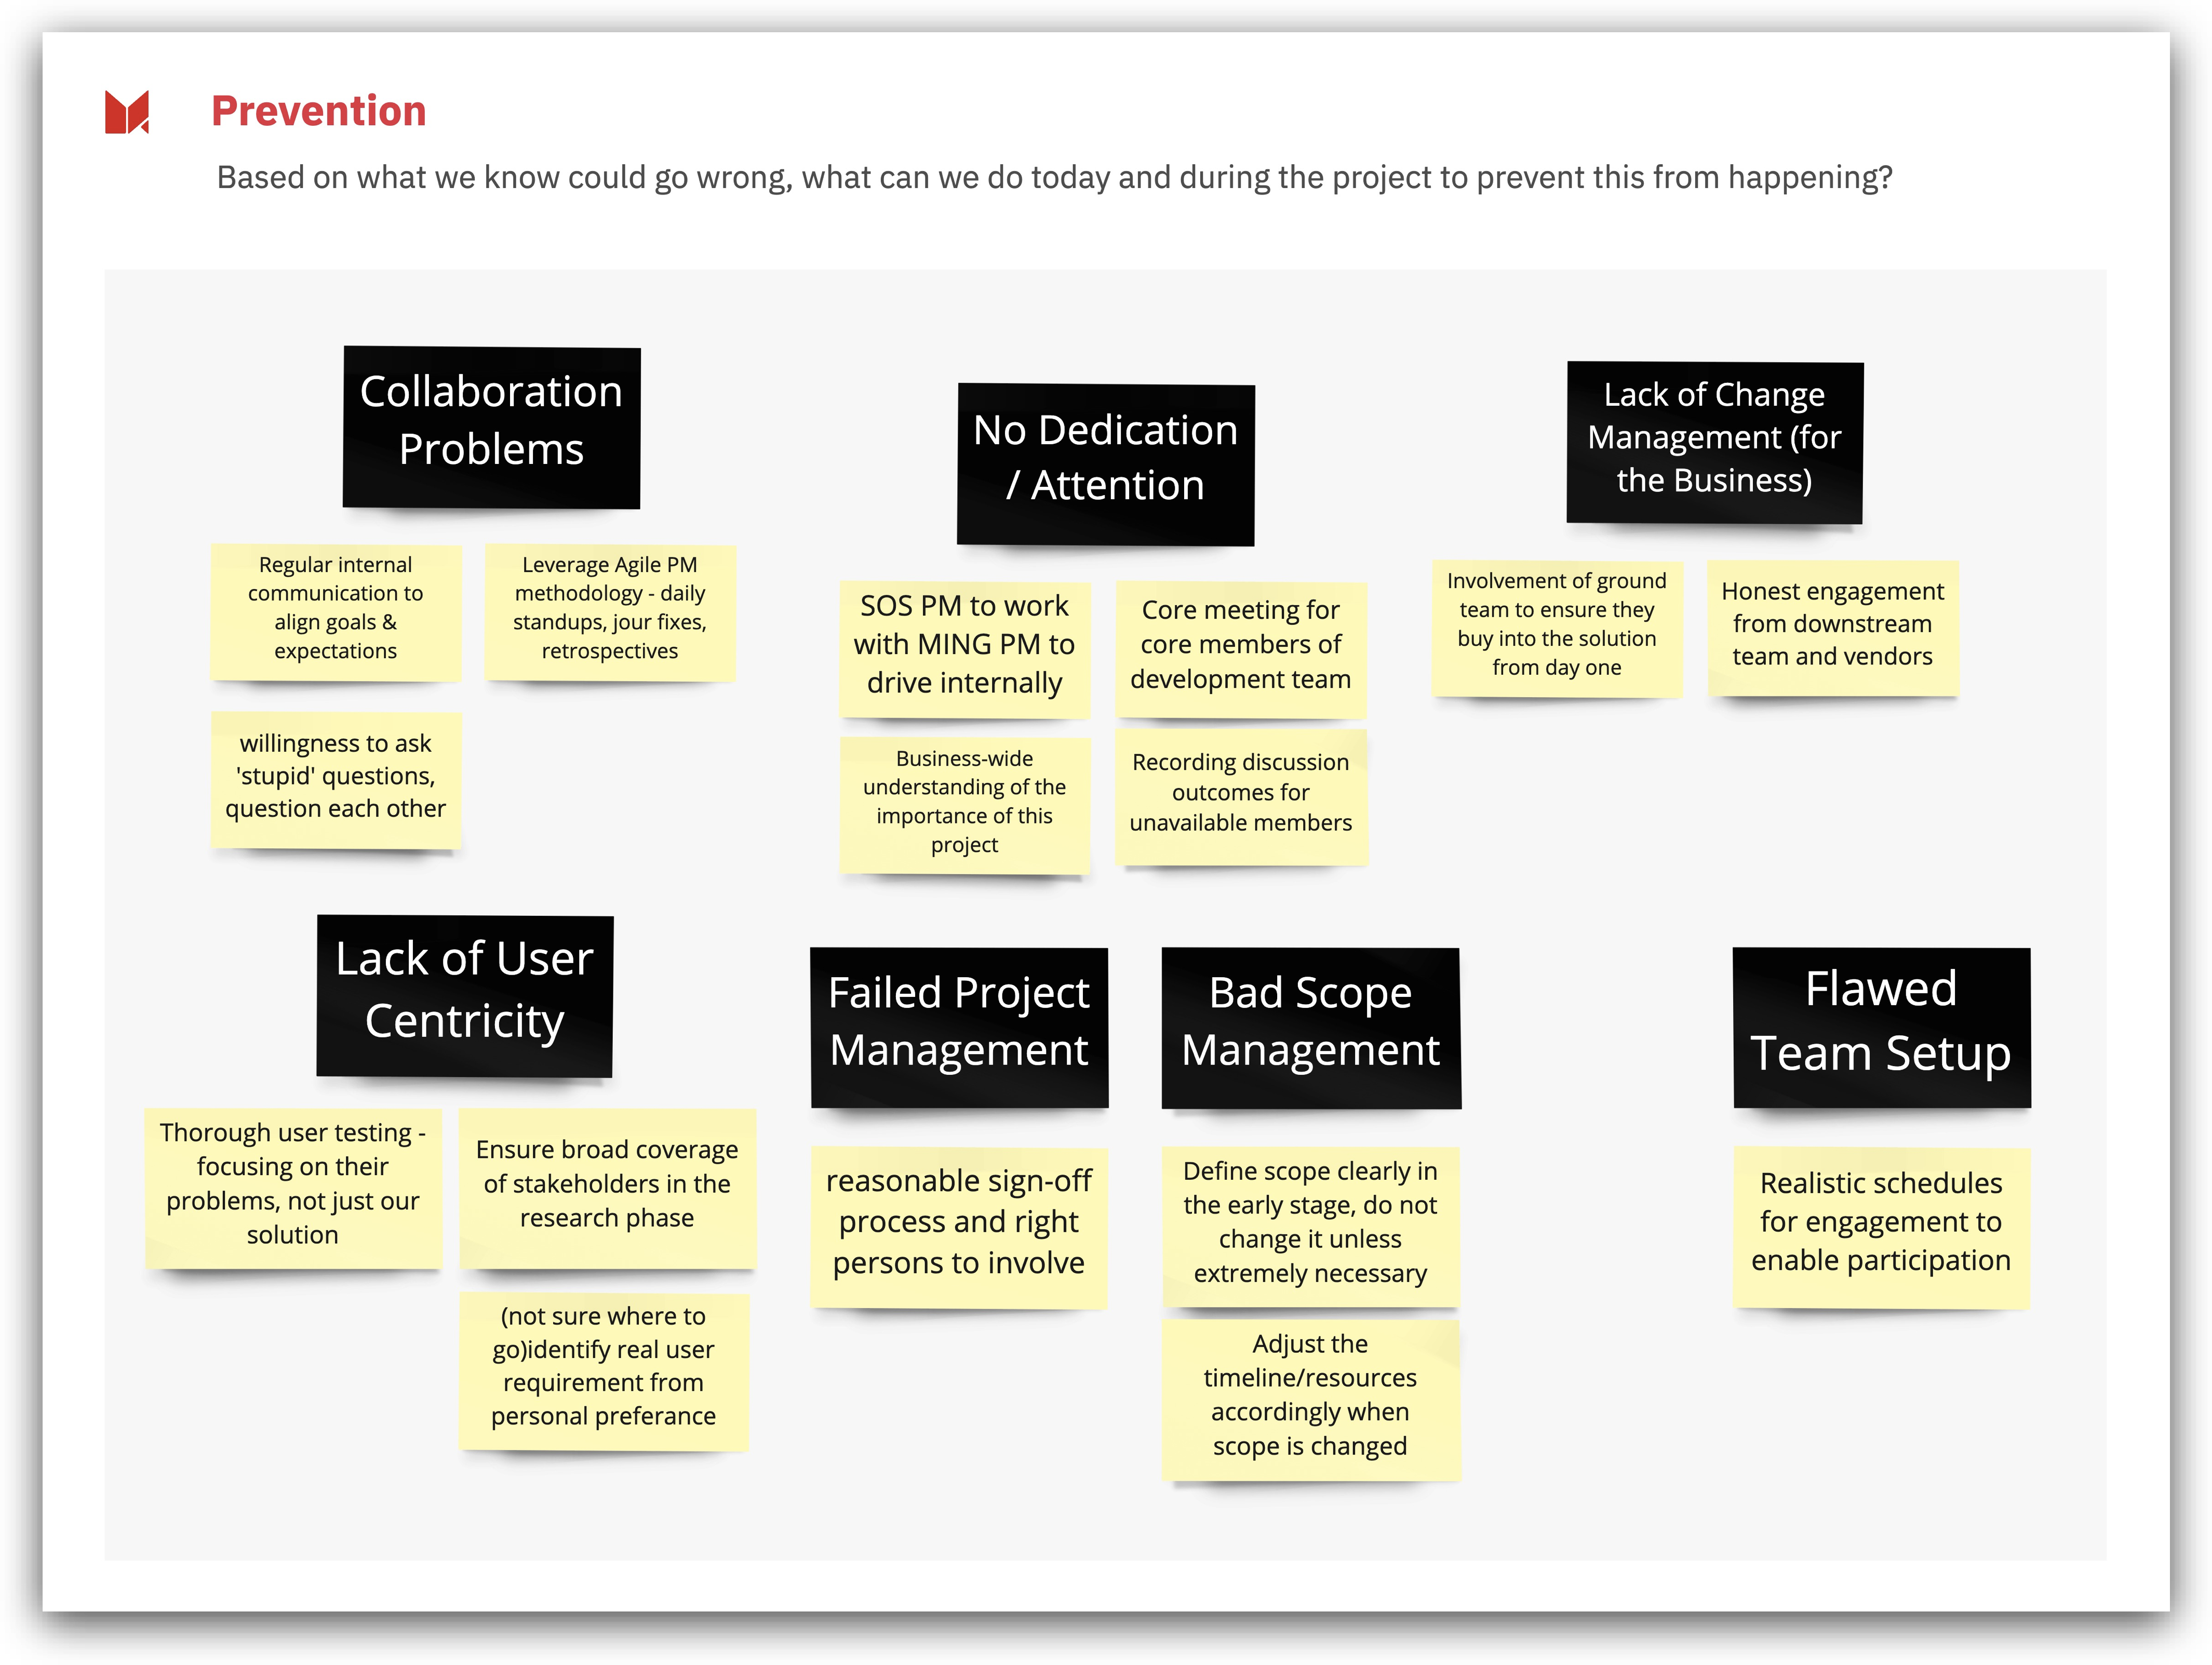
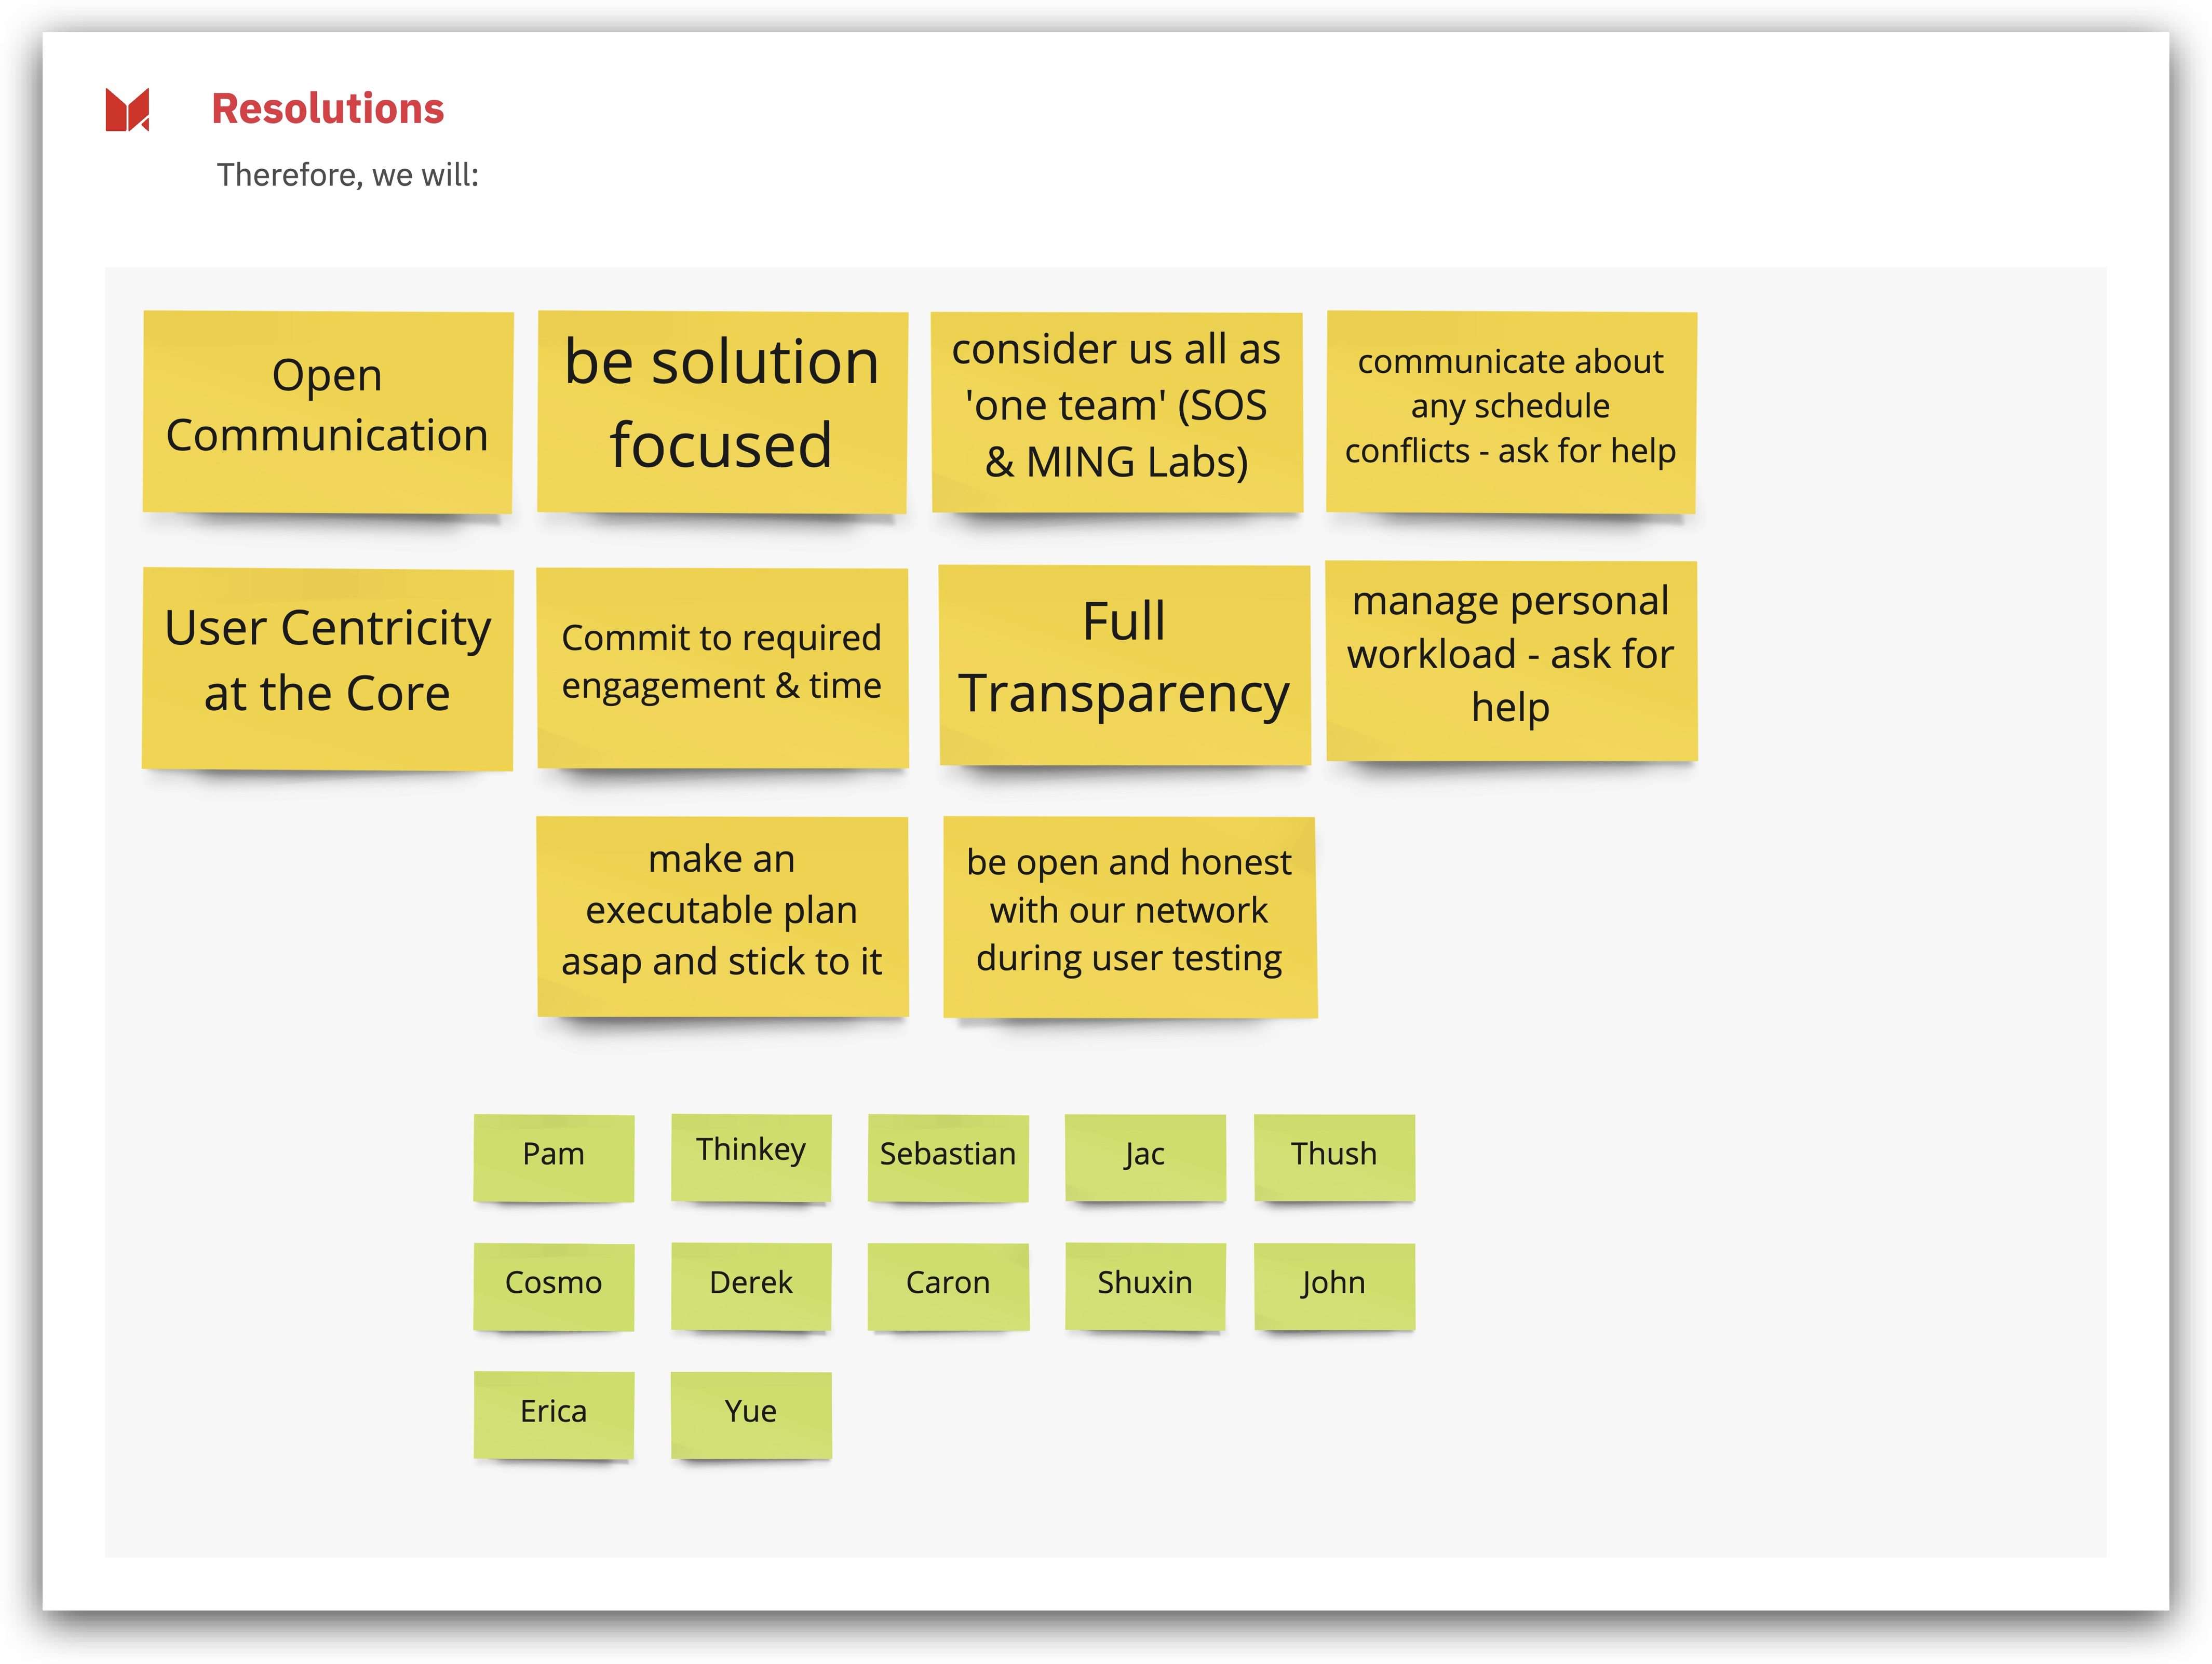
Last but not least, for this first part of the workshop, it can be helpful to try and predict what might go wrong and find resolutions for how we avoid those unhappy paths. This is especially important for complex or lengthy projects, where much uncertainty can creep up and lead the team astray.
Ask the team four questions:
- How will we know we failed? It helps to define failure.
- What might have caused us to fail? It helps to identify root causes.
- How could we prevent failure? Finally, it helps to explore actions.
- What do we resolve to do today? Commits the team to actions that prevent failure
On the left, you see an example of a 4-step pre-mortem.
¶ Problem Statement
¶ What it is
A Problem Statement states the challenge you want to address with your project and drives all the subsequent work. It defines the gap between the current state and the desired experience on a high level.
¶ Why it is useful
The project aims to address the challenge your customers are facing. A meaningful problem statement will steer you in the right direction and help you define the project's scope and research goals.
¶ When to use it
Always try to define a Problem Statement when you want to articulate a problem and provide a clear-cut objective to work towards. We suggest you use this approach right upon the start for you and your team to get a better understanding of the challenge at hand.
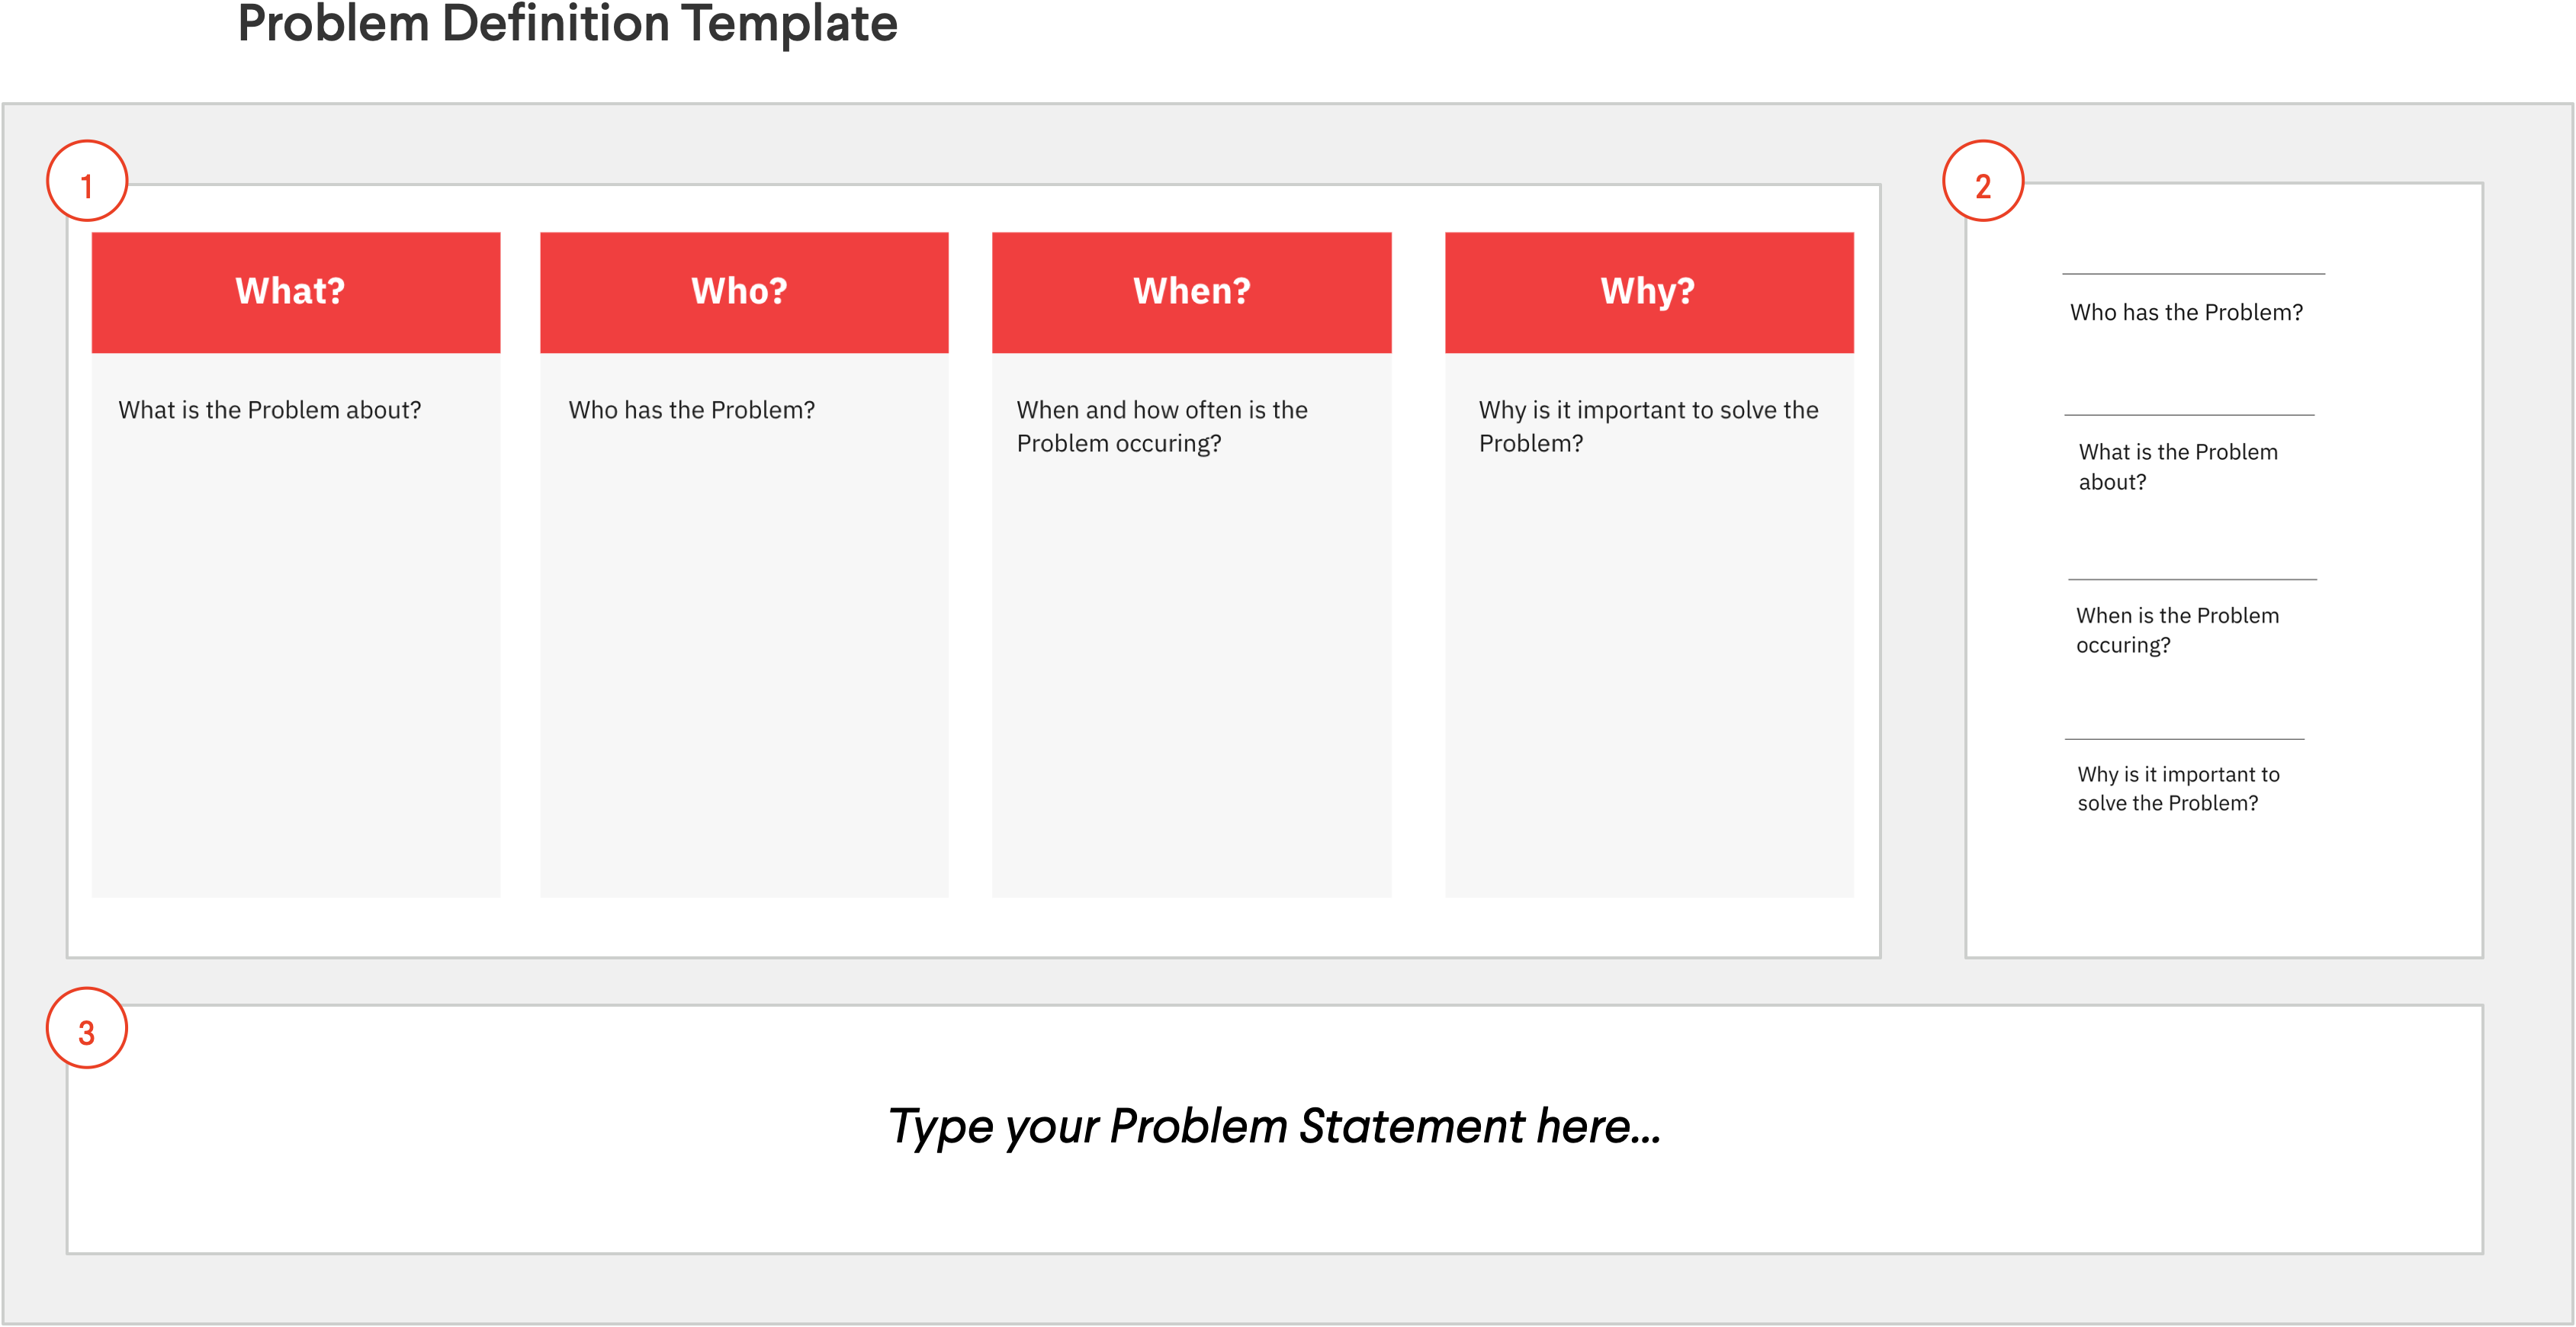
¶ A good Problem Statement should tell you
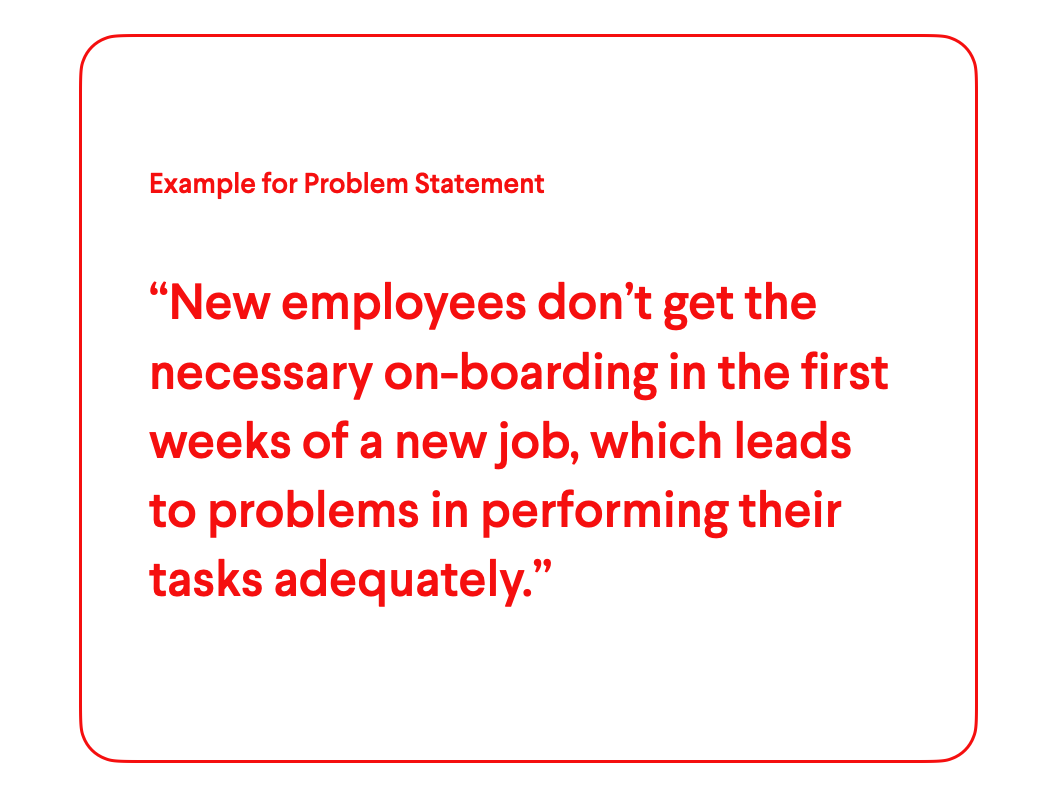
- What is the problem?
- Who has the problem?
- When and how often does the problem occur?
- Why is it important to solve the problem?
When asking your project team to formulate a Problem Statement, don’t just ask what the problem is you are trying to solve. Instead, it’s better to ask What? Who? When? And Why? Questions separately and then as a team decides which answers will go into a Problem Statement.
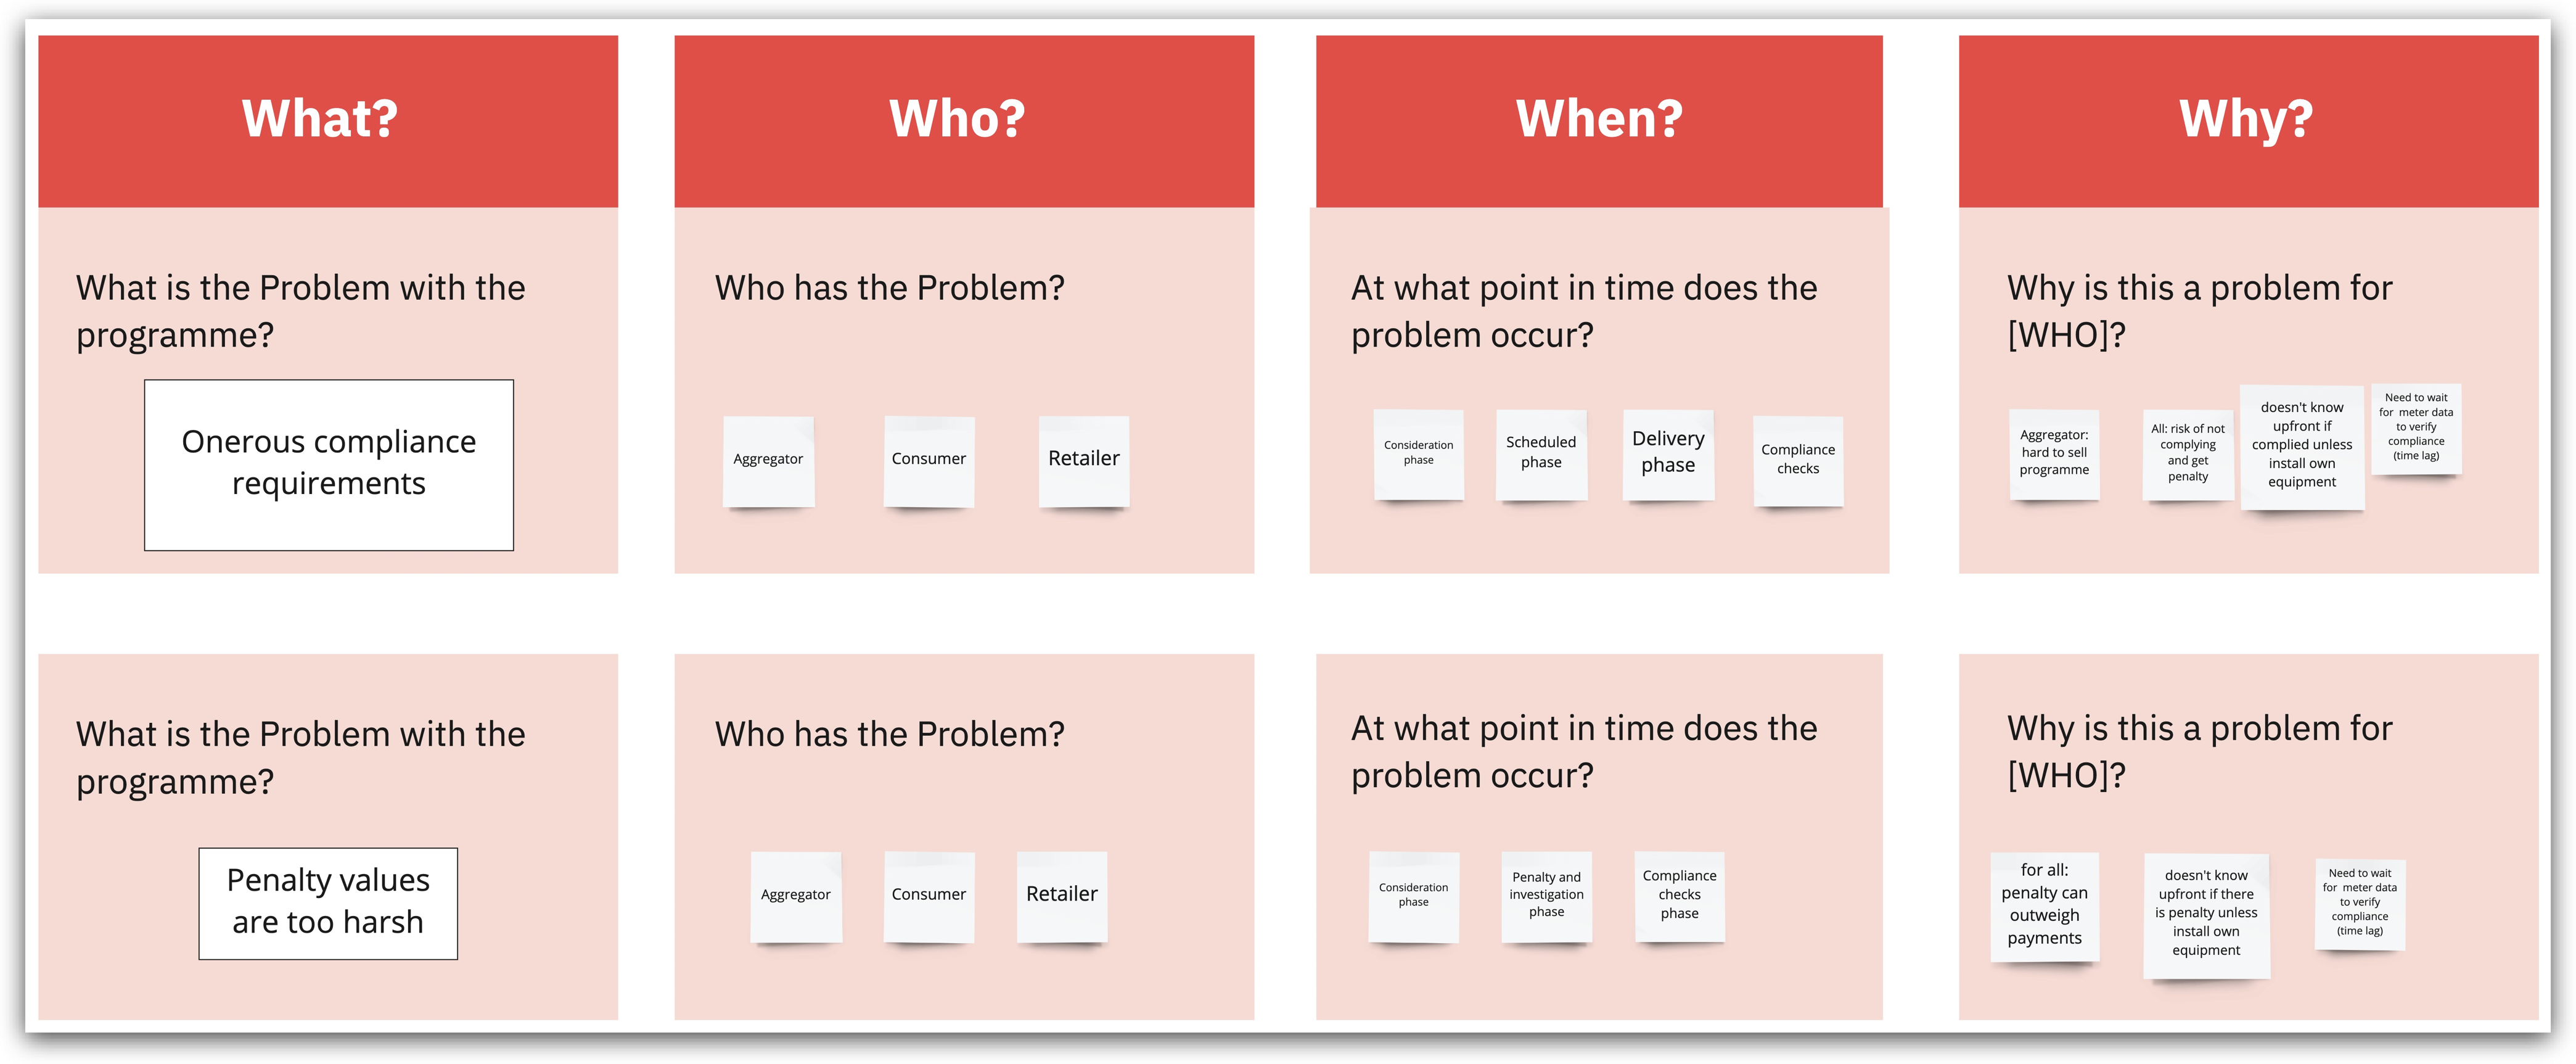
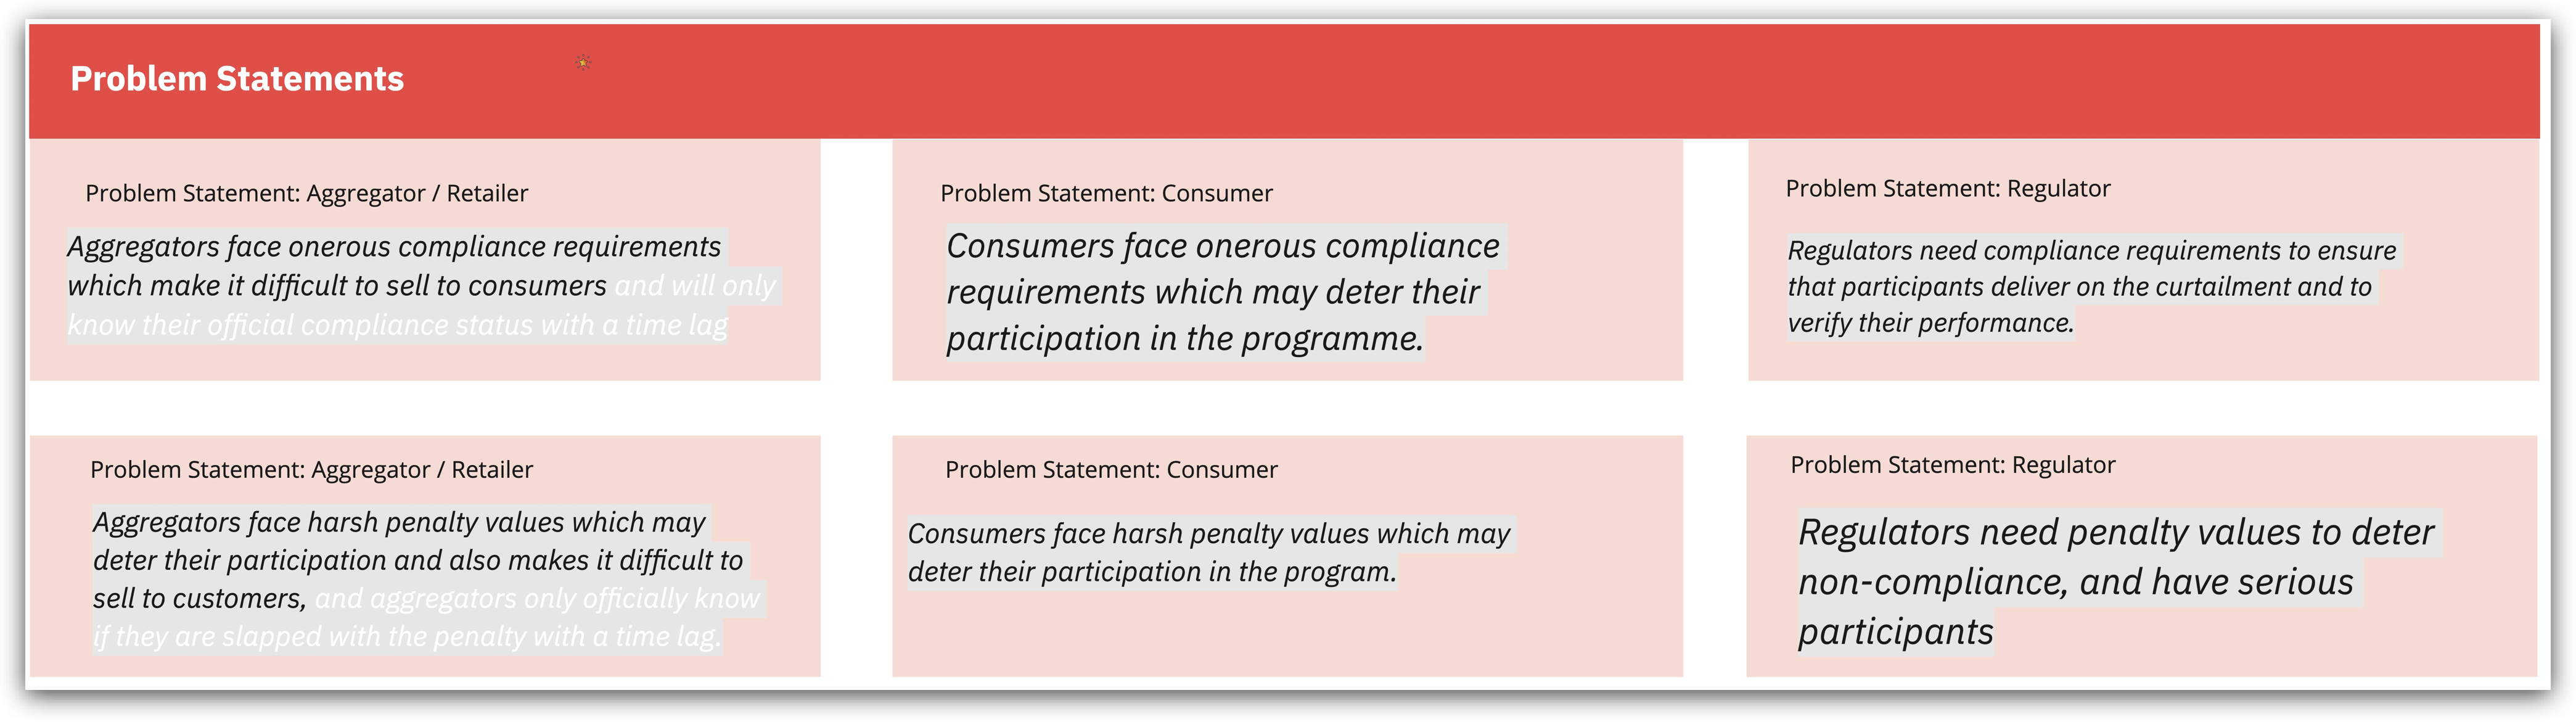
For a larger program or product endeavour, there can be multiple problem statements for different stakeholders, as complexity increases with the number of target customers/customers, like in the example on the right.
¶ How is it done
Ask the following questions to understand your challenge and develop a Problem Statement:
- Who? Who has the problem? Who is involved in the issues?
- What? What is the problem about? What are the issues customers are facing?
- When? When and how often does the problem occur?
- Why? Why is it important to solve the problem? What are the consequences of the problem?
¶ Do's & Don't
Do's
- Try to understand the project background as much as possible: Why is it time to address this problem now? Which efforts have been made in the past?
- Involve some customers to get a rough overview of pain points, the gravity of their challenges, and their priorities.
- Go after the most important problems. Don’t just go for the small win, or the nice-to-have projects, because people won’t bring their best efforts.
¶ Tools needed
- Whiteboard (virtual)
- Markers and pens (virtual)
¶ Example
¶ Problem Statement Resources
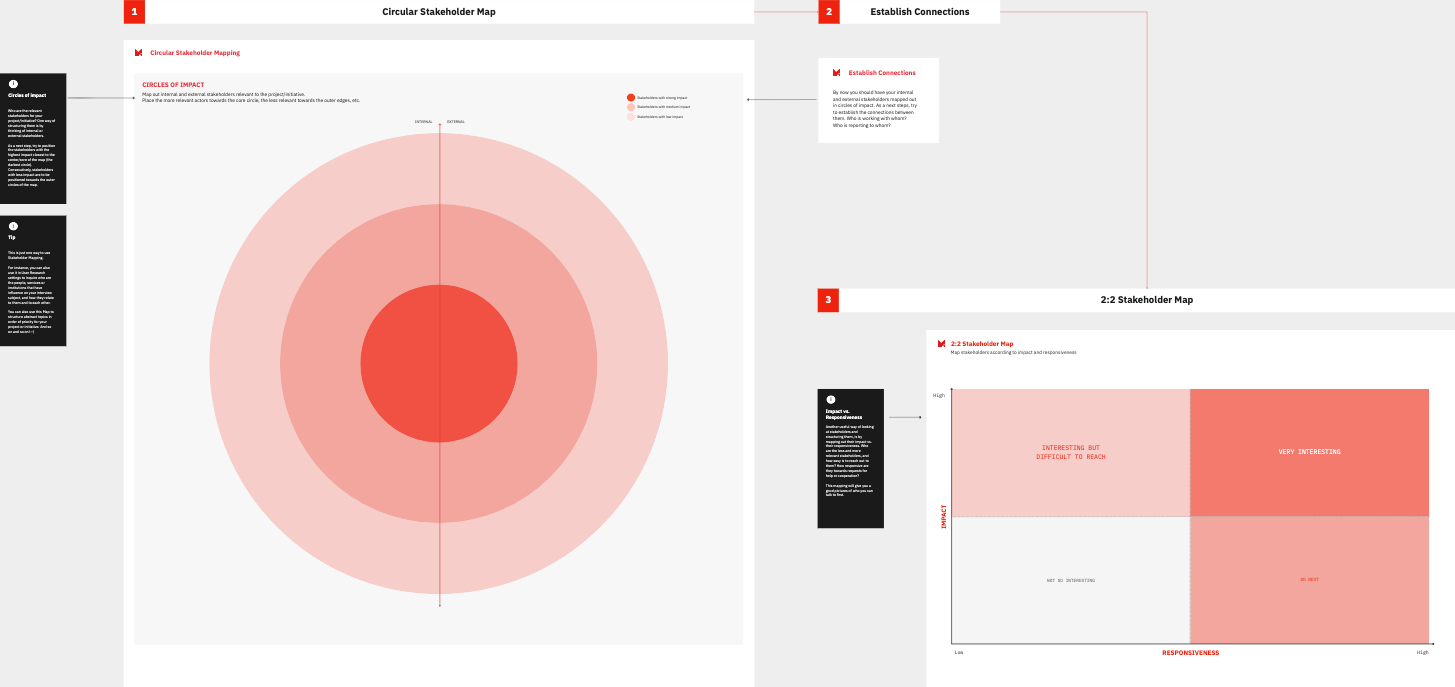
¶ Stakeholder Map
¶ What it is
A Stakeholder Map captures all the parties influenced by or interested in the project outcome. In addition, it indicates the involvement and role of each stakeholder group in the process.
¶ Why it is useful
Considering all the implications of the change you want to introduce is essential. Who is influenced by or might interrupt the progress of the project? The Stakeholder Map helps to consider priorities and potential conflicts between parties and gives a good overview of whom you might want to interview or involve in the process.
¶ When to use it
Every project involves people who have a direct stake in the outcome. But circling back to people you’ve forgotten to include can set a project back and slow it down. This is why it’s essential to identify and engage with your stakeholders as early as possible. Whether you’re integrating new team members, starting a new project, exploring a new market, or expanding a service offering, building an understanding of and relationship with stakeholders is integral to your process.
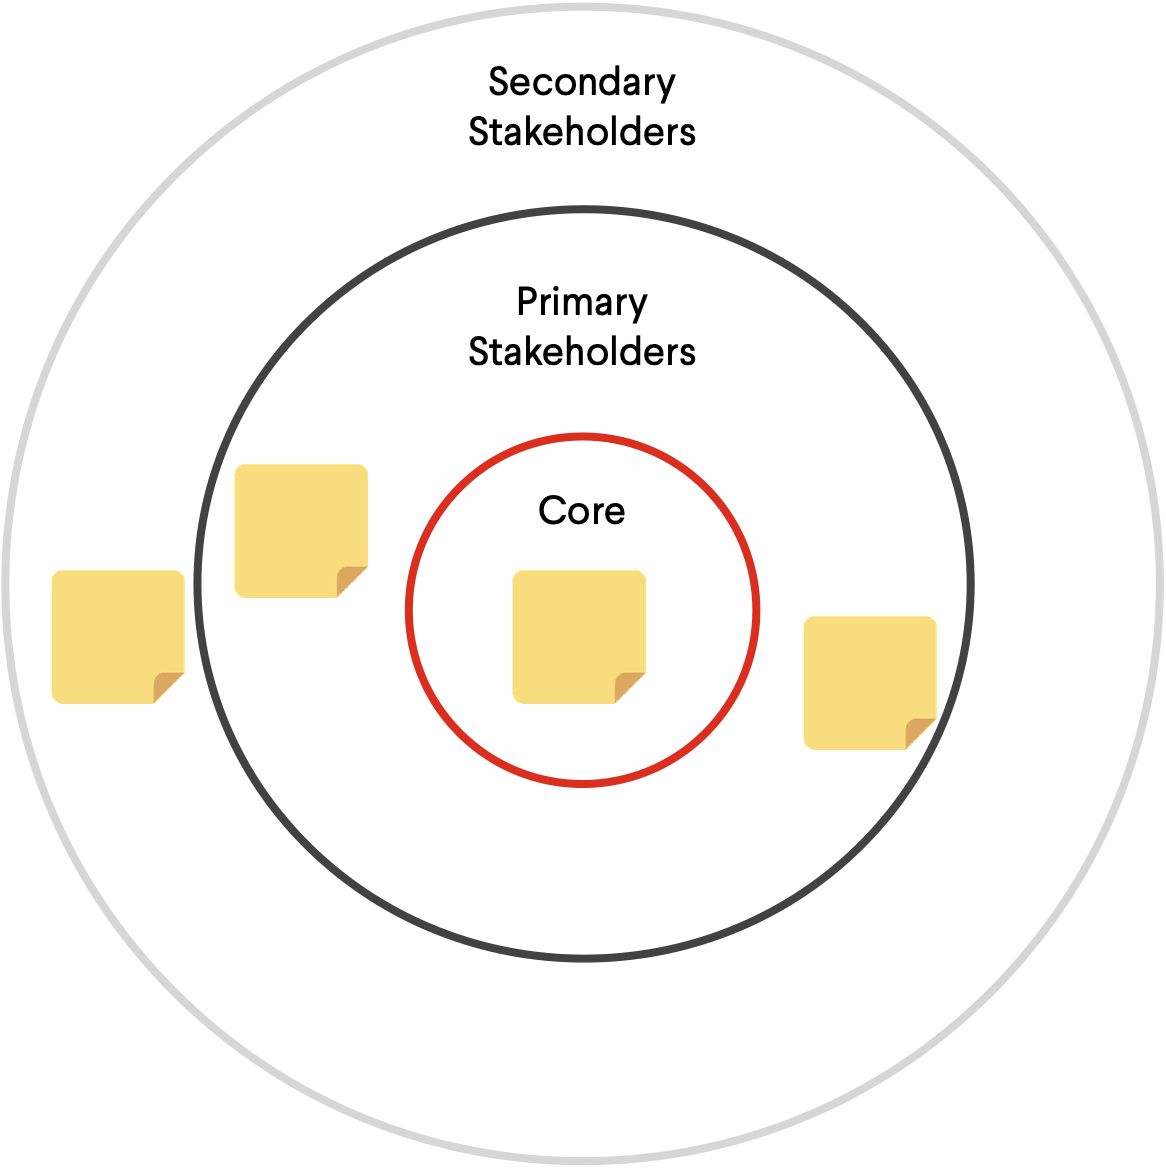
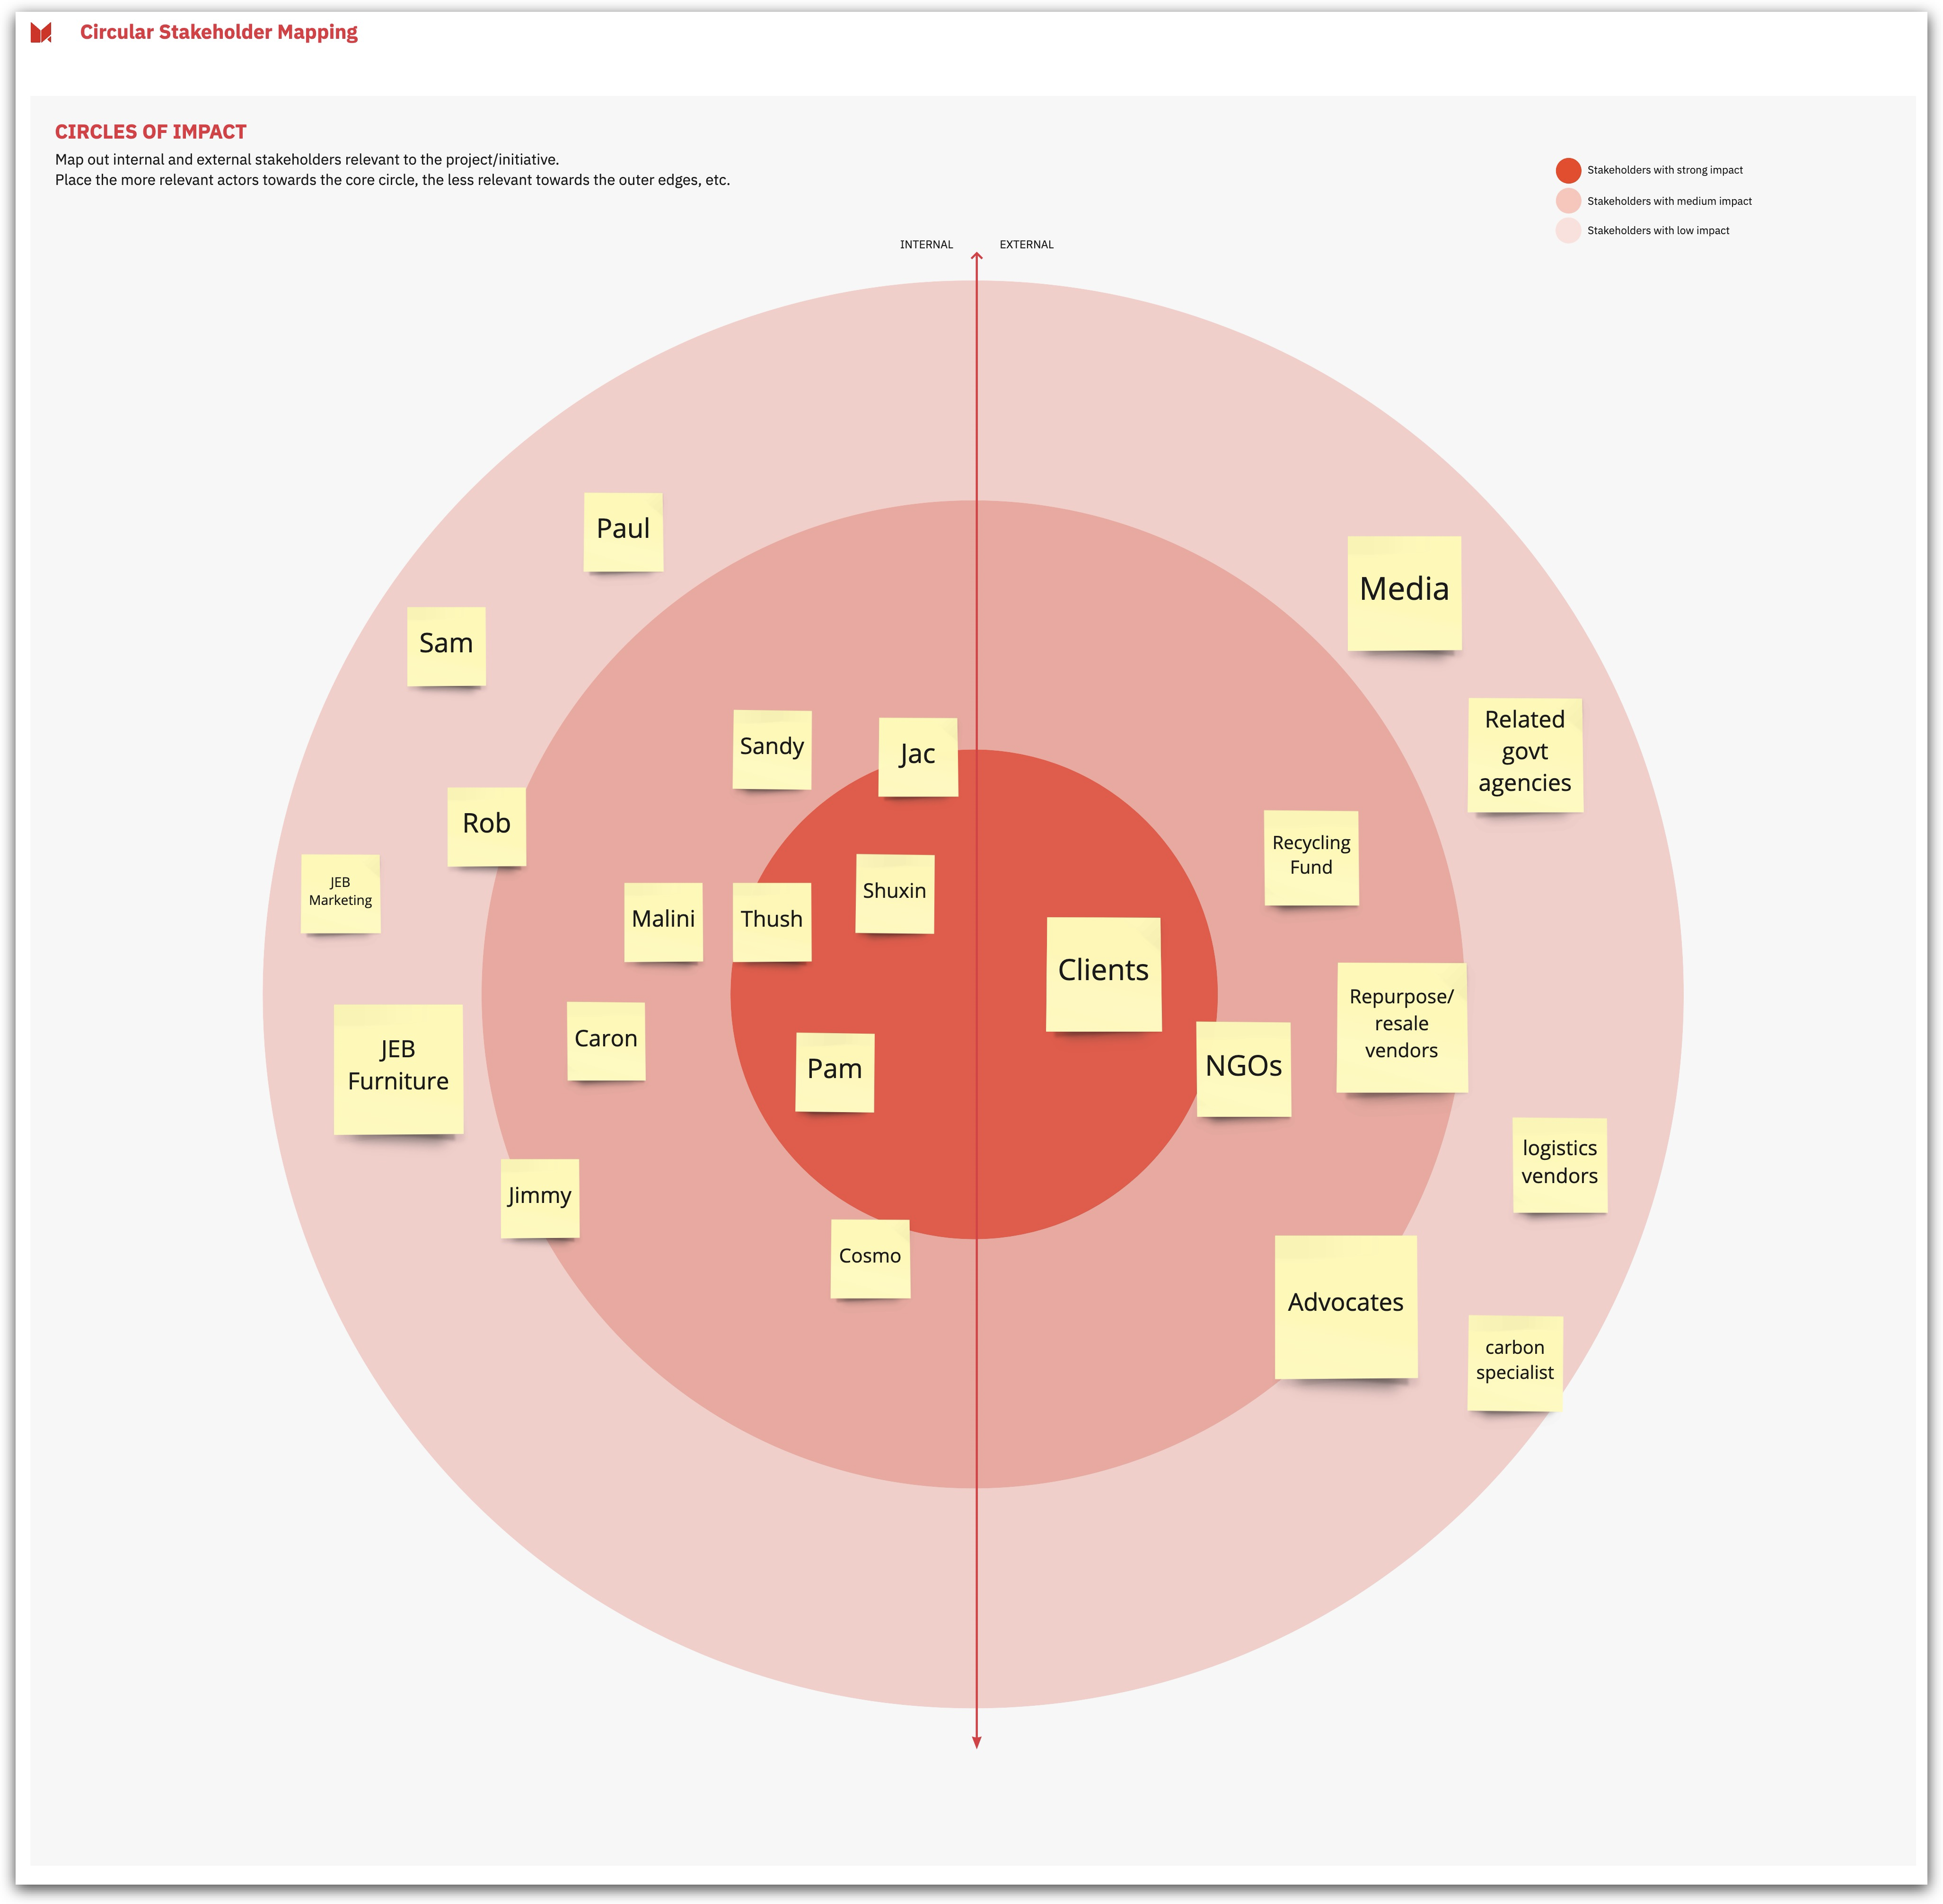
A Stakeholder Map gives an overview of all the people or parties involved in or influenced by your project. By categorising them into the core, primary and secondary stakeholders, you can better understand the dynamics and decision power among the different stakeholders and whom to involve in your process.
Further, some of the stakeholders you need to involve are internal to your organisation, while others are external. Therefore, it is essential to deeply reflect on which external stakeholders there might be, as discovering them is more complicated than discovering the internal stakeholders.
Take enough time with the team to think about and reflect on whose lives you will touch, who will have an interest, whose support you need, and so forth. In the beginning, rather than err on the side of listing too many parties - you can always prune down later.
¶ How is it done
- Write down all the stakeholders who are, to some extent, impacted by your undertaking.
- Categorise the stakeholders into three groups:
- Core: people directly involved or impacted
- Primary: people and groups with decision power over your product and resources
- Secondary: Parties who might have an impact, but to a lesser degree, and are not vital to the success of the undertaking
- On a whiteboard, draw one core and two outer circles. Name the centre “Core stakeholders,” the second layer “Primary stakeholders,” and the outer circle “Secondary stakeholders.”
- Place the previously categorised stakeholders in the corresponding circle on the Stakeholder Map.
¶ Do's & Don't
Do's
- Consider the whole project ecosystem: include potential partners and critics of your project.
- Try to think about which parties are interested in or are influenced by the project in the short and long term. Some stakeholders might only come into the picture in certain circumstances or after some time - don’t forget about them!
¶ Tools needed
- Whiteboard (virtual)
- Markers, pens, and post-its (virtual)