Previous
¶ Storyboards
¶ What it is
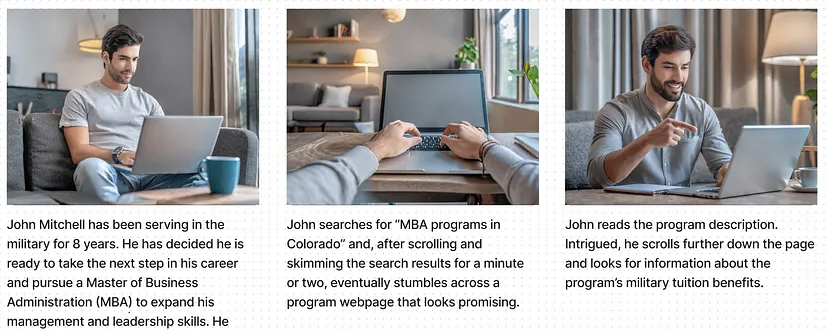
A Storyboard is a series of drawings or visualisations that visualise a particular hypothetical sequence of events within your new product or service offering.
¶ Why it is useful
Storyboards are a quick and straightforward way to visualise your idea and can be used in prototyping to capture the experiences and feelings of people when testing a new concept. In addition, storyboards can provoke meaningful discussions and uncover potential problems or opportunities.
On the other hand, the project team is forced to put full attention on the customer’s perspective and, therefore, can uncover valuable details for the service.
¶ When to use it
Storyboards are generally used after ideation and when you want to see how customers experience your design. Then, in the prototyping stage, you can start with a storyboard and develop a more high-fidelity prototype based on it.
¶ How is it done
- Decide which scenario/sequence of your service you want to display and test.
- Identify scenes that plot the scenario from the start to the end.
- Sketch on a piece of paper a series of illustrations that tells the story of how a customer goes through and experiences the different touchpoints of your service. You can also use photographs instead of sketches.
¶ Do's & Don't
Do's
- Try to include as many contextual details as possible so that the situation you describe feels real.
- You can visualise the scenarios in different ways - the most common one is the comic-strip format with speech and thought bubbles, captions, narration, etc.
Don't
- Don’t worry about the looks of your sketch - it only serves to visualise ideas and connect them.
¶ Tools needed
- Paper, pen (virtual)
- Photographs representing the customer in a specific situation (optional)
¶ Example
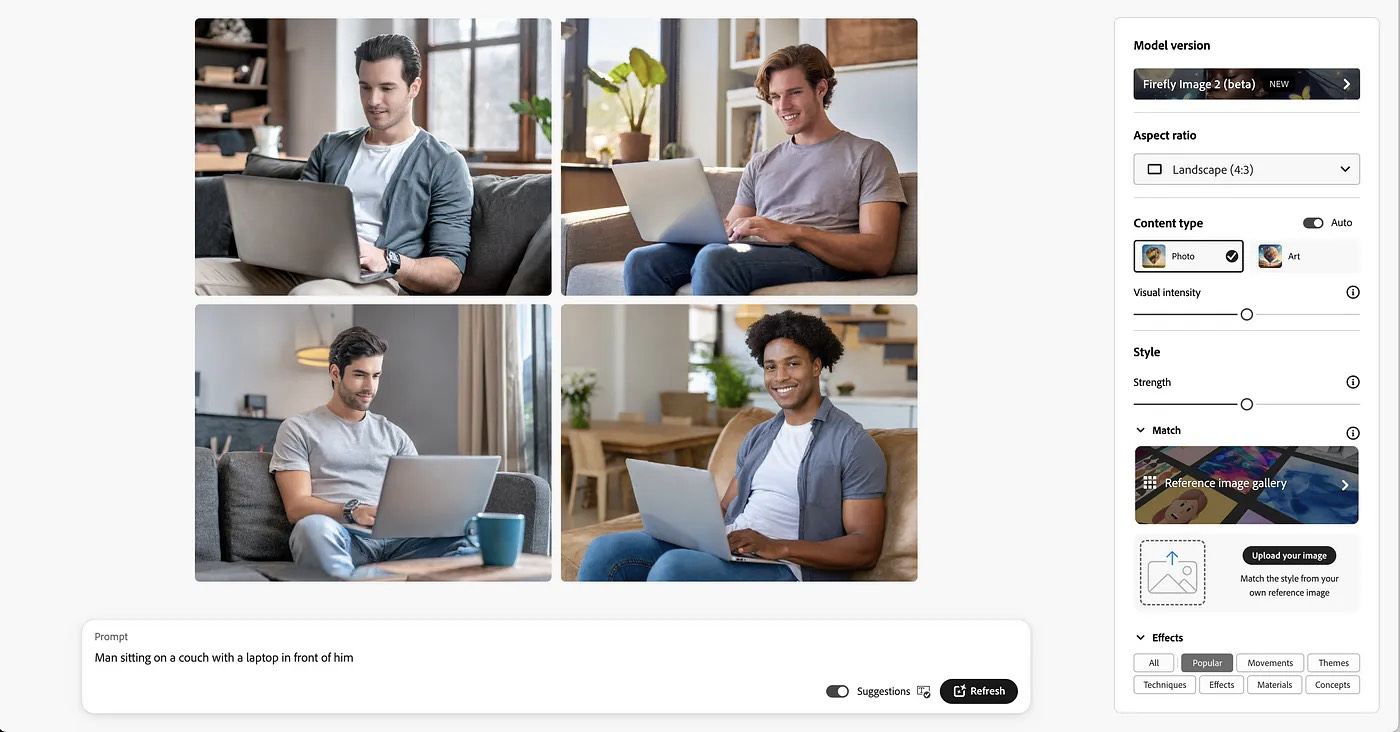
¶ GenAI Tool Use Case
¶ Empowering User Stories Image Creation
Adobe Firefly redefines user story creation by swiftly generating high-quality images based on detailed prompts, allowing designers to visualize narratives with specific artistic styles or moods. Its features ensure consistency across visuals and offer control over photo parameters for lifelike images, enhancing storytelling. For our production, we can quickly generate photos for us after we have established the story which can speed up our work speed.
Key Steps Tutorial:
- Ideating a UX Story
- Prompting Adobe Firefly to Generate Images
- Enter a description
- To set a generated image as a style reference: Then continue to enter ‘modify description’ until appropriate
- Output image
- The Final UX Story
Read More:
UX and AI: Visualizing a UX story with Adobe Firefly
Other Inspirational Tool:
¶ Paper Prototype
¶ What it is
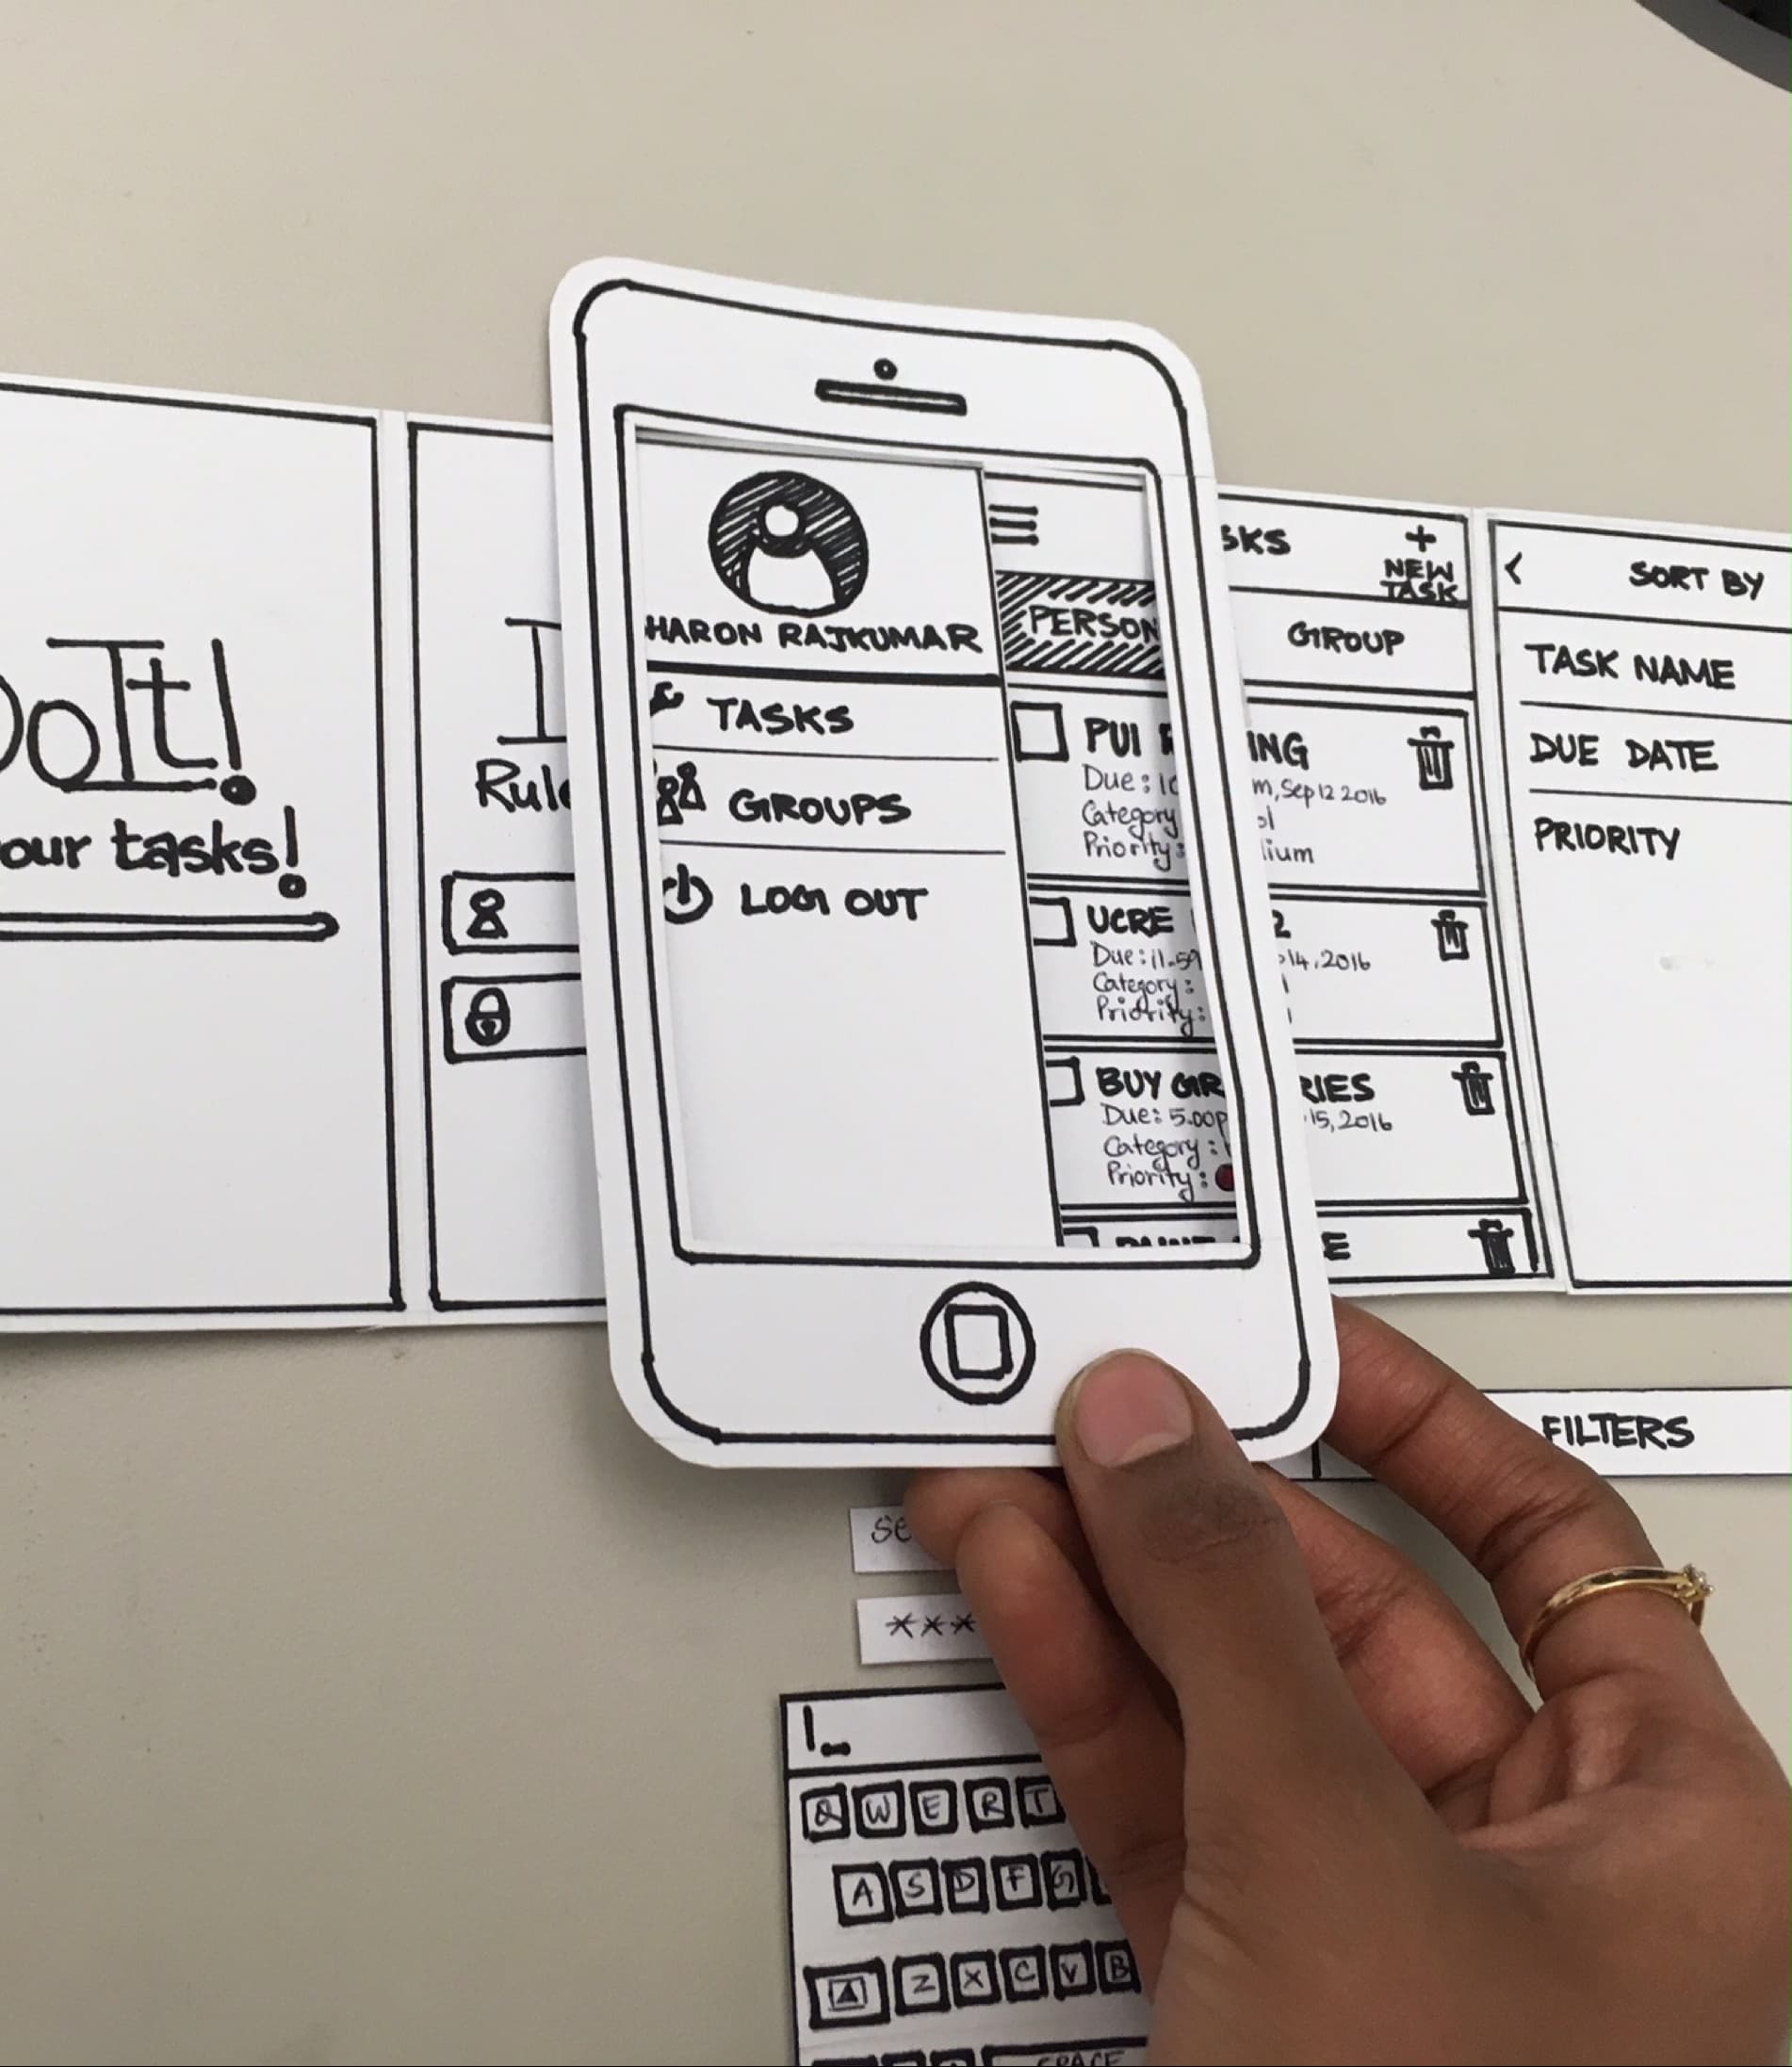
Paper prototyping is a quick and cheap way of gaining insights without the need for costly time or resource investment. It simulates the function but not the aesthetic of a proposed design.
¶ Why it is useful
Paper prototyping can be used to quickly validate the functions of a design at a low cost. It does not have to validate aesthetics, and it focuses on functionalities. Test results of the paper concept can be revised and improved to develop further.
¶ When to use it
In the initial stages of concept creation, if you want to validate, e.g., the desirability of a specific function.
¶ How is it done
- Based on your Storyboard, revisit the aspired customer journey of your offering.
- Think through the functionalities you would like to get early feedback on and how they might work in a user flow of different interactions.
- Sketch the various screens that are vital to the feature you want to get feedback on and fill in the level of detail (e.g., copywriting, icon, etc.) to the degree that they matter for the feature - leave everything out that is not relevant to understand the feature.
- Create a frame where you can position your screens and walk through the flows to double-check the logic.
¶ Do's & Don't
Do's
- Make the feature/functionality you want to test clear and ensure there is enough context to understand it well.
- Think through what an end-to-end interaction would look like that provides value and prototypes enough to ensure the customer understands the value you want to create for them.
Don't
- Don’t worry about colours or similar brand-level elements; they will not be paper for this prototype.
- Don’t include unnecessary detail that has nothing to do with the function you want to test - it might distract and overwhelm testers.
¶ Tools needed
- Pen, paper, and scissors
- Storyboard sketches
¶ Example
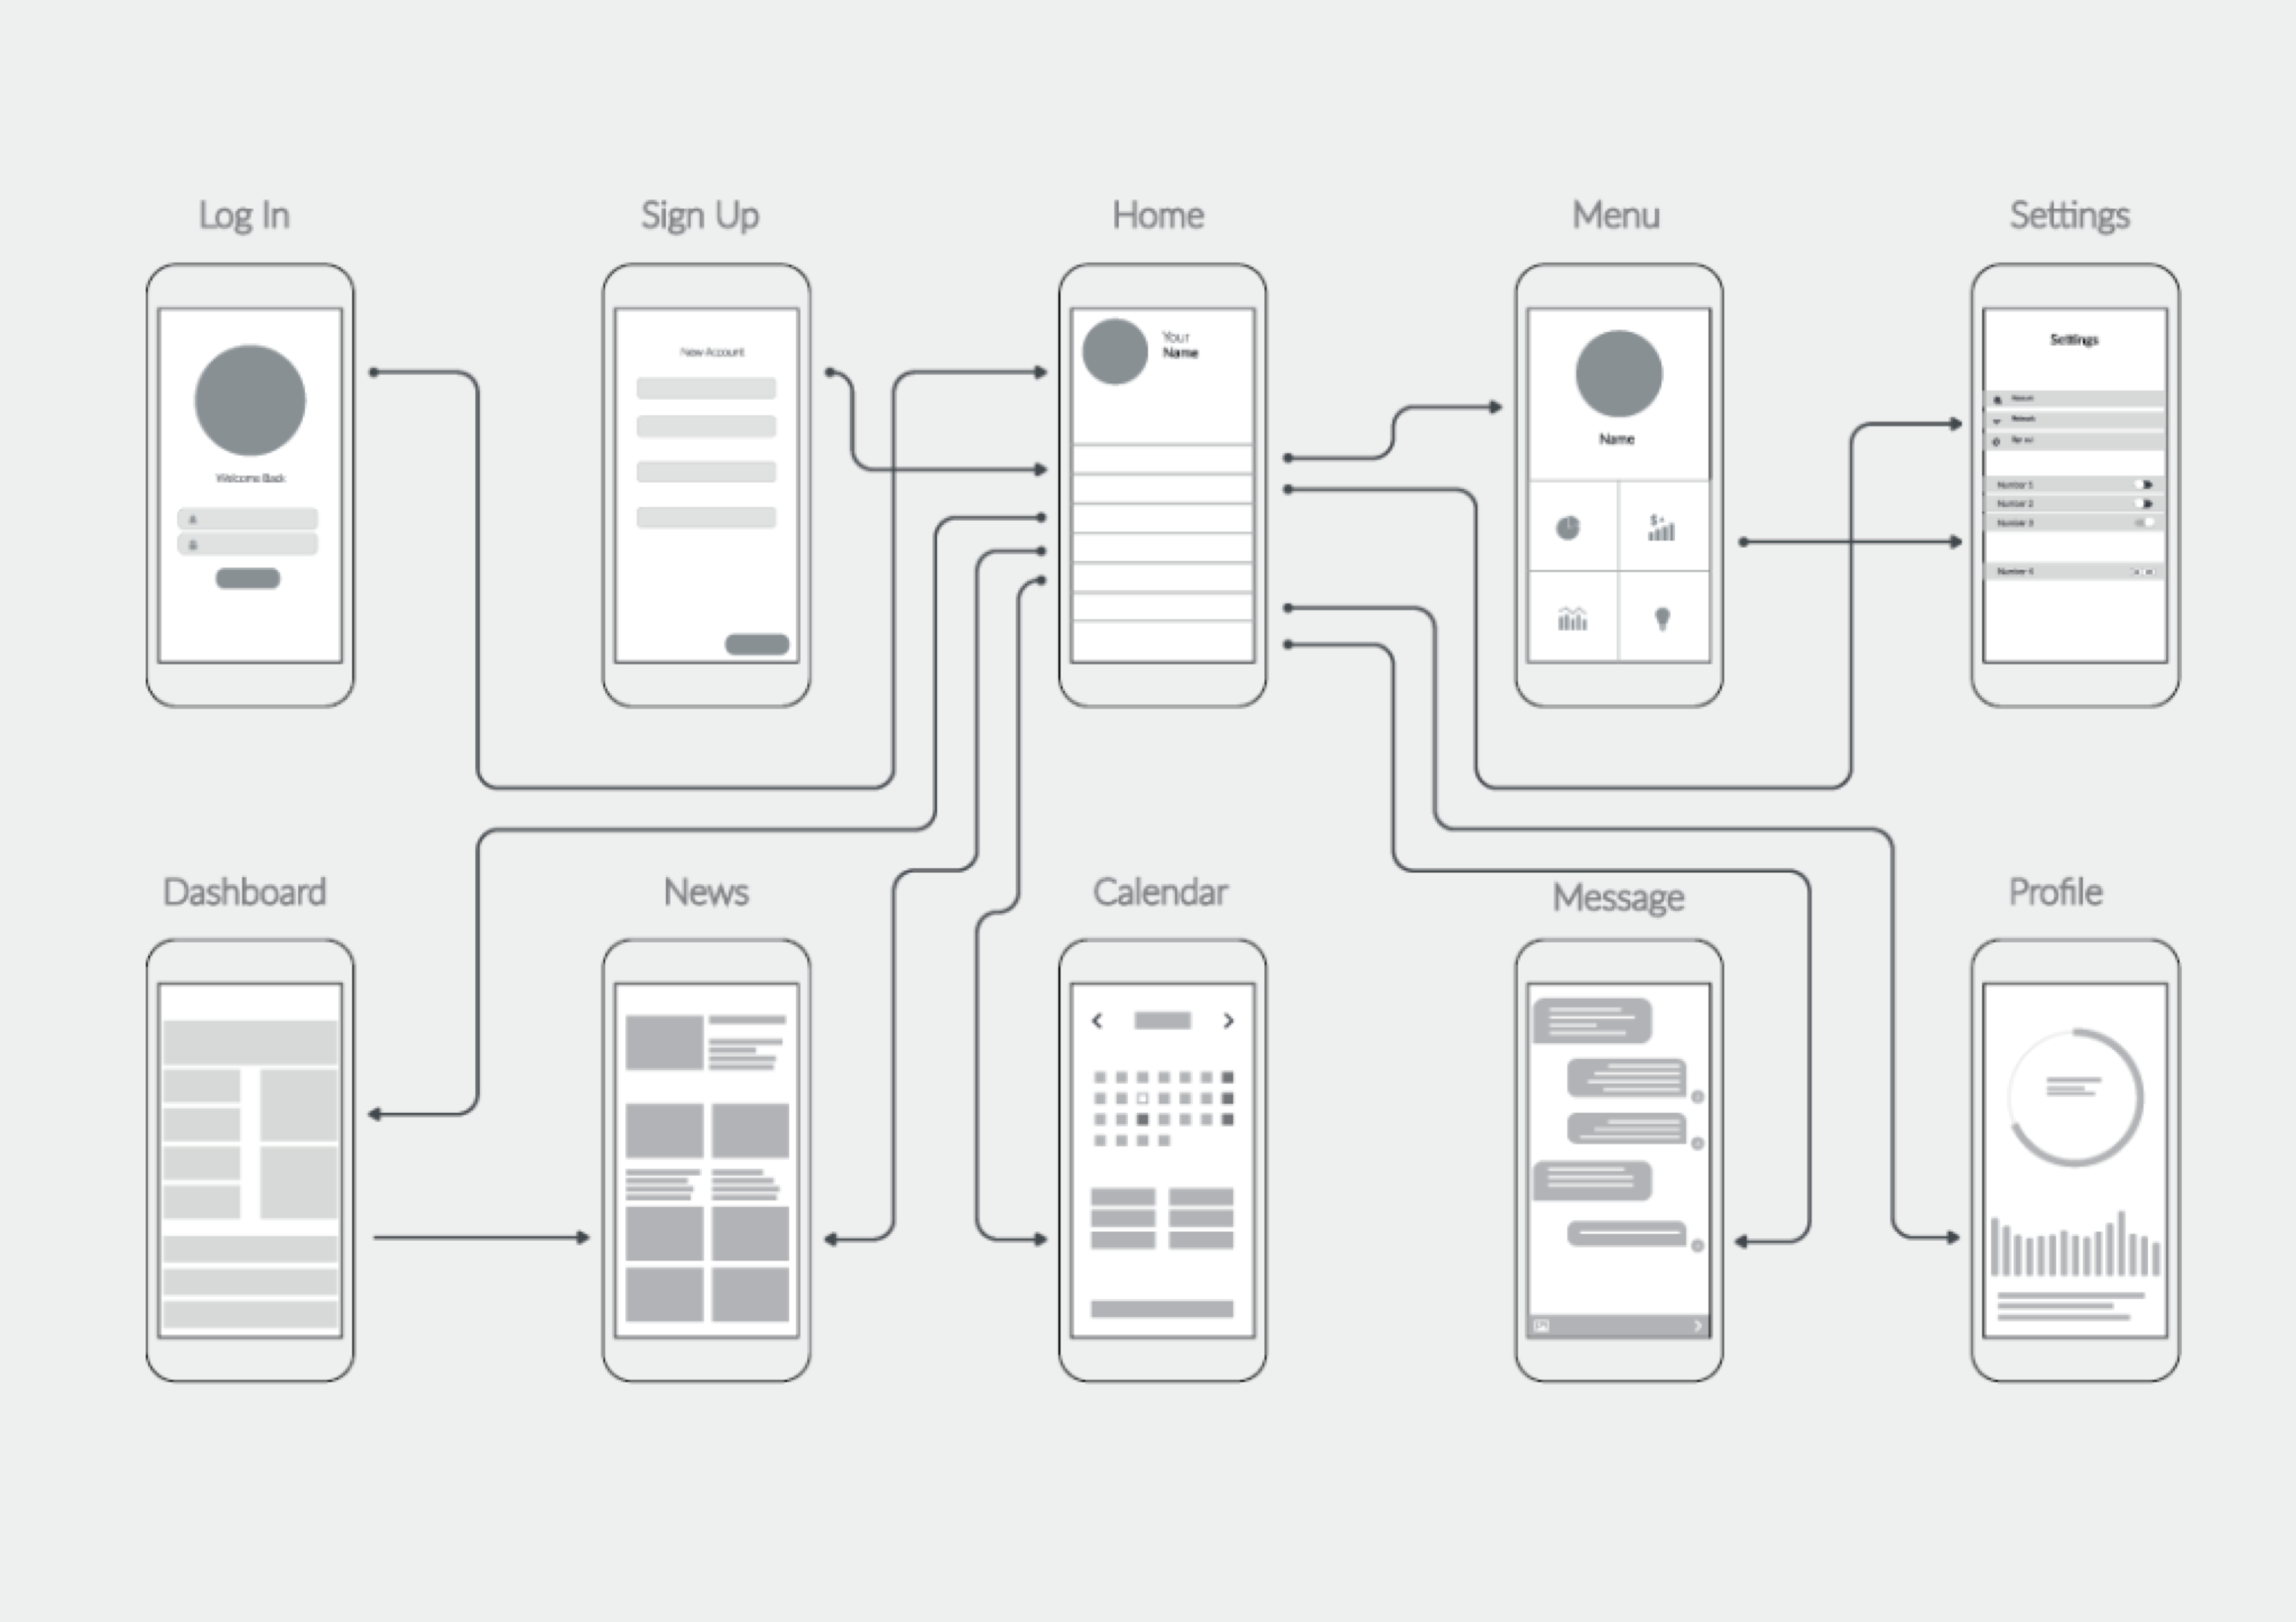
¶ Wireframes
¶ What it is
Wireframes are simplified outlines of all the different elements of a digital product or service. For example, one would typically create a series of Wireframes that map out a whole flow to help testers understand the logic and elements of interaction.
¶ Why it is useful
Wireframes are used to get feedback on the layout, interface, navigation, and functionality to validate an initial (screen) design and layout idea. They can also be used to validate the desirability and feasibility of features when used in the right way with testers and experts
¶ When to use it
Once a rough draft of a digital service idea has been developed, and before moving to details, Wireframes are a great in-between checkpoint to get feedback and iterate.
¶ How is it done
1. Based on your Storyboard, revisit the aspired customer journey of your service.
2. Draw wireframes (“screen skeletons”) to represent what the screen looks like at every step of the service.
3. Fill in each wireframe by considering the following questions:
- How can you structure the page to make it easiest for the customer to find content and reach his goal?
- Which information should the customer see or focus on first?
- Which buttons or interfaces are essential to fulfil the customer’s desired action?
4. Add the necessary content without focusing too much on colours, branding, and other aesthetics. Initially, you are creating a low-fidelity prototype.
¶ Do's & Don't
Do's
- Use simple, intuitive wording to instruct calls to action.
- Follow usability conventions such as making the customer read or scroll from top to bottom.
- If you want to reach high fidelity, add more details to the wireframes to make them look more realistic. You can also link them and make them clickable for an authentic, interactive experience.
¶ Tools needed
- Virtual tool to draft wireframes (e.g., Keynote, PowerPoint, Figma) or websites and software (e.g., wix.com)
- Storyboard sketches
¶ Example
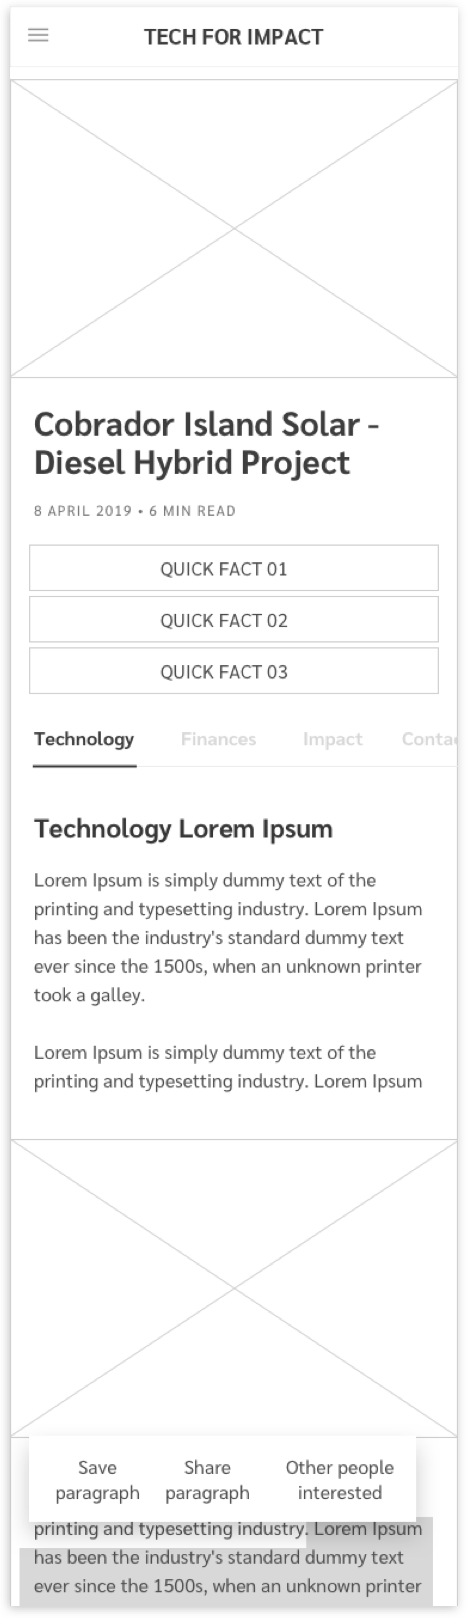

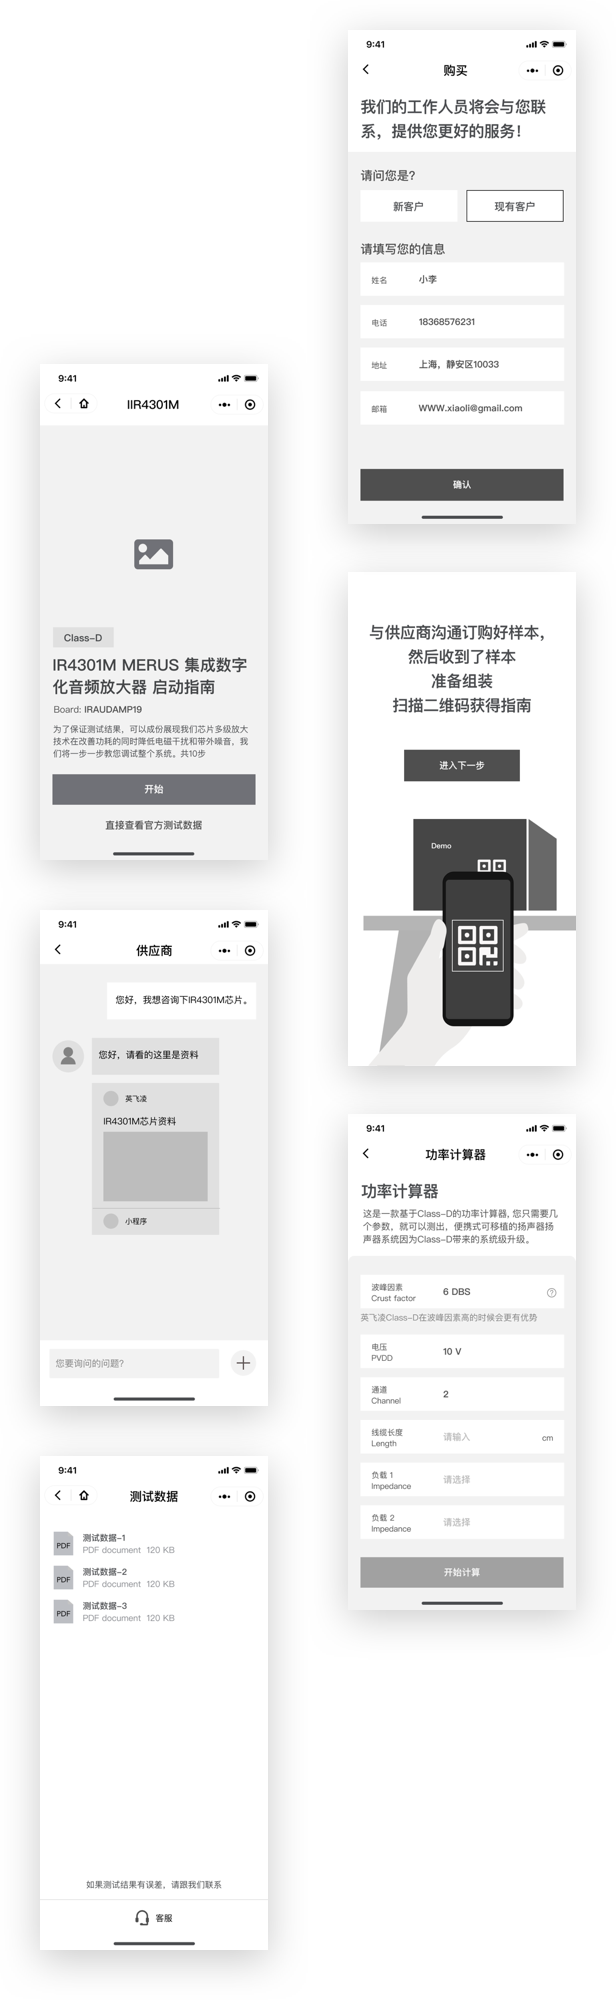
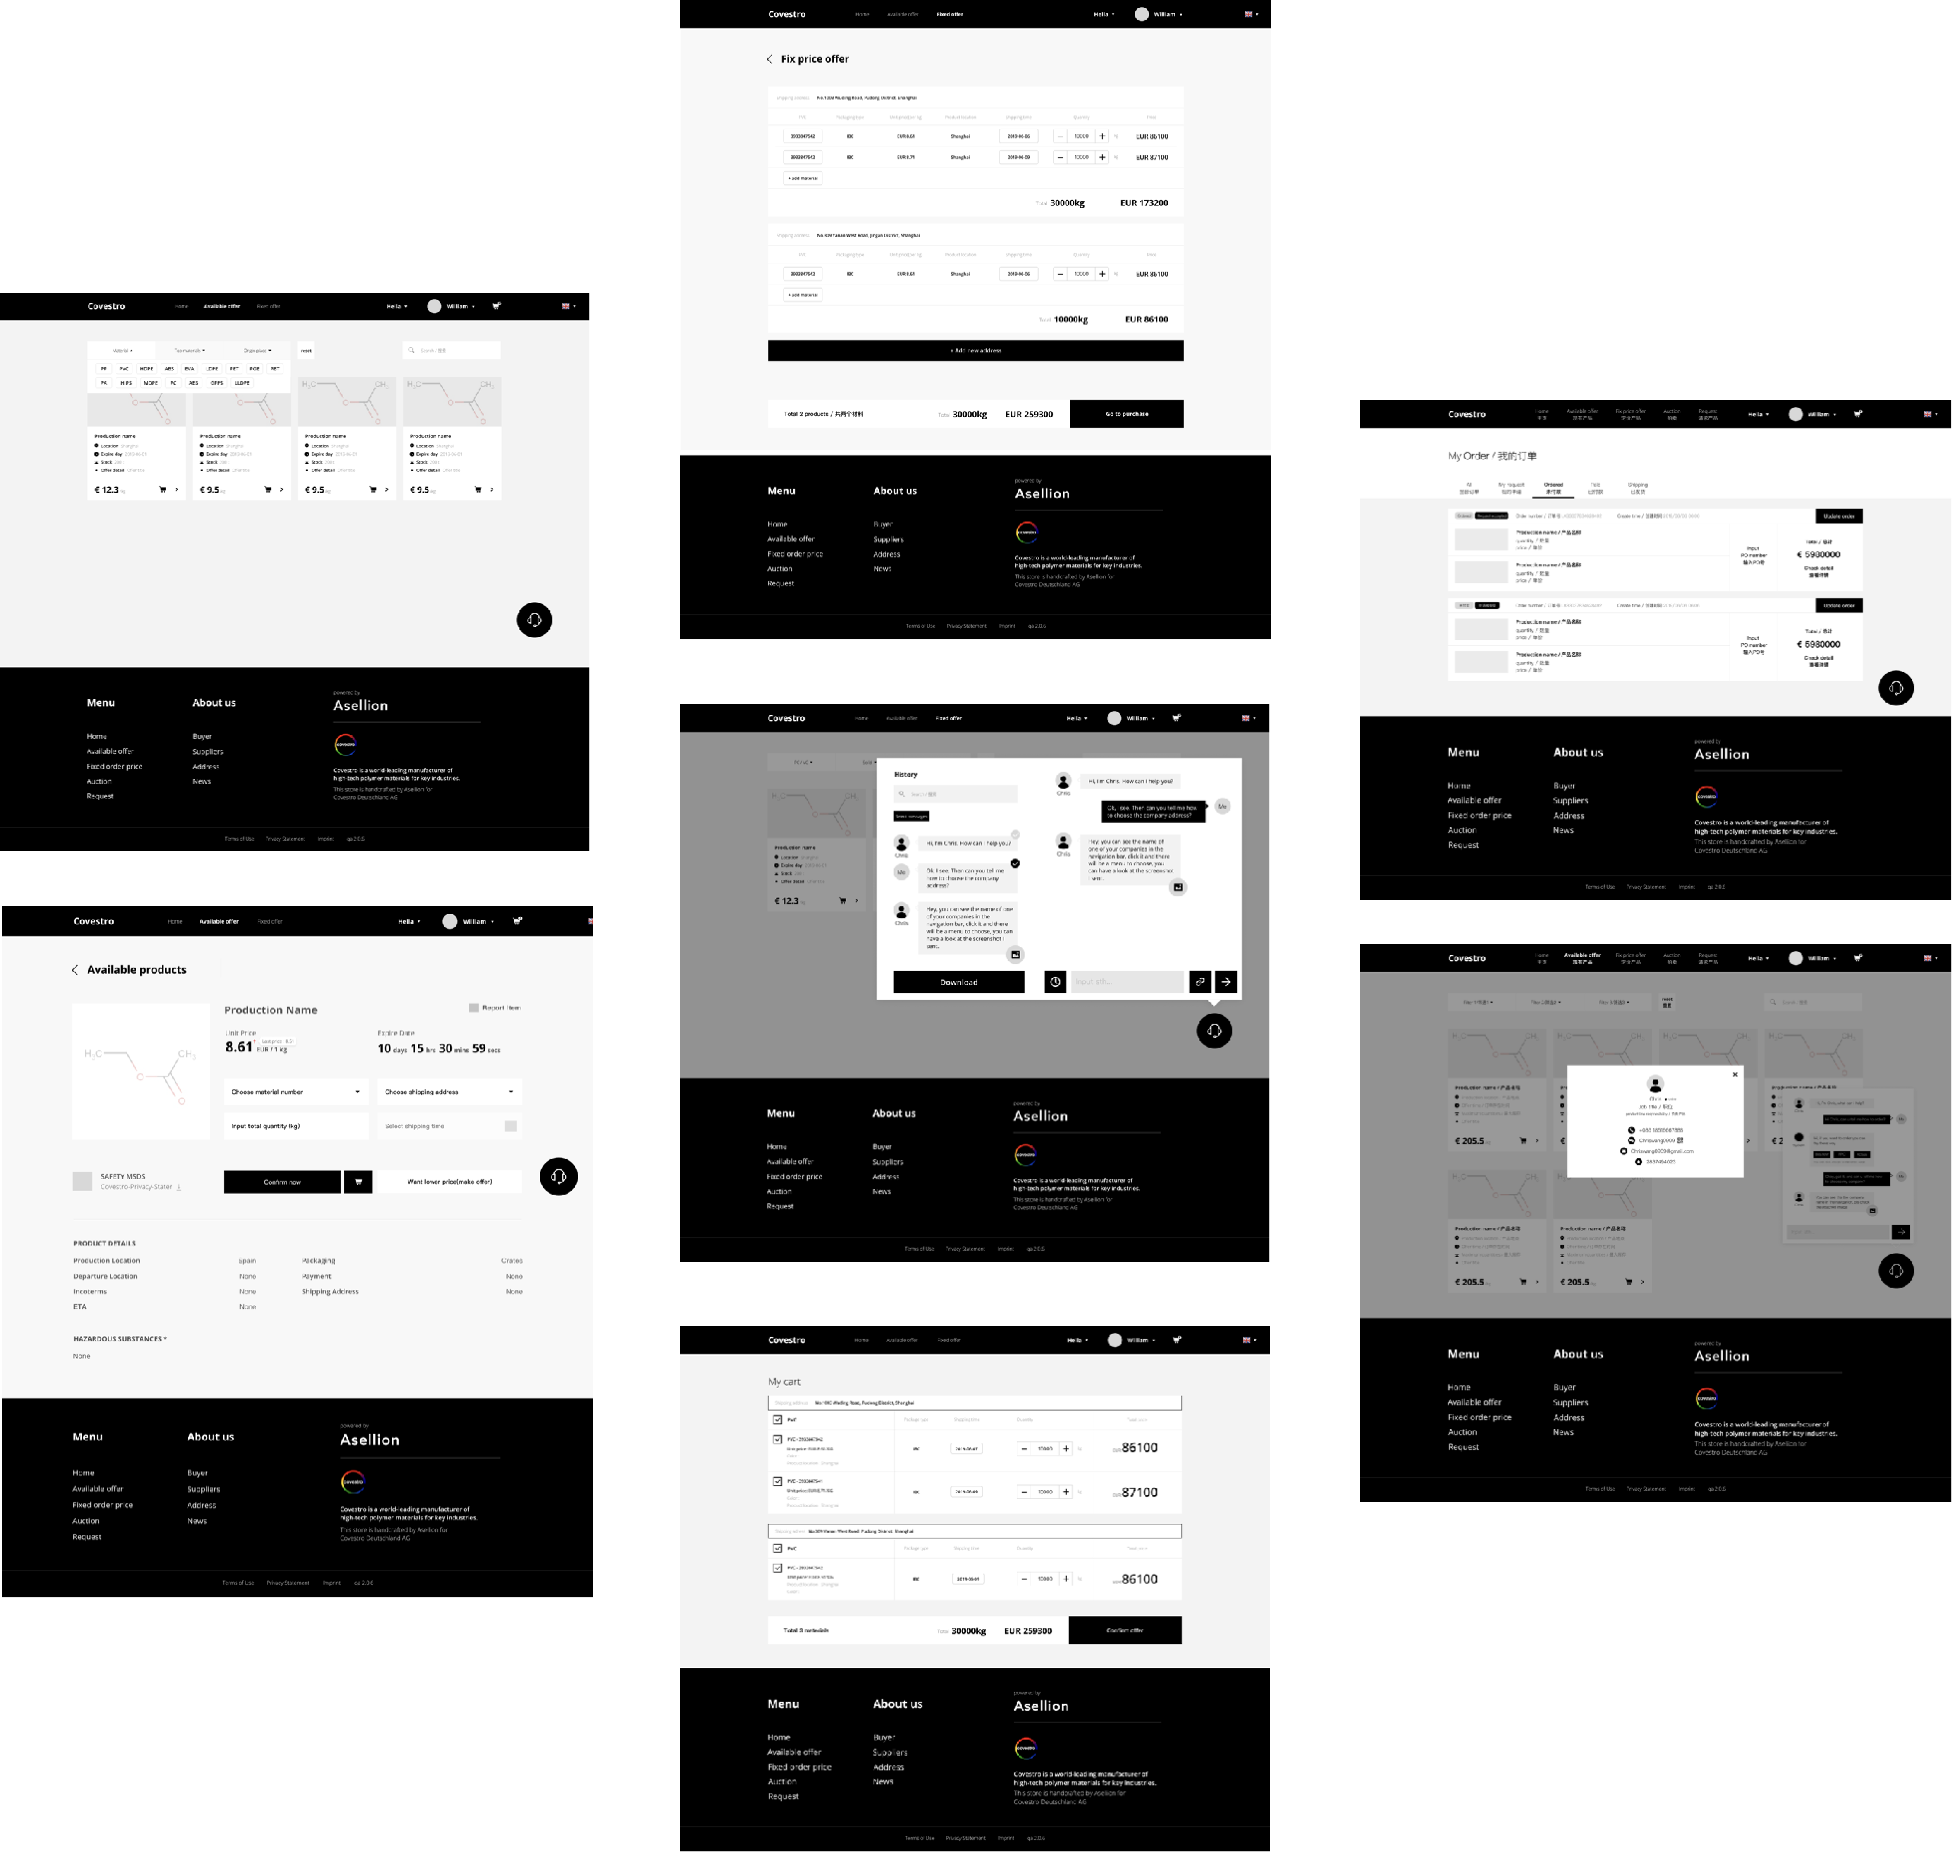
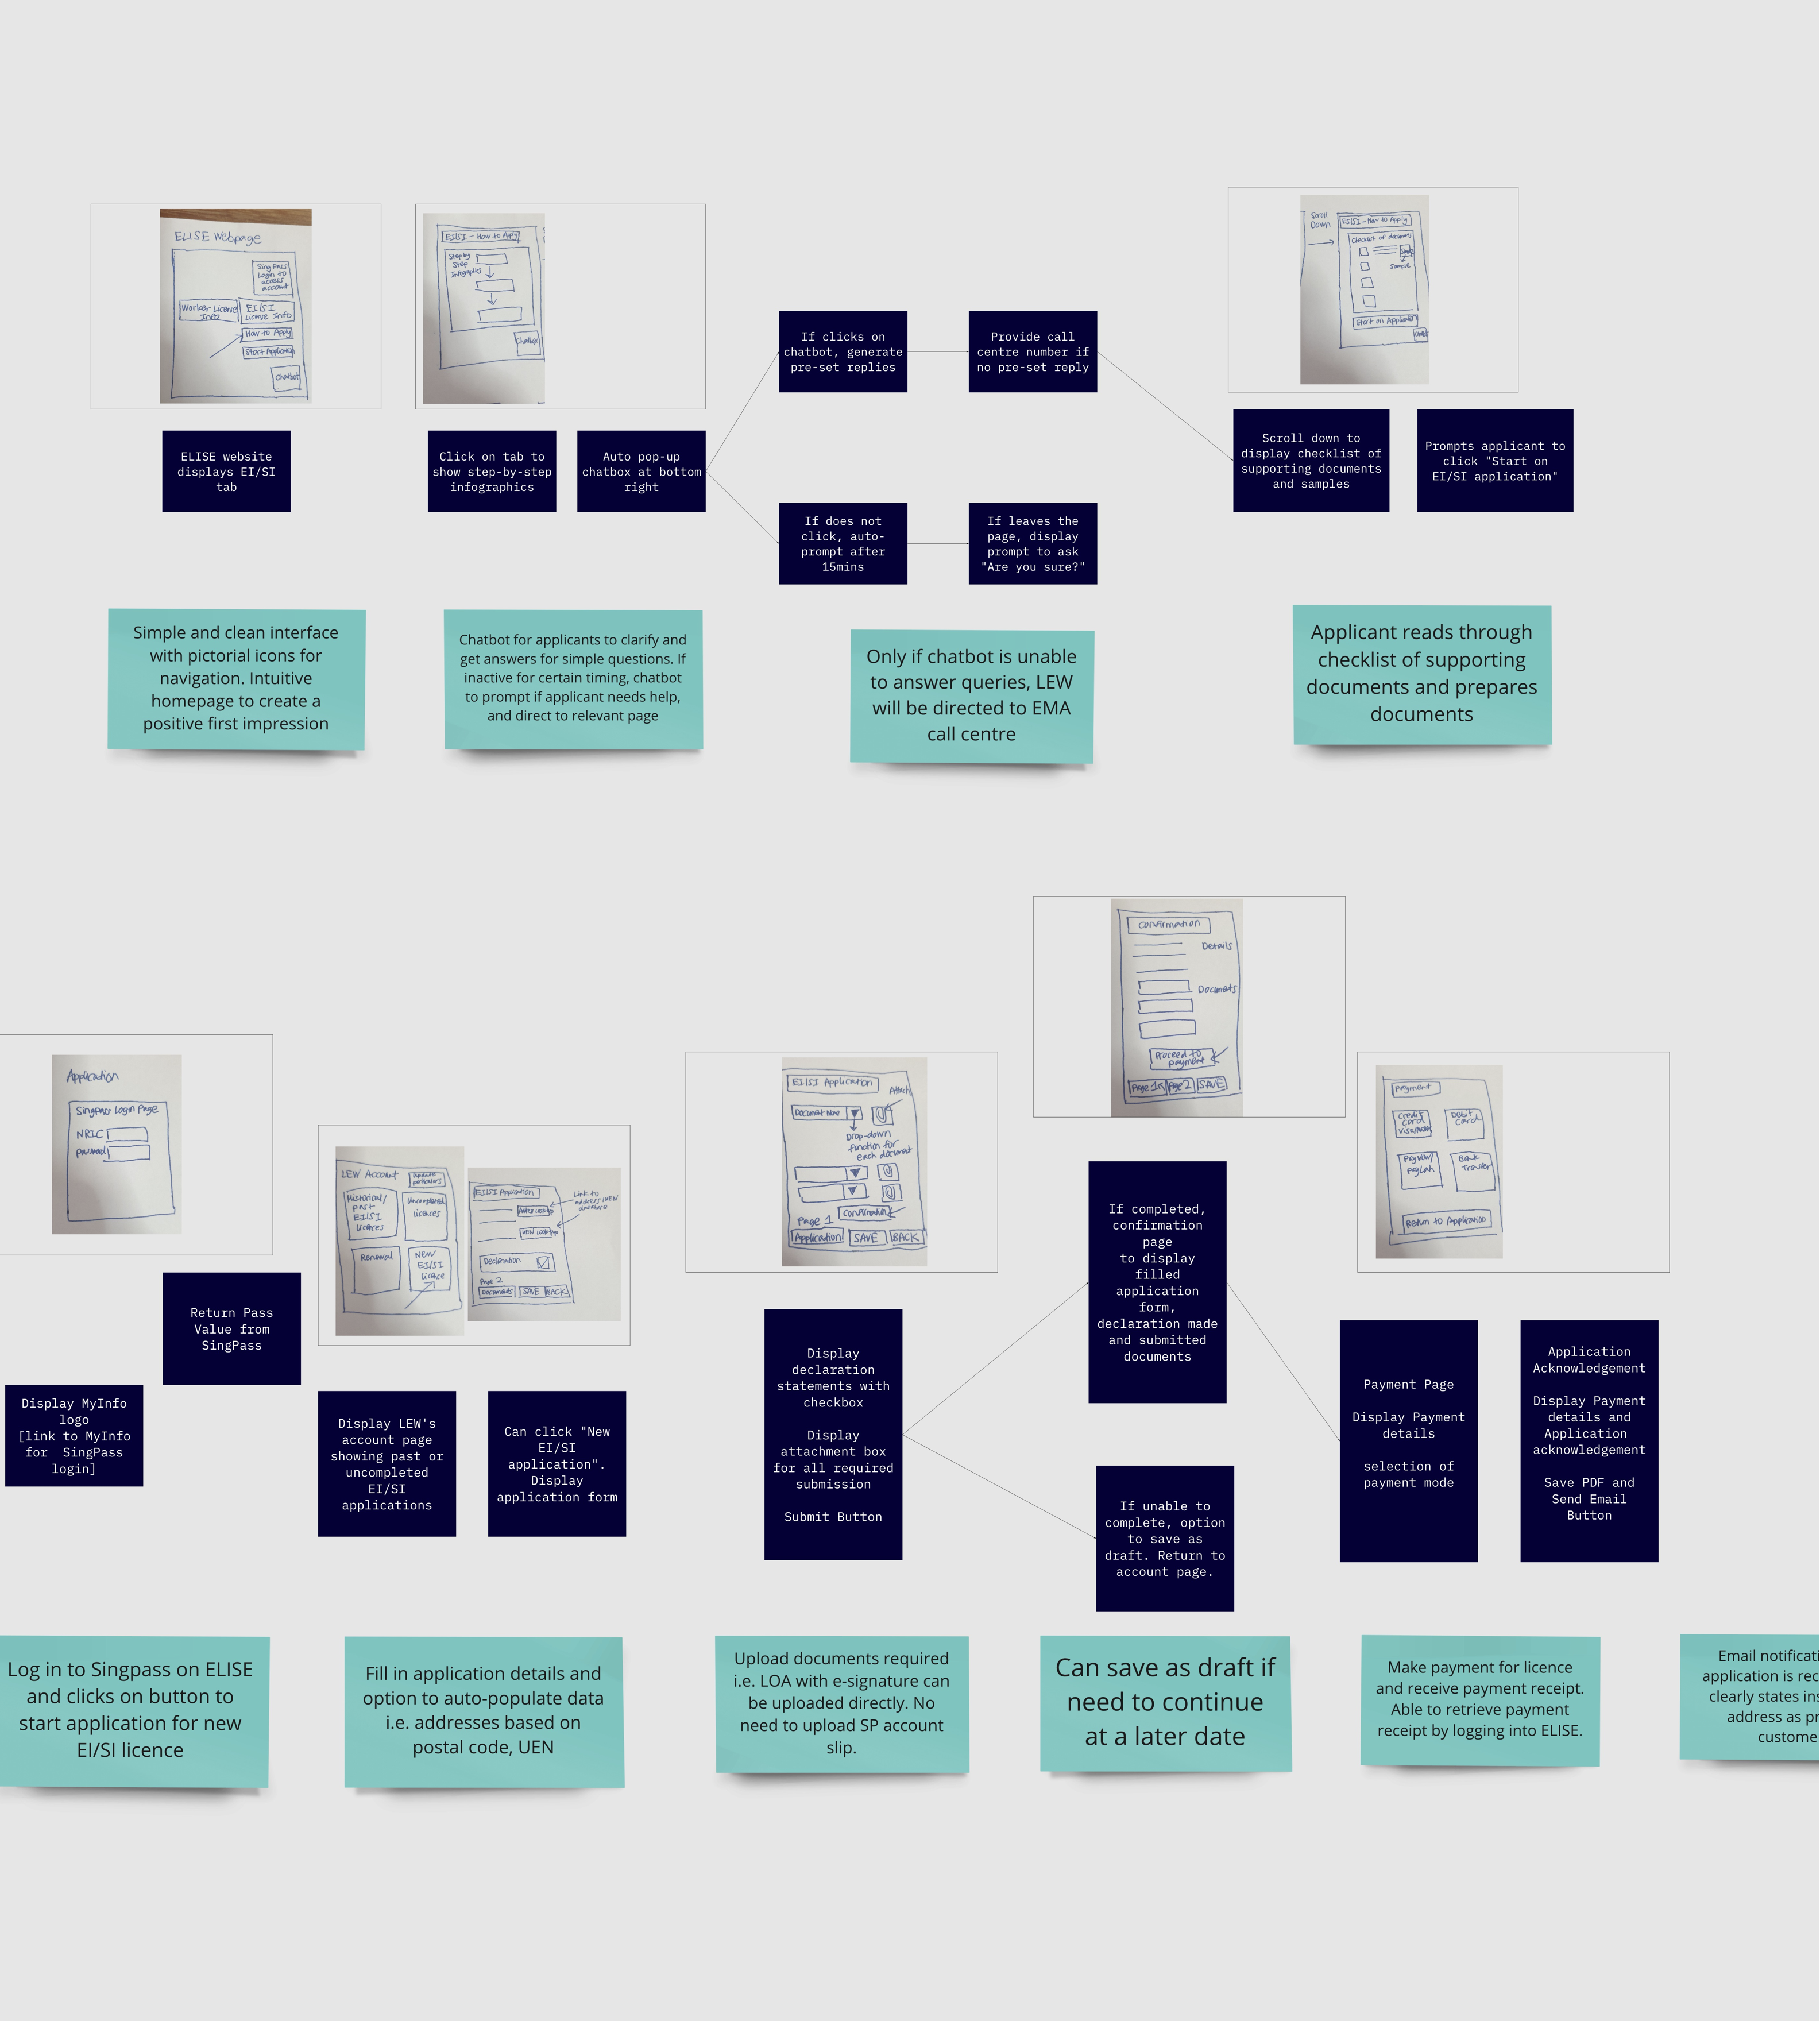
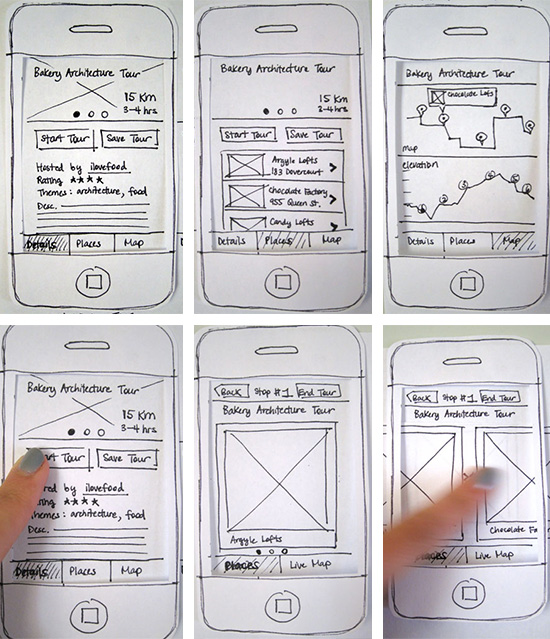
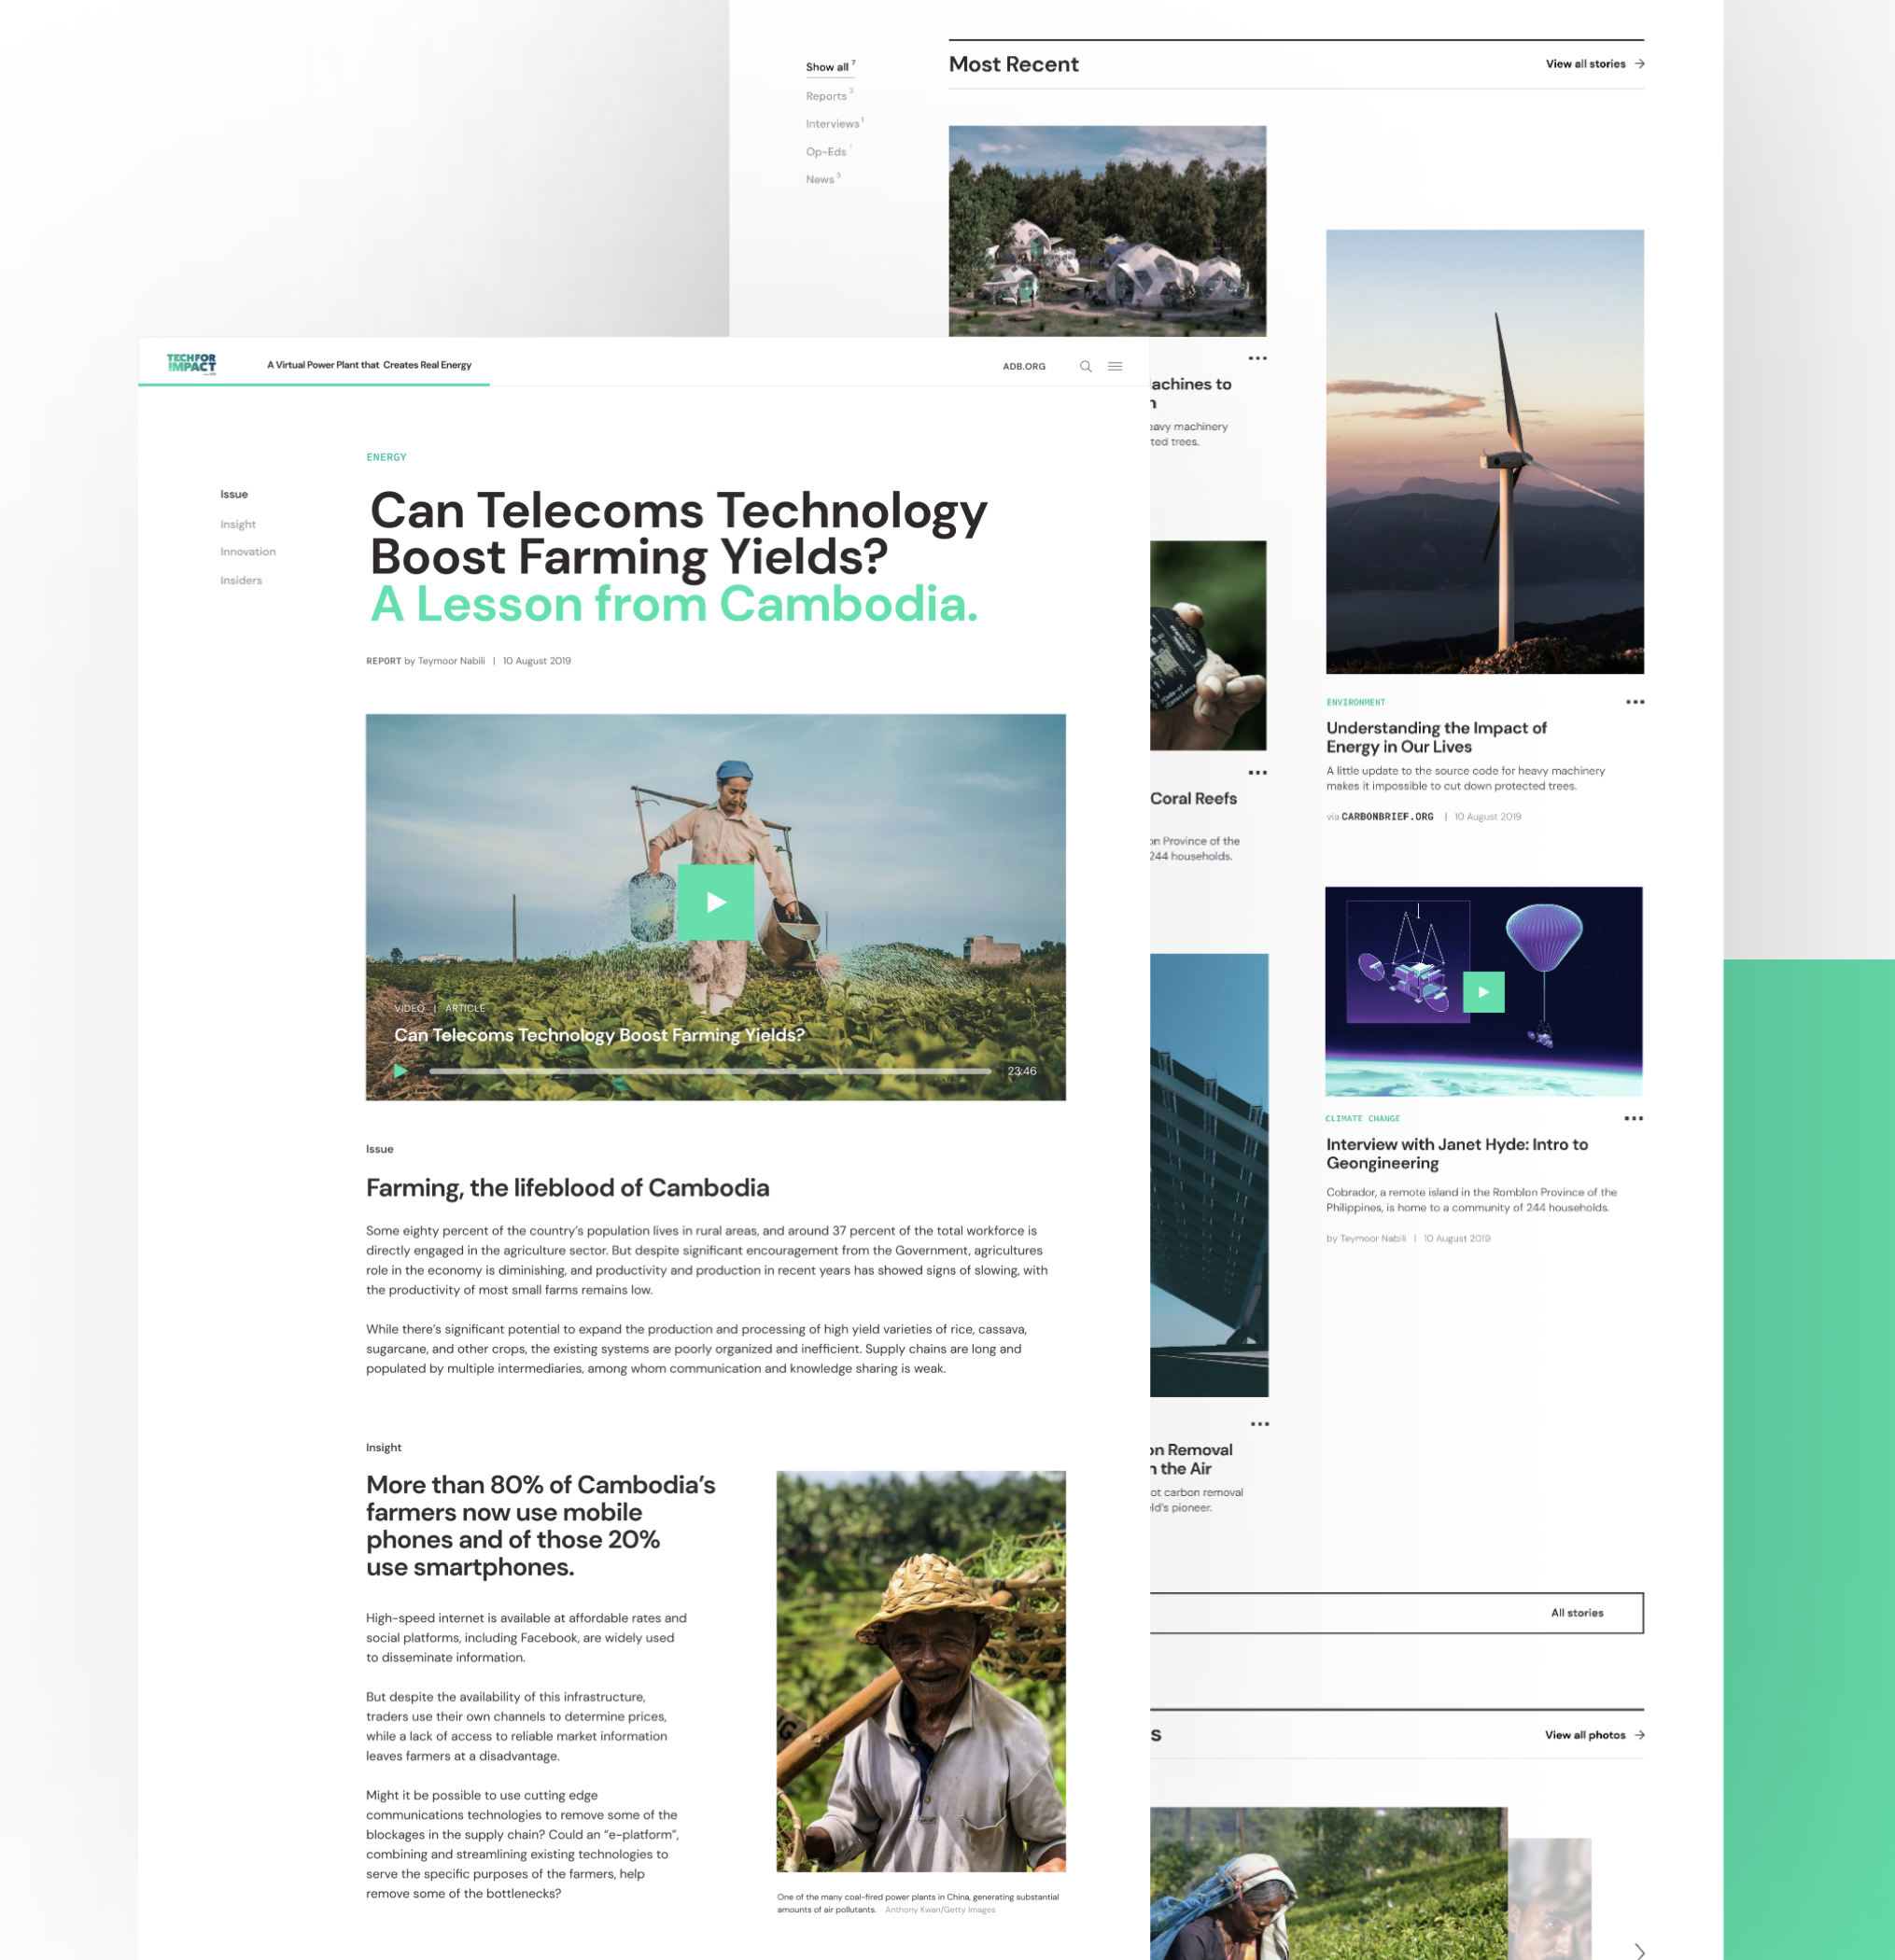
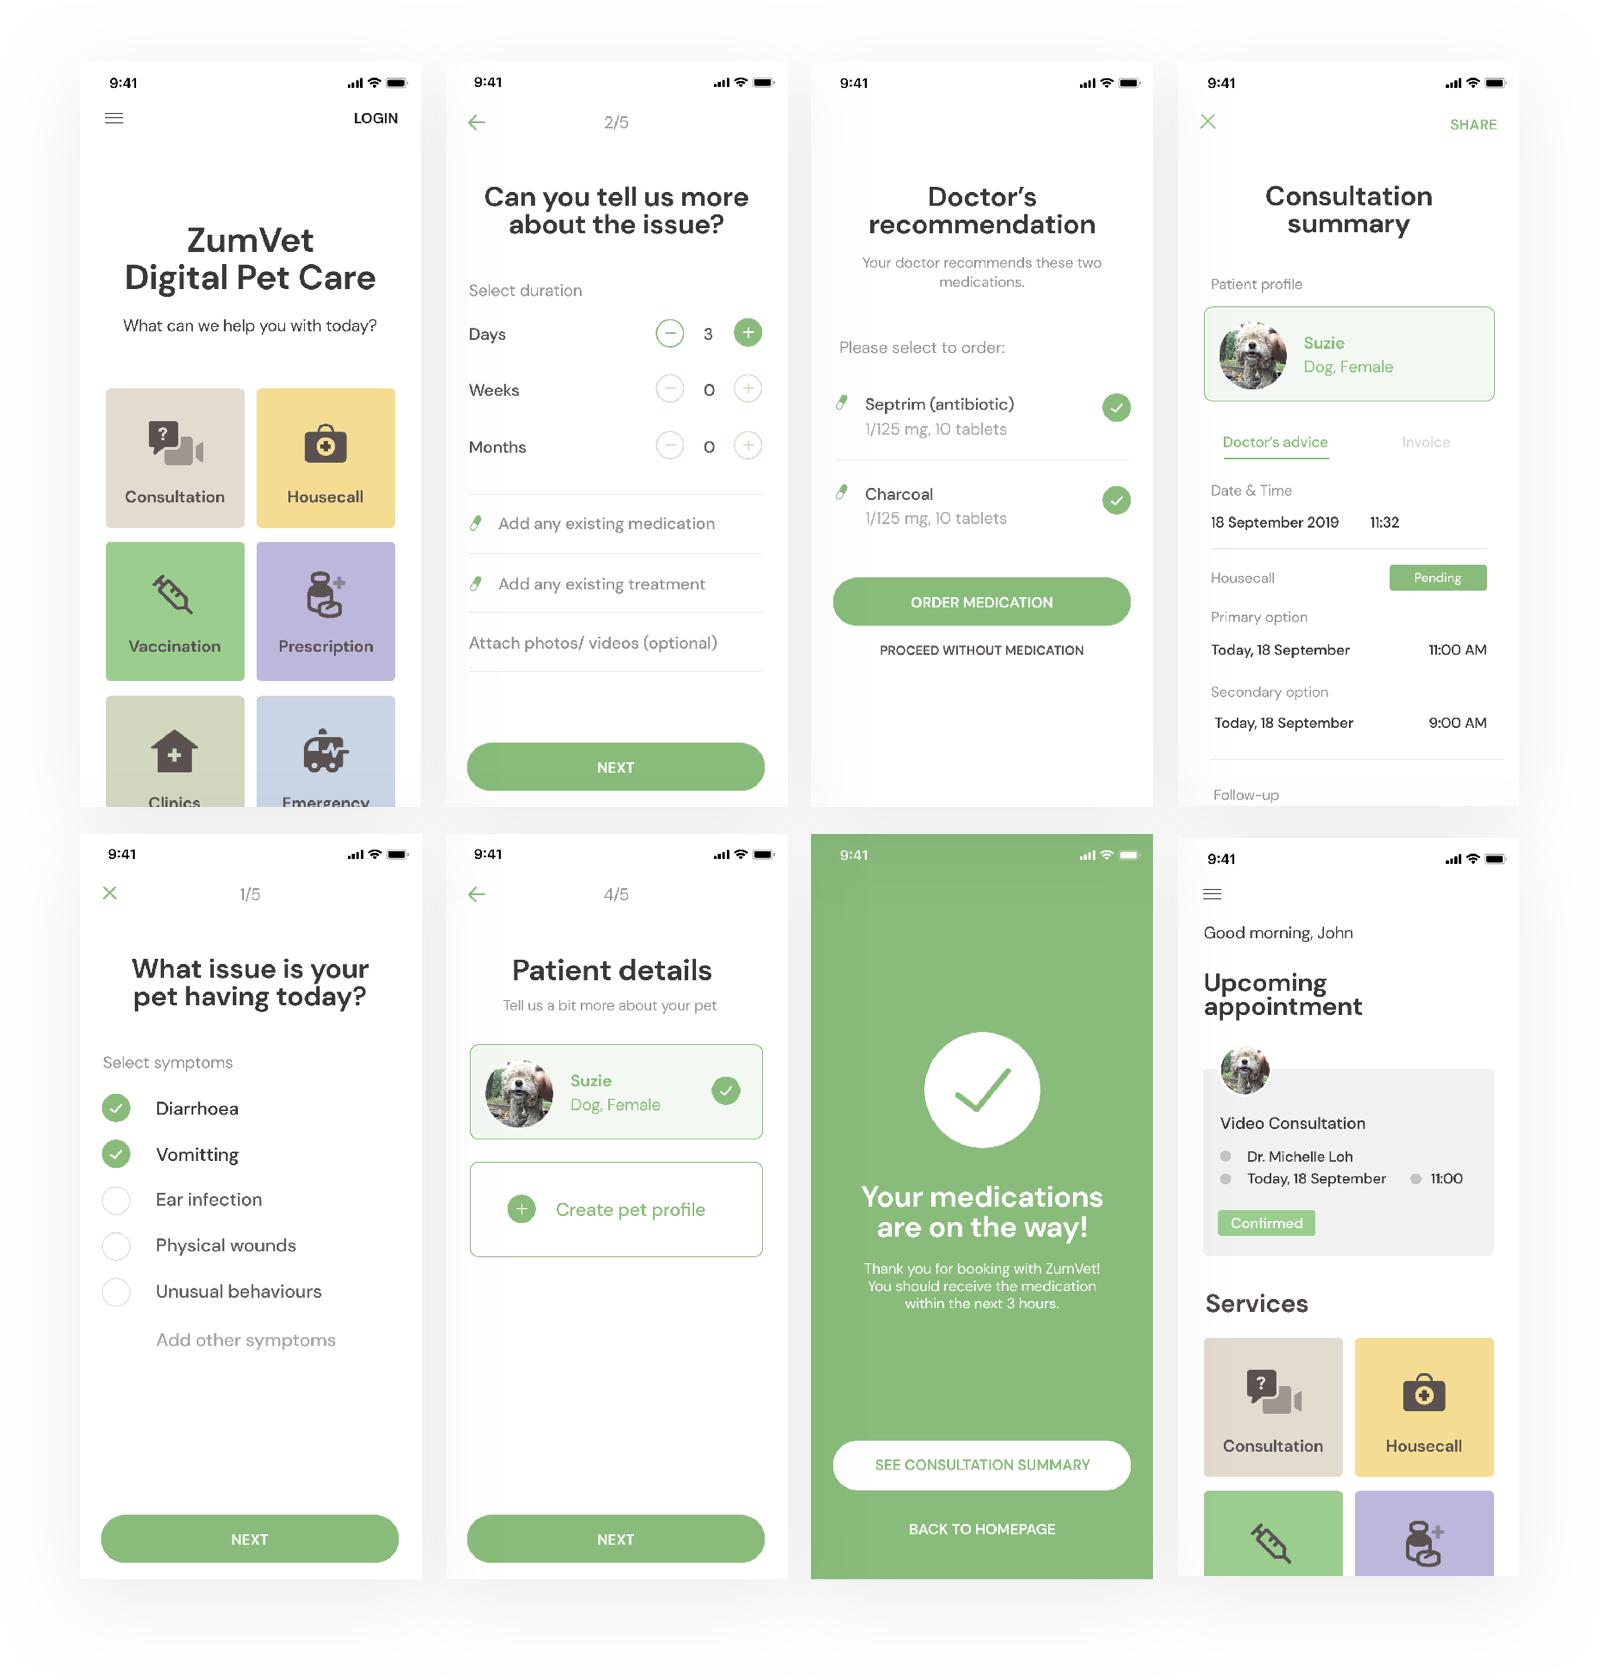
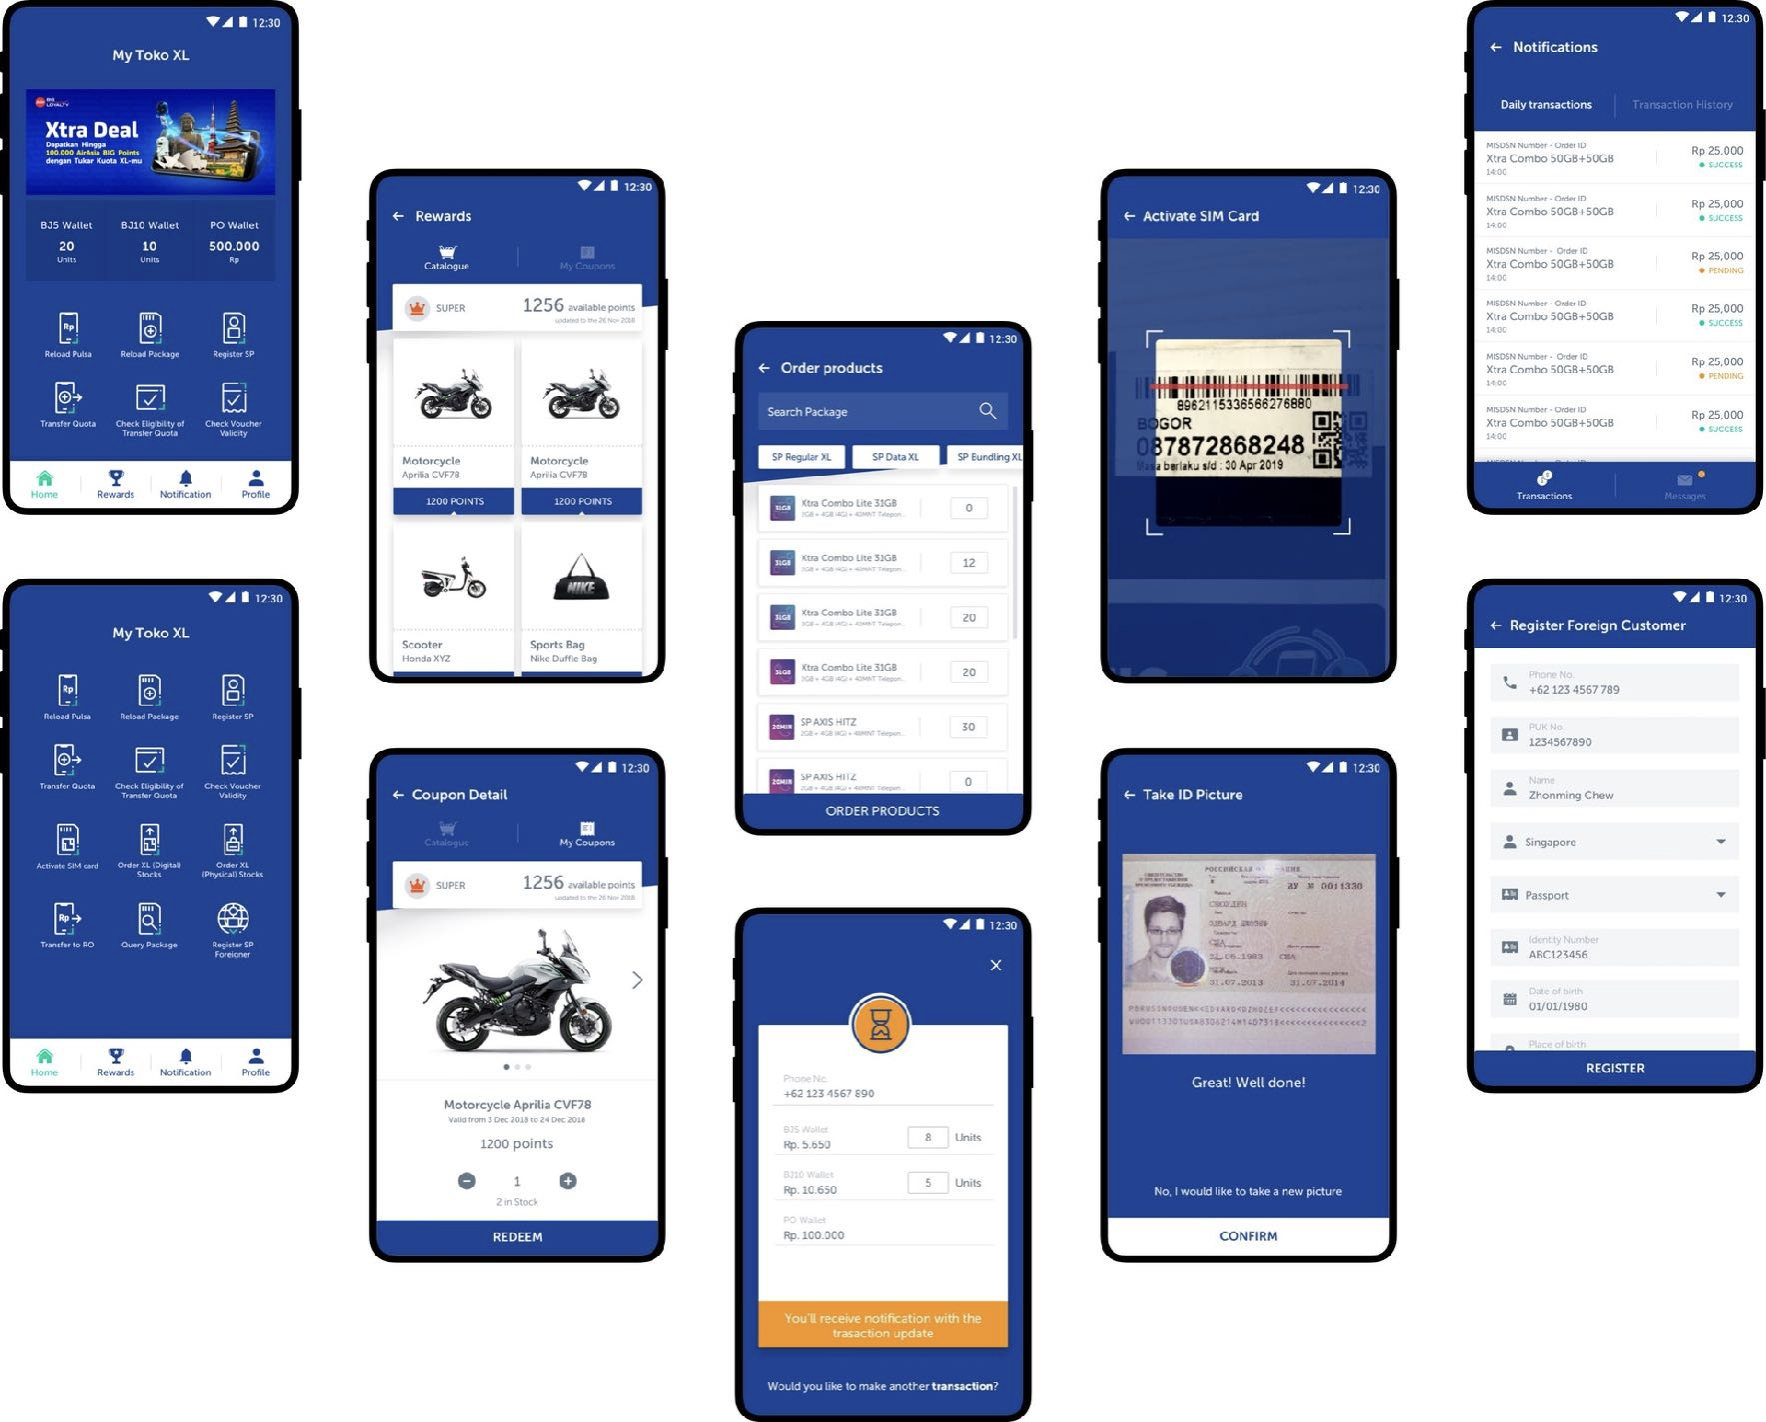
¶ Screen Prototype
¶ What it is
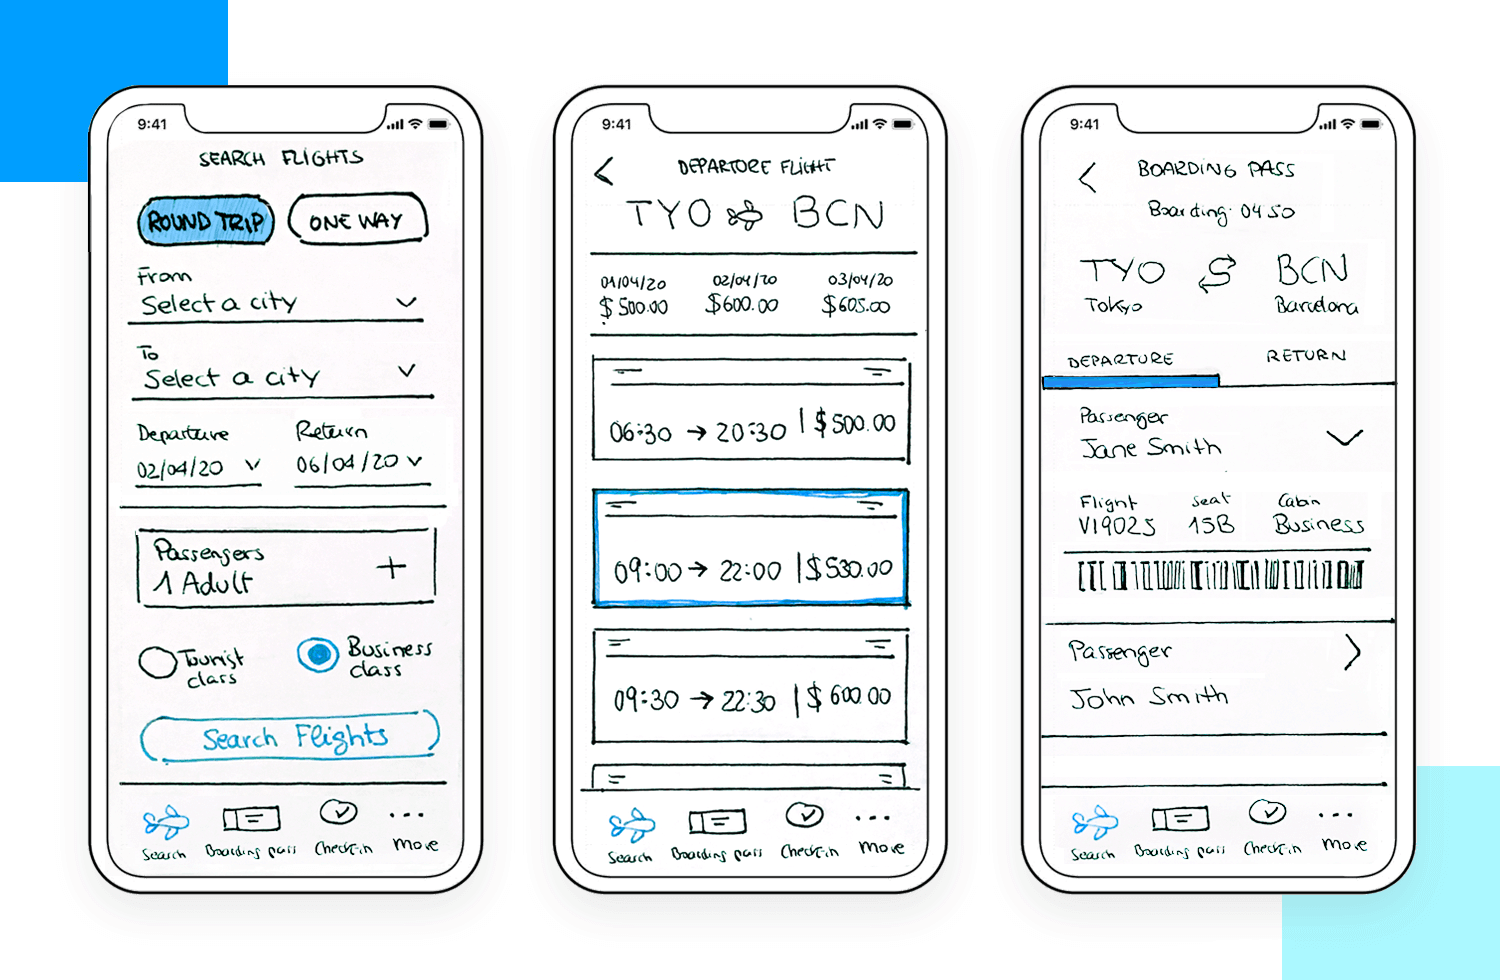
A Screen Prototype visually demonstrates a customer's interactions when going through a digital service. It consists of a sequence of designed screens, which are layouts of digital interfaces. The screens focus on each touchpoint's general form, content, and functionalities rather than on granular design details.
¶ Why it is useful
The Screen Prototype conceptually structures your service, puts together the pieces of each touchpoint, and displays the content presented to the customer in each step. By giving a general idea of what the customer interface will look like, a Screen Prototype helps to imagine the customer’s interactions during the service.
¶ When to use it
Use this prototype if your end product or service will be digital. For example, this prototype is most appropriate if your customers interact with a digital interface.
¶ How is it done
- Based on your Storyboard, revisit the aspired customer journey of your service and the assumptions you want to test.
- Discuss how to best get to the Desirability or Viability assumptions you want to test with this higher-fidelity, interactive prototype.
- The UX designers will create the necessary screens in design software, which the team can review to iterate on aspects of it.
- Once the screens and flow are agreed upon, connect the screens in prototyping software into a clickable prototype with which testers can interact.
¶ Do's & Don't
Do's
- Use simple, intuitive wording to instruct calls to action.
- Follow usability conventions such as making the customer read or scroll from top to bottom.
- Try to combine different Desirability and Viability assumptions in your prototypes to test combinations of those in action, which gives you more realistic market feedback.
Don't
- Please don’t make it too complex. Hundreds of screens of the prototype will not help. Instead, focus on the key assumptions to validate.
¶ Tools needed
¶ Example
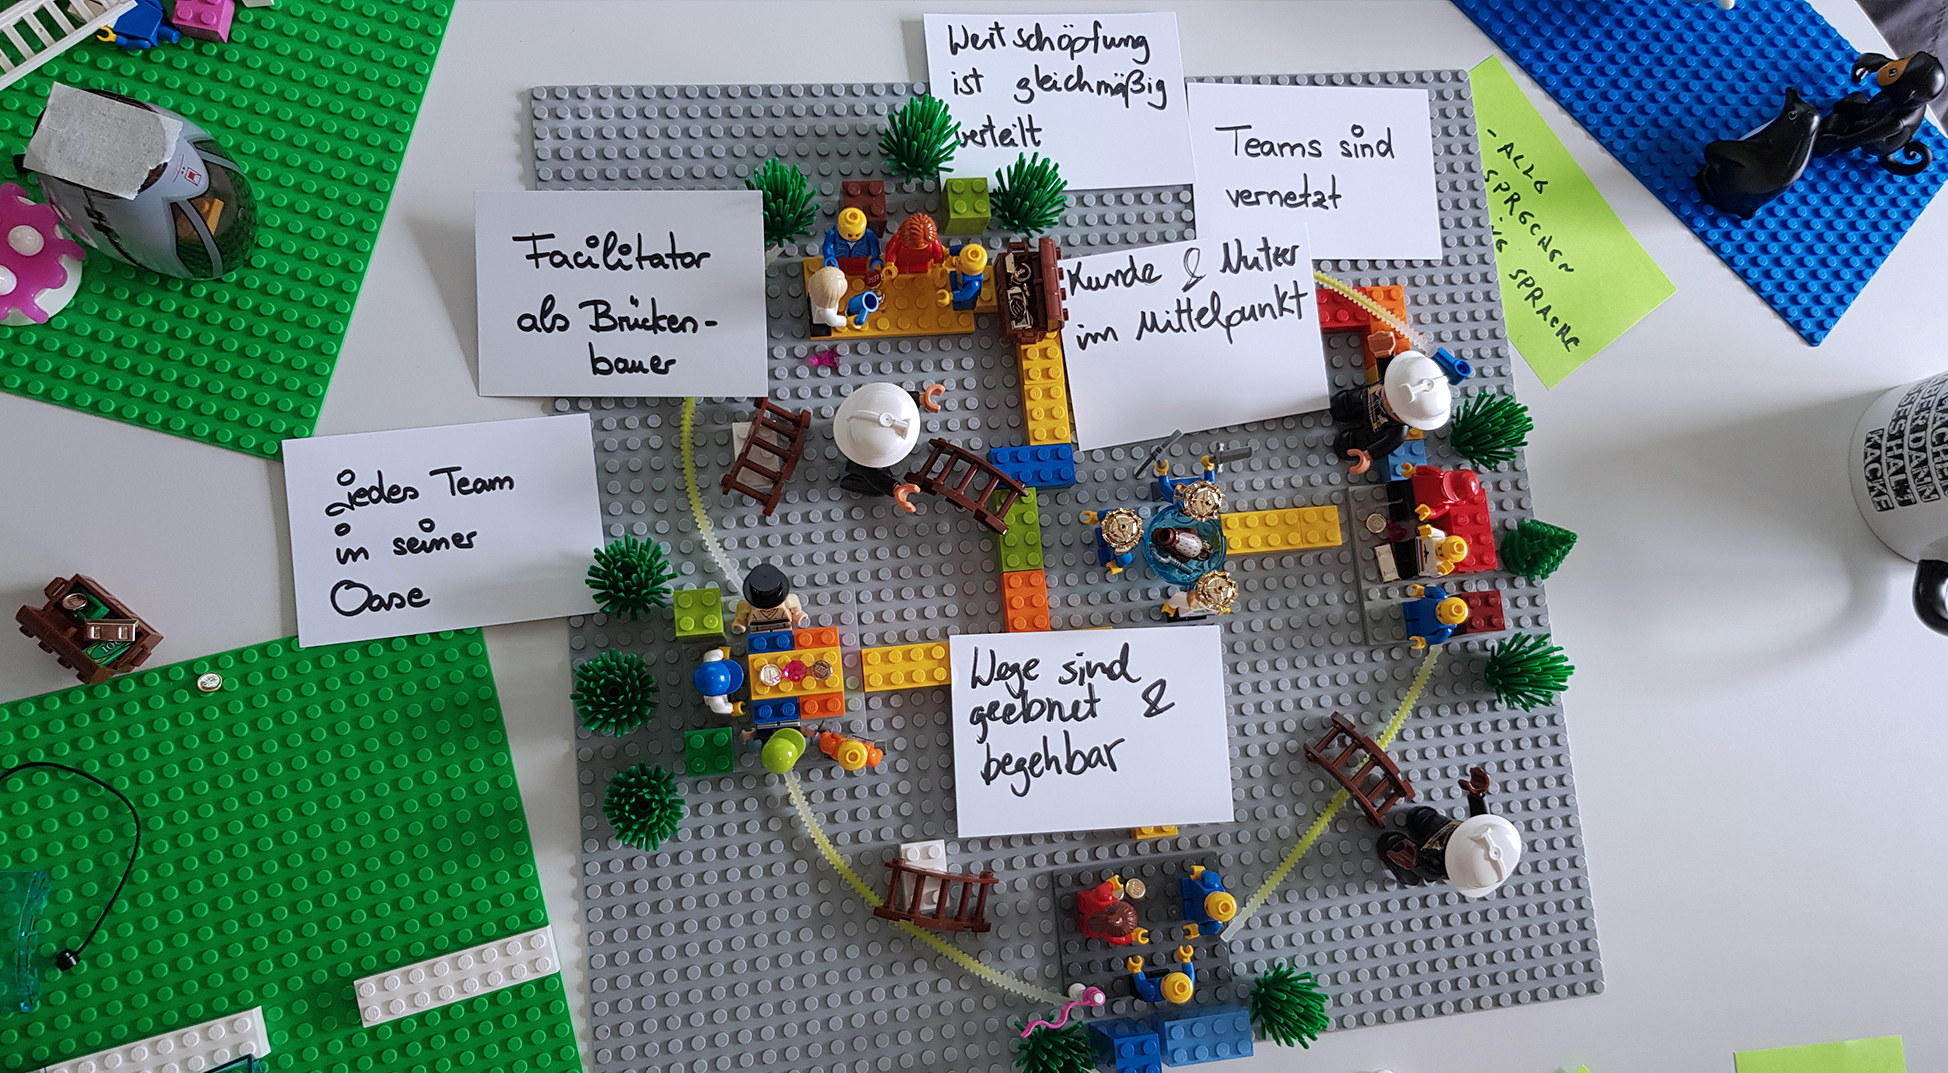
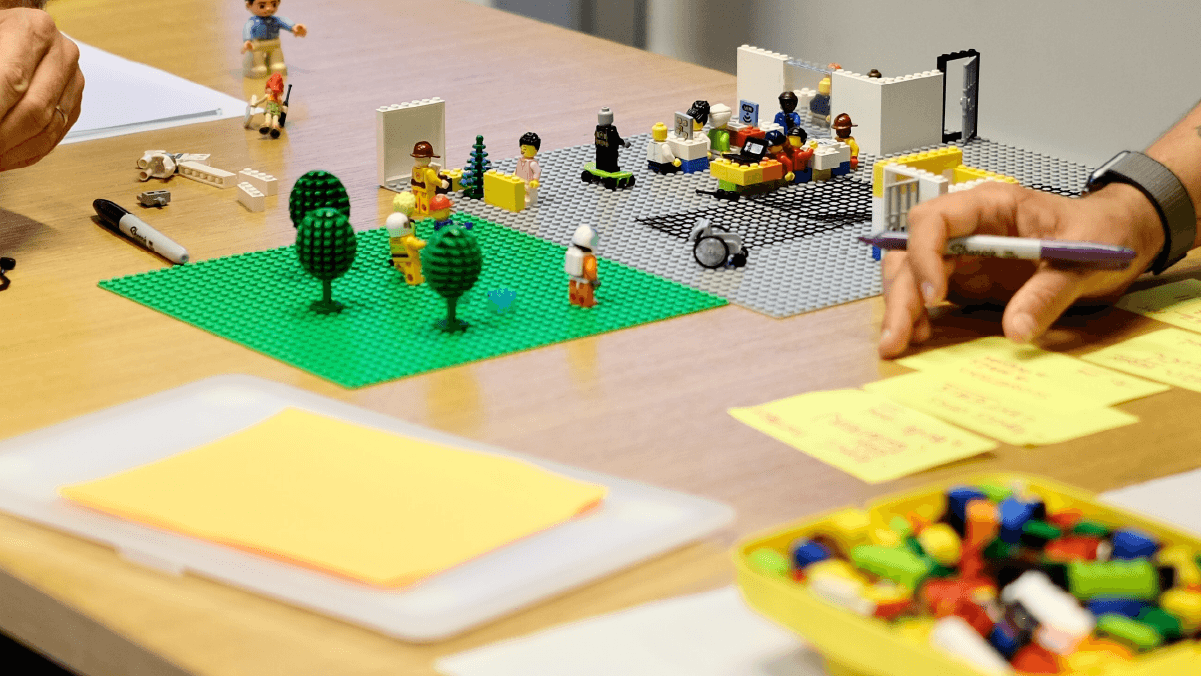
¶ Desktop Walkthrough
¶ What it is
For a Desktop Walkthrough, you build a small-scale 3D model of your service, which can be made from simple tools like Lego figures or Playmobil. Then, you act out a service by moving the figures through the model.
¶ Why it is useful
Desktop Walkthroughs allow you to quickly bring a particular situation of your service journey to life and generate high engagement. You can also quickly iterate on the service by adding details or removing them.
¶ When to use it
You can use a Desktop Walkthrough as a standalone prototype to quickly bring your idea to life without wasting time or resources. Use it to get a playful perspective on your product or service.
¶ How is it done
- Think about a scenario you want to test.
- Build your 3D model, but remember to keep it simple. For example, use lego bricks and label them to build the touchpoint within your journey.
- Add figures which can be based on your Personas and represent staff or your customers.
- Clearly define the roles of each actor.
- Act out the “walkthrough" actions to represent everyday situations by moving the characters around the model and simulating the interactions which might happen.
- Run multiple iterations if necessary. Reflect and document what worked and where the experience was interrupted.
¶ Do's & Don't
Do's
- Ensure an uninterrupted walkthrough so participants can see one idea through without breaks. Even if you have comments in the middle or feel that specific actions need improvement, take notes and discuss your points at the end of the one walkthrough.
- Document the walkthrough by taking notes or photos.
Don't
- Don’t simply move the figures along the model; act out all dialogues and interactions between the actors, devices, etc.
- Don’t teleport - instead, make sure you don’t skip steps and can always track how a person got to a certain point.
¶ Tools needed
- Tools to build the 3D model: scissors, glue, paper, cardboard, and toys
- Paper, pens
- Personas
- Digital camera (optional)
¶ Example
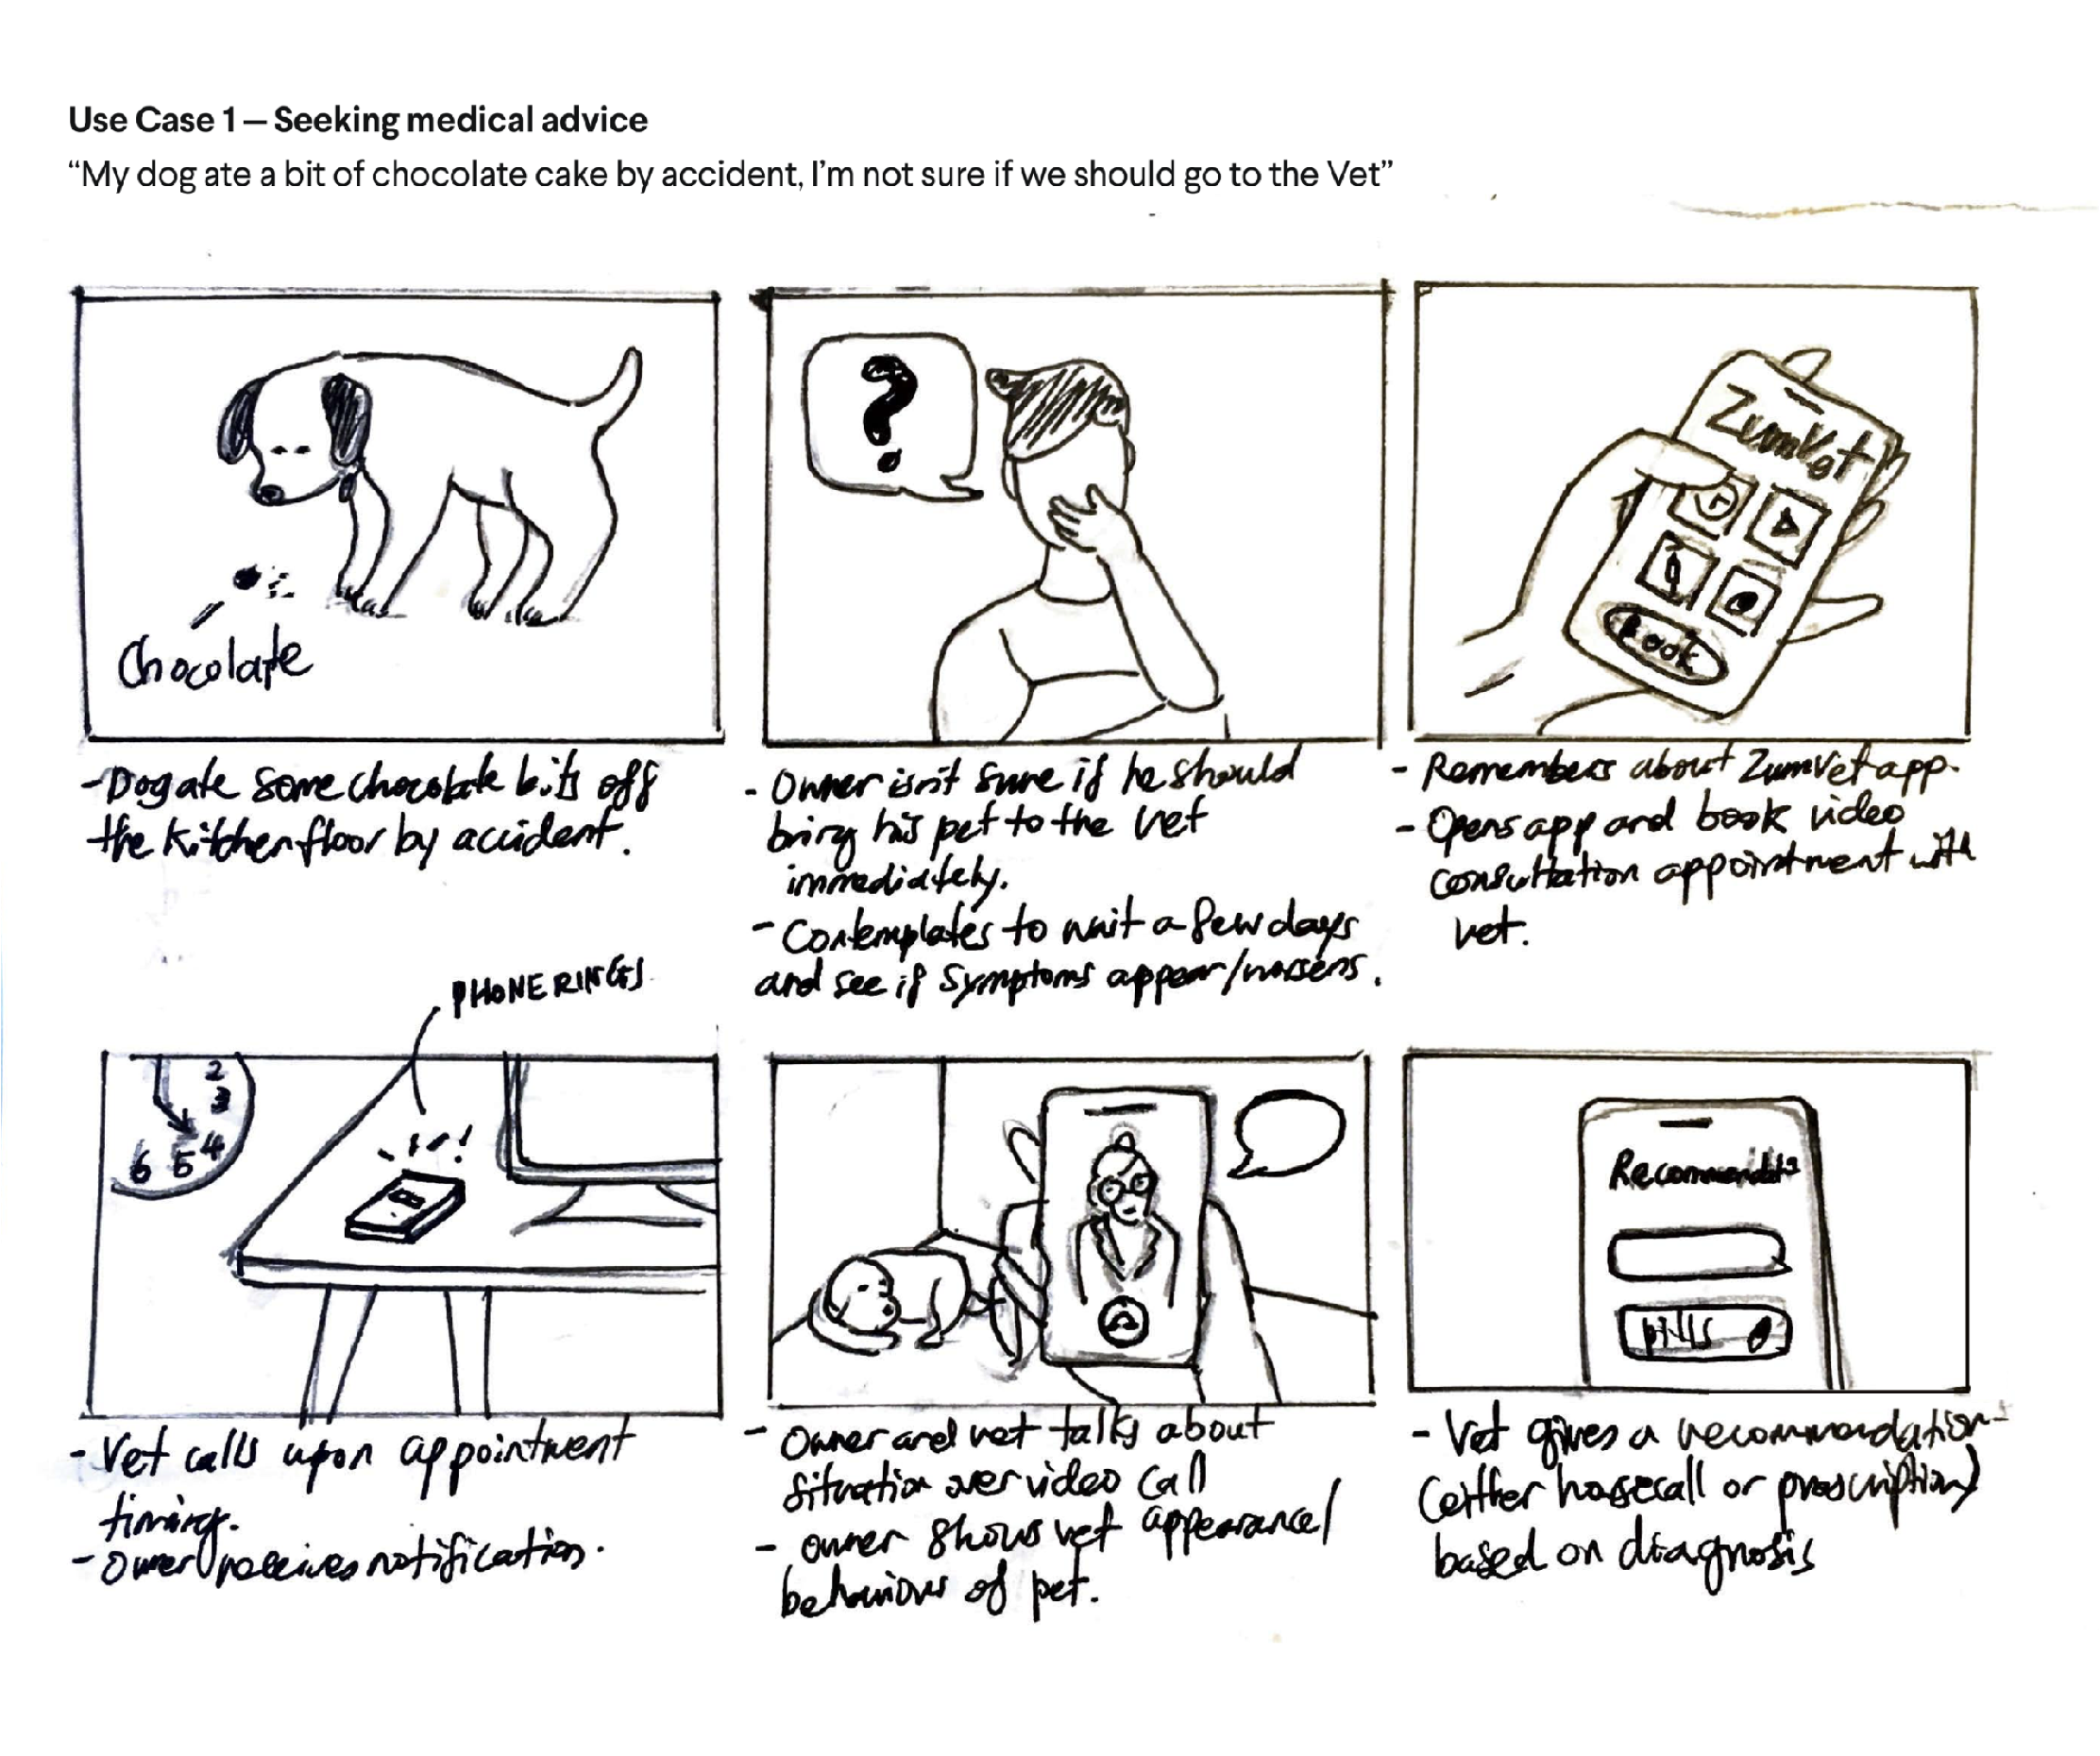
¶ Service Roleplay
¶ What it is
Service Roleplay is the physical acting out of specific scenarios and prototypes. It can involve staff members and customers to simulate the service experience.
¶ Why it is useful
Service Roleplay brings a service to life and gives room for emotions. It allows focusing on body language to gather more subtle information as people are giving feedback and living the service experience.
Members of the project team can also empathise more with the service experience as they have to take the perspective of certain Personas when designing the Service Roleplay.
¶ When to use it
Use the Service Roleplay when your prototype is a service. For example, to simulate the steps the customer would take in the service, it is appropriate to act it out.

¶ How is it done
- Think about a scenario you want to test. For example, you might build up on a previous Storyboard or prototype session and use this as your starting point.
- Understand which roles can be covered by your project team and which roles are reserved for the customers.
- Write a script for the sequence. What does each actor say and do? Do you need a narrator to fill in jumps between scenes or two touchpoints?
- Invite customers and act out the situation together with them.
¶ Do's & Don't
Do's
- It is best to have a safe environment where participants can freely play and share their feedback.
- Consider having a “director” to orchestrate the Roleplay.
- Try to simulate the customer experience as realistically as possible - act out dialogues, and take adequate time for every step as the actual customer would.
- The Service Roleplay could simulate customer support, client service, or customers experiencing the service in a physical space such as a car, a restaurant, etc.
¶ Tools needed
- Physical space and actors
- Storyboard or prototype (optional)
- Accessories to simulate the service (optional)
¶ Example

¶ Video Prototype
¶ What it is
A video prototype shows how your offering will be used or look. It visually presents the service concept by narrating the service journey and displaying persons who act out the service in front of the camera.
¶ Why it is useful
A Video Prototype makes complex offerings easy to grasp and is a simple way to communicate how the new service addresses the customer's pain points. It brings your idea to life and connects the touchpoints into one service experience from the beginning to the end. Furthermore, it’s a portable explanation of your design idea and can be looked at by anyone on your team anytime.
¶ When to use it
You can use a video prototype to explain a product or service in a few minutes. For example, it is helpful when your design team wants to test or communicate a promising idea that is complicated or time-consuming to prototype.
¶ How is it done
- Create an outline and a script for the Video Prototype. What will be shown, and which tasks will be done? Who will do what, when, and how? Do some parts need a narrator to set the stage? You can use your Storyboard as guidance.
- Decide on and gather everything you need to shoot the video (location, camera, actors, materials, etc.).
- Film your service journey as a whole or in sequences.
- Create explanatory graphics and special effects such as on-screen text narratives or transitions if needed.
- Edit the story parts to create one coherent video showing the service journey.
¶ Do's & Don't
Do's
- If you are using audio, ensure the quality is good enough and the actors speak clearly and loudly.
- Make the video self-explanatory: if seeing the tasks performed by actors is not enough, let them speak or add explanatory text fields or special effects so the video transmits your service.
- Show the entire customer journey from the motivation before using the service through using it and successfully reaching the desired outcome in the end.
¶ Tools needed
- Storyboard
- Video camera and tool to edit the video
- Actors
- Accessories to simulate the service, e.g., tablet used by the customer (optional)
¶ Example
¶ Landing Pages
¶ What it is
Landing Pages are an experiment tool in which the team creates a website that goes live on the internet, typically with a website builder, which mainly consists of the main page that focuses on messaging around the product or service on offer. By putting it live on the internet and driving traffic to it, the team can observe how customers that find the website behaves - e.g., whether they read, whether they follow a call-to-action (like sign-up), etc. by looking at the analytics of the page.
¶ Why it is useful
Landing page tests are a form of unobserved tests where customers come across and interact with an experiment on their own time and without an observer. This can yield more authentic reactions. Further, seeing how people interact with the messaging and CTA on their own time gives a clue into what they value and whether they find a proposition interesting.
¶ When to use it
Landing page experiments are great for evaluating the Desirability and partial also Viability of a new offering on the value proposition level, as they focus on messaging.
¶ How is it done
- Review the Desirability and Viability assumption(s) you should test with a landing page and discuss how to best bring those out in the structure and messaging of a website.
- Use a website creation tool (e.g., Webflow) to create the landing page, focusing on clear, concise messaging and CTAs.
- Test the landing page with some people not involved in the project to ensure the messaging is clear and people understand what you are trying to offer.
- Purchase a domain (typically also through the website builder) and publish the site online. Ensure you have analytics running on the page that tell you at least the bounce rates, click-through rates, CTA clicks, and other essential variables.
- Drive traffic to it through SEO, search ads, or by promoting it in groups or forums.
¶ Do's & Don't
Do's
- Please focus on the value proposition of the offering and message very clearly to ensure customers visiting the site know what you are trying to do for them.
- Keep CTAs simple, such as email sign-ups or inquiry forms. Nothing too complex that might scare customers off.
- Make it feel like a real service, not an experiment.
Don't
- Keep the page concise - don’t make customers scroll through too much content, or they might get bored and leave.
- If you have multiple ideas for the value proposition of a concept, don’t try to cram them all into one page. Instead, there might be value in creating various landing pages to test them separately and compare their appeal.
¶ Tools needed
¶ Example
¶ Sales Decks
¶ What it is
Sales Decks highlight the value proposition of an offering by walking the potential customer through the pains they are addressing and the gains they are creating. This can take the form of small brochures or longer PDF sales pitches, depending on the concept and audience.
¶ Why it is useful
In the real world, once launched, the offering will need to be sold to customers. Sales decks are a fast and straightforward way of testing whether a pitch resonates by spelling it out and pitching potential customers. Based on their reaction, you will understand whether they are interested or not or which aspects interest them the most.
¶ When to use it
Sales decks are compelling for more complex B2B products, where often the buyers and influencers for a decision differ from the actual users. So pitching different parts of the decision-making cycle with other messages, you will see where work is left to strengthen the concept.
¶ How is it done
- Review the Value Proposition Canvas of the concept you are trying to test and the key assumptions you are trying to test.
- Create a document in the frame of mind of trying to sell the product or service to a customer, which explains the benefits of the offering to the customer.
- Iterate within the team and get some uninvolved outsiders to read the document and listen to the pitch to ensure the clarity of the language and pitch.
- Use the document to share with potential customers or pitch to customers of the right target audience and get feedback from them.
¶ Do's & Don't
Do's
- Describe the service or product realistically, making customers feel like this is a real offering and not just a test.
- Include visuals, where possible, to increase the feeling of realism.
Don't
- Don’t pitch the product's final, ultimate, or best version, which takes five years to produce. Instead, pitch the MVP you have in mind.
¶ Tools needed
- Value Proposition Canvas
- Experimentation Board
- Slide Creation Software (like PPT or Keynote)
¶ Example
¶ Surveys for Validation
¶ What it is
A Survey is a predetermined set of questions sent out to research participants in a (typically virtual) document or form. Questions are standardised and often include Yes/ No or quantifiable questions.
¶ Why it is useful
By asking multiple people the same questions, you can generalise the insights collected and quickly gather information about your sample customer group, their opinions, and trends. In addition, surveys do not have to be executed in person and can be analysed using digital tools. Therefore, they help add some quantitative data to your insights without the significant time commitment.
¶ When to use it
Use surveys if you are seeking reliable, factual (as the customer said) data in a reasonably quick time and affordable budget. More so, use surveys when you draw relationships among questions, customer types, or categories also if you are seeking quantitative data to have a statistical basis for inferences. On the other hand, do not use surveys if you desire a deeper understanding of a situation or future scenario.

¶ How is it done
- Select a customer group that you want to survey. Then, decide which areas you want to learn about. Your Survey questions should serve to understand the customers' background and answer your research questions.
-
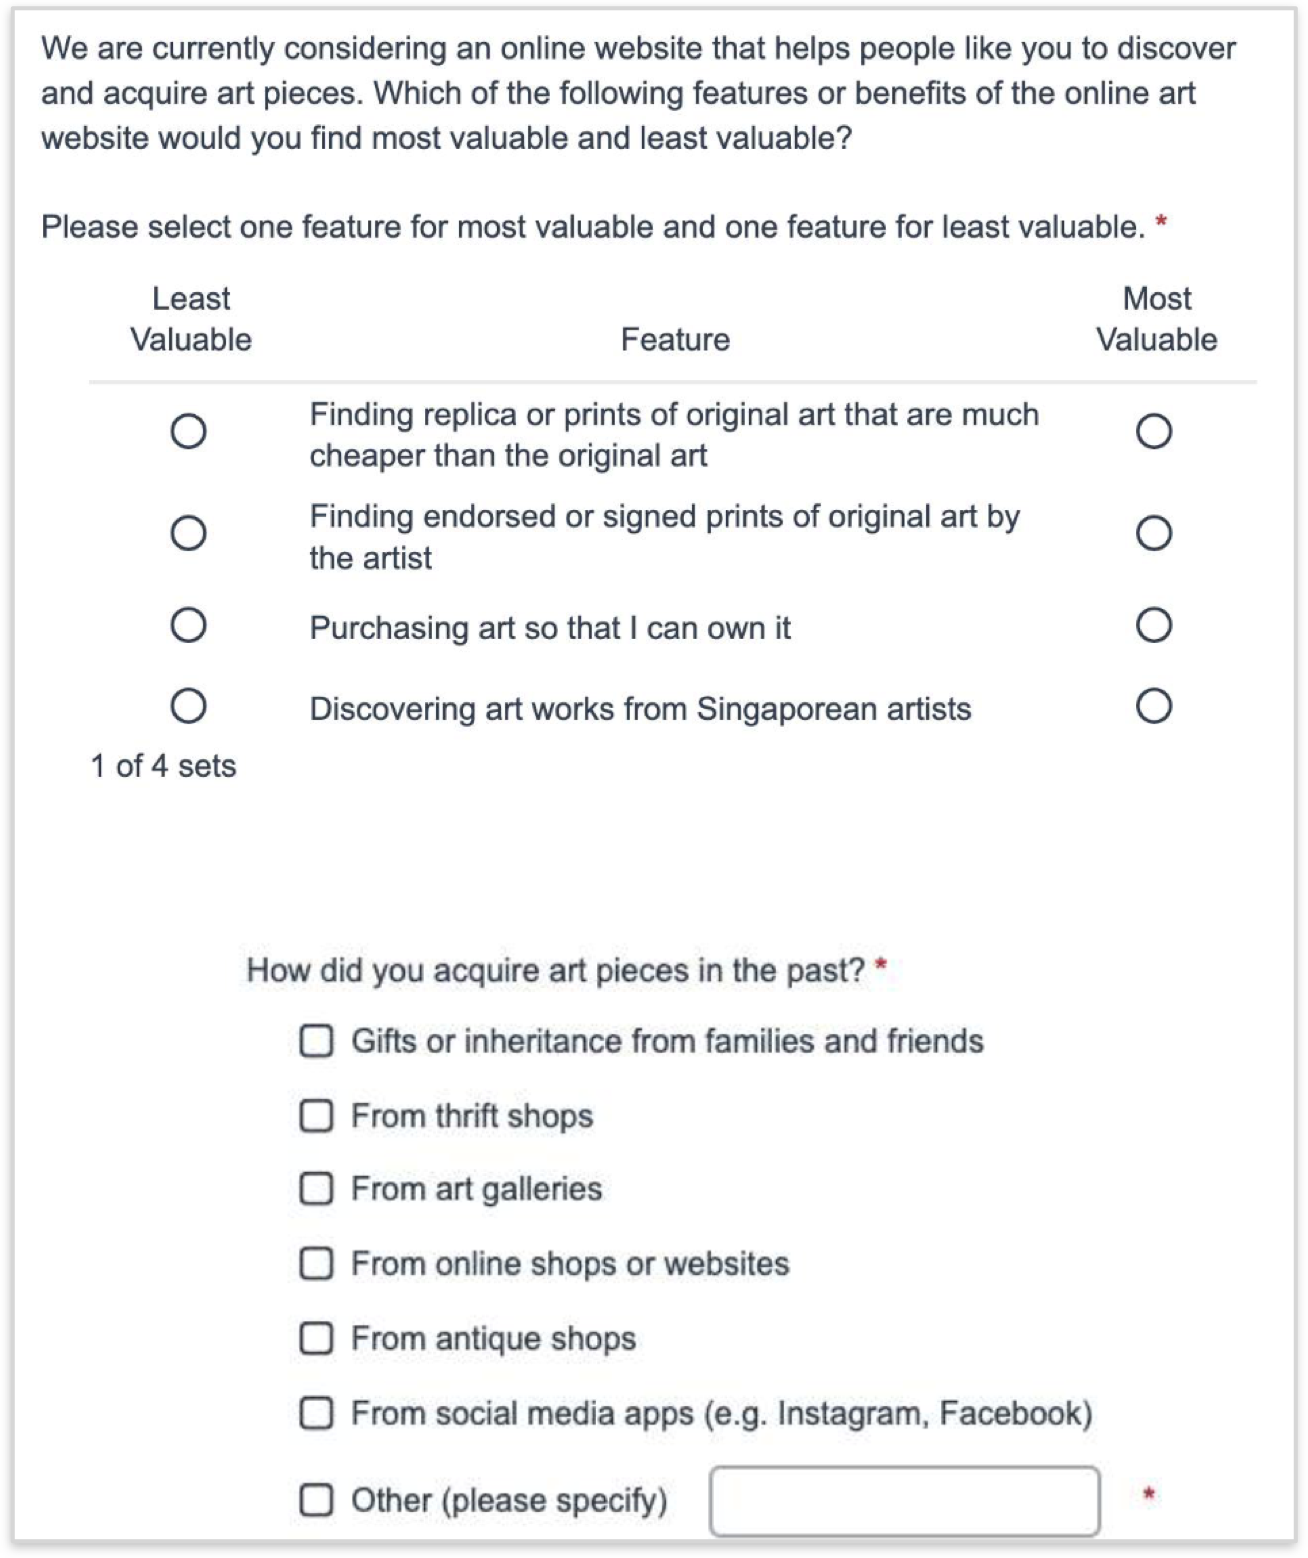
Use the following types to formulate your questions:
- Categorial: Yes/No, Checkbox, Multiple choice questions, etc. (Example: Which tasks are part of your daily routine? - Spot checks/ Approval/ Client services)
- Filtering: Basis questions to filter the audience for follow-up questions. (Example: What do you like better? Office or on-site work?)
- Ranking: Participants rank a set of answer options based on criteria (Example: Rank these three attributes based on importance to you: Salary/ Work hours/ Cognitive challenge). You can also ask participants to rank a statement on a scale of 1-10 (Example: How likely are you to recommend this service?).
- Create your survey in a digital tool and send it via link or e-mail. Give respondents a few days to answer.
- Use analytical tools, e.g., tables, bar diagrams, or pie charts, to graphically understand and summarise the results.
¶ Do's & Don't
Do's
- Create one survey, but send it out separately to each customer group. Collecting results from each customer group separately allows you to generalise the findings per customer group and compare answers between groups.
- Use your Survey results to complement your other research findings. The collected data should be a quantitative addition to the insights from other research tools.
Don't
- Don’t overdraw conclusions from your survey; use it to support your other research findings. You can only precisely conclude what you have asked in your questions, but you cannot infer or interpret anything from the answers that are not explicitly stated.
- Don’t create a survey that would take longer than 10-15 minutes to complete. People’s attention spans are short, and they might give unthought answers.
¶ Tools needed
- Digital survey tool (e.g. Survey Monkey, Google Forms)
¶ Example
¶ Useful Tips
¶ Prototyping with the Right Mindset
Remember that prototypes do not aim to be perfect - they are representations or samples of what your service can eventually look like. Keep this purpose in mind to avoid getting lost during the quest for perfection.
Build instead of overthinking.
Start working on your prototype as soon as you prioritise your ideas, even if there are some uncertainties. Building a prototype will help you concretely clarify these uncertainties and inspire you to improve the concept further. Have multiple iterations rather than trying to get it all right on the first try. Furthermore, your resources will likely be limited, so find workarounds and simple methods to build your prototype and imitate a real scenario.
Keep an eye on the time.
While you should invest enough time to think your ideas through properly, do not waste time trying to make every prototype detail perfect. This is optional for customer testing, and you risk getting too emotionally attached to the idea by spending too much time developing your prototype. Although you should be excited about it, you still have to be able to judge it objectively and might have to let go of it entirely if customer testing reveals that customers dislike it.
Put the customer at the centre.
Remember that you are creating your concept to delight your customer. Always remember whom you are developing the prototype for, and keep sight of your overall objective.
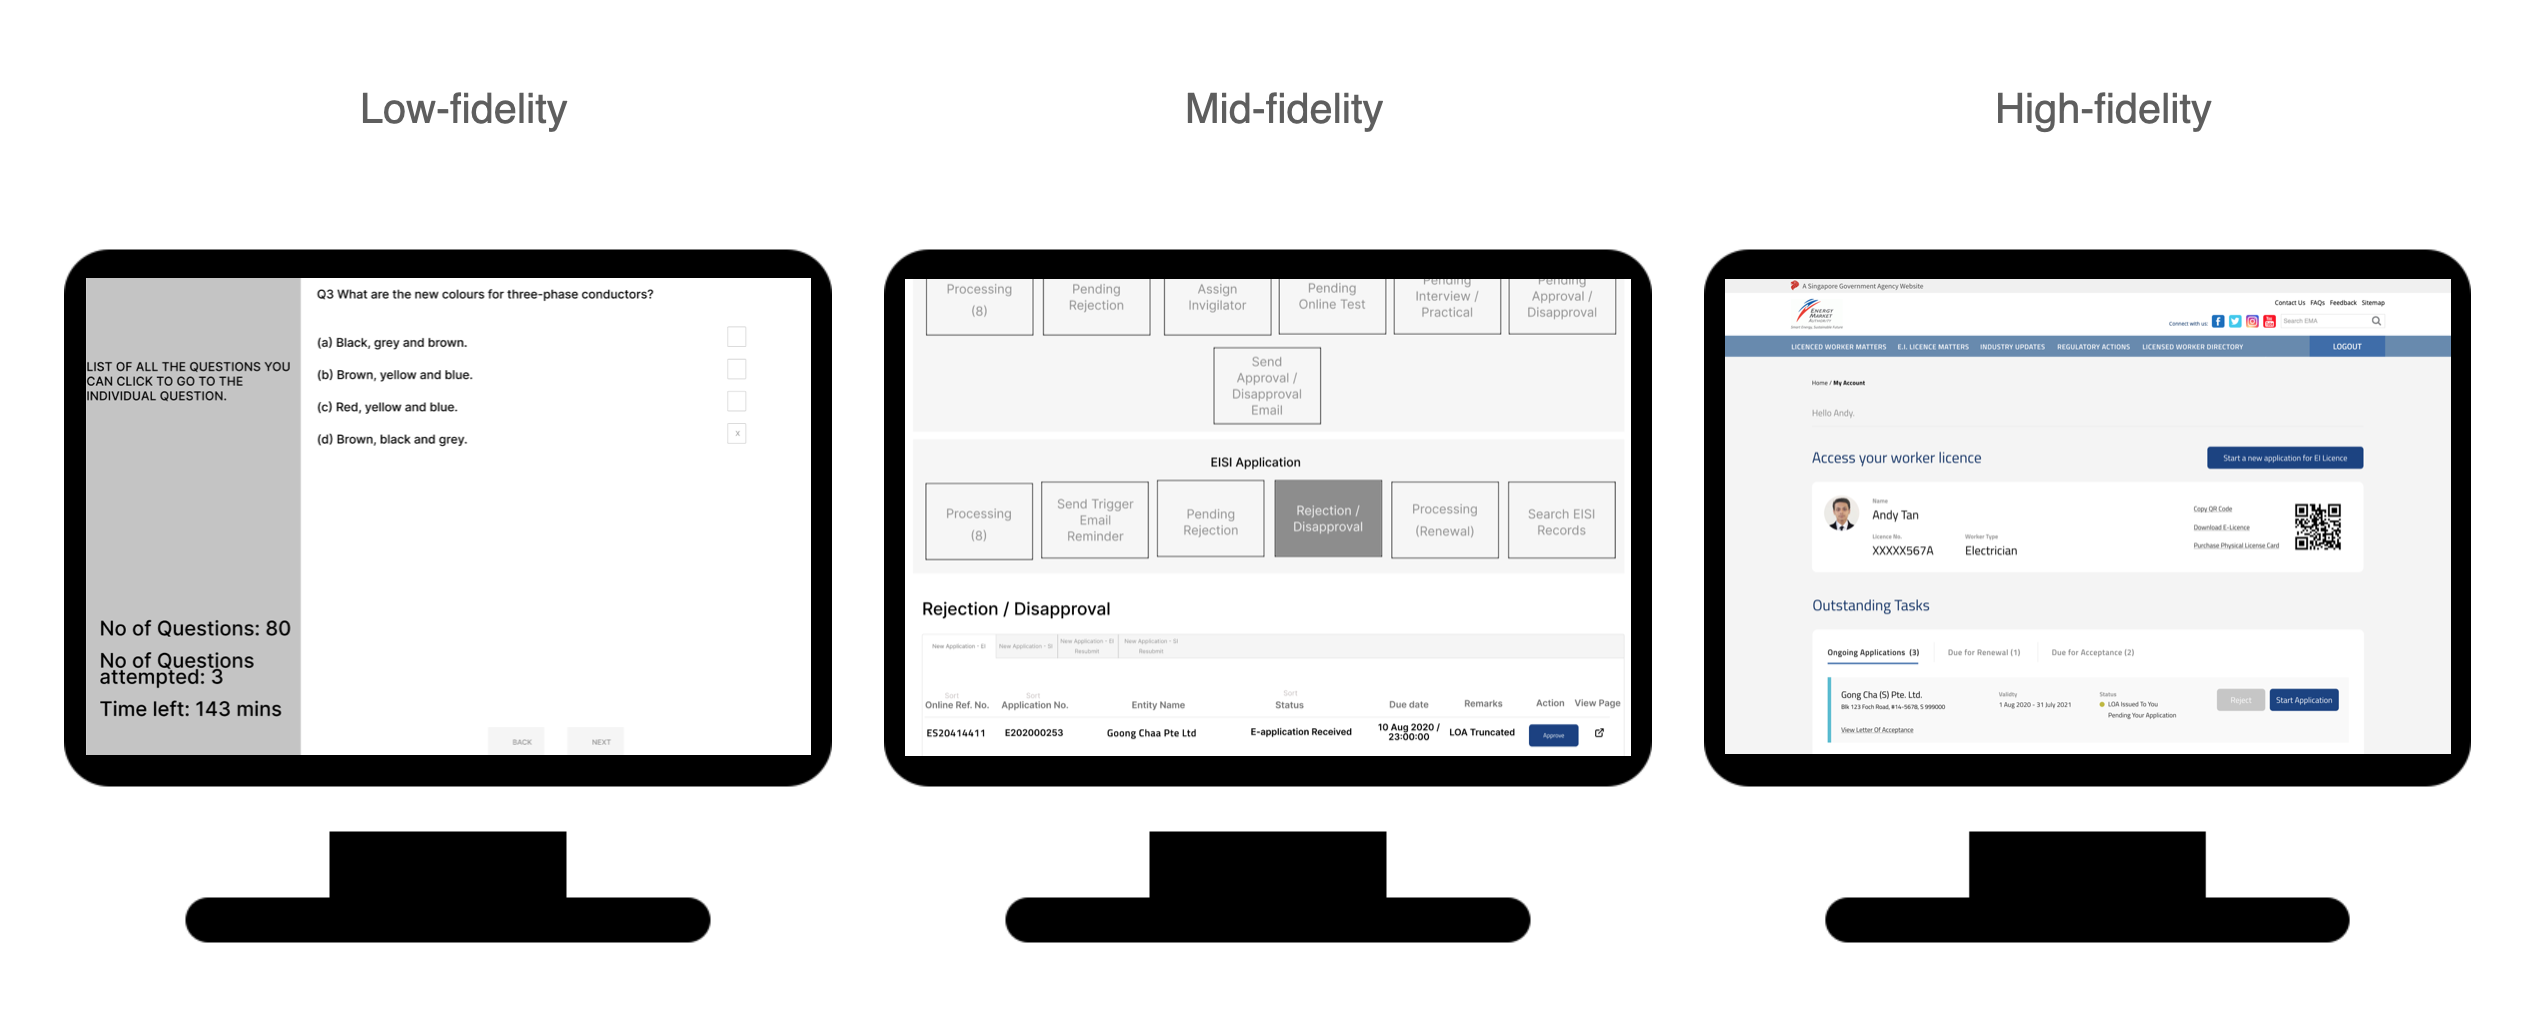
¶ Choosing the Right Degree of Fidelity
When developing your prototypes, you must choose the level of detail you want to realise. Fidelity refers to how much the prototype resembles the final product or service. Your prototype can range from low-fidelity with the most basic attributes to high-fidelity, which nearly conveys the complete look and feel of the final product. The levels of fidelity can vary in terms of visual design, content, and interactivity of the prototype.
Low-Fidelity Prototype
+ Quick and low-budget as the design is very basic
+ Easy to change, short iteration cycles
− The sketchy layout is far from what the actual design will eventually look like, so customers might need to be more objective in judging the current layout. This could reduce the validity of your customer test results.
− Low-fidelity prototypes do not simulate the actual customer experience because of limited interactivity.
Things to consider for Low-Fidelity Prototype
- Low-fidelity prototypes might be most useful to get internal feedback or to be tested by customers familiar with the service process and the project's purpose. In addition, they are less likely to misjudge the prototype because of the need for more design.
High-Fidelity Prototype
+ High-fidelity prototypes are closest to the final version of a product or service. As a result, customer testing will be more realistic, and results will reflect the customer experience.
+ Stakeholders will be convinced of the solution more efficiently as it looks finished and professional.
The development takes much longer.
− Making changes is more complex and time-consuming.
− Customers might pay more attention to superficial attributes, such as the design in customer tests, than the content.
Things to consider for High-Fidelity Prototype
- High-fidelity prototypes could be appropriate for external customer testing or for customers who need to become more familiar with the service to avoid confusion related to design.
- You can choose a combination of low- and high-fidelity prototypes as well. Mid-fidelity prototypes are more detailed and realistic than the absolute basics but are less complex than high-fidelity prototypes.
¶ Example for Fidelity Levels of a Screen Prototype